How To Repair Termite-Damaged Floor Boards
Discovering termite damage in floor boards can be a homeowner’s worst nightmare. These silent destroyers can compromise the structural integrity of a home, necessitating prompt and effective repair. This article provides a comprehensive guide to repairing termite-damaged floor boards, covering assessment, preparation, repair techniques, and preventative measures.
Termites thrive in damp, dark environments, often attacking wooden structures from the inside out. This insidious nature makes early detection challenging. Damage can range from superficial surface imperfections to significant structural weakening, depending on the duration and severity of the infestation.
Before commencing any repair work, it is crucial to positively identify the pest causing the damage. Termites can be distinguished from other wood-boring insects by their soft bodies, straight antennae, and the mud-like tunnels they create. Signs of termite infestation include hollow-sounding wood when tapped, discarded wings near windows or doors, and visible mud tubes running along walls or foundations.
Assessing the Extent of the Damage
A thorough assessment is the first step in repairing termite-damaged floor boards. This process involves identifying all affected areas and determining the extent of the damage. A visual inspection alone is often insufficient; probing with a screwdriver or awl is necessary to reveal hidden damage beneath the surface.
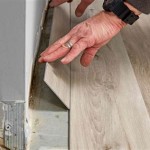
Begin by examining the perimeter of the room, paying close attention to areas near walls, plumbing, and other potential moisture sources. Carefully inspect any floor boards that appear discolored, warped, or have small holes. Gently probe these areas with a screwdriver. If the wood is soft or crumbles easily, it is likely damaged by termites.
Continue the inspection by systematically probing each floor board, working across the entire room. Mark any damaged areas with chalk or painter’s tape for easy identification during the repair process. Note the severity of the damage for each area, categorizing it as minor, moderate, or severe.
Minor damage typically involves surface imperfections or small areas of weakened wood. Moderate damage may require patching or reinforcement, while severe damage often necessitates complete board replacement. Understanding the extent of the damage will help determine the appropriate repair methods and materials.
In some cases, it may be necessary to remove adjacent floor boards to fully assess the damage. This is particularly important when dealing with tongue-and-groove flooring, where damage can spread hidden beneath the surface. Carefully pry up the surrounding boards, using a pry bar and a small piece of wood to protect the finished surface. Examine the exposed subfloor for additional damage.
Preparing for the Repair
Once the assessment is complete, the next step is to prepare the area for repair. This involves removing damaged wood, treating the affected area with a termite control product, and gathering the necessary tools and materials.
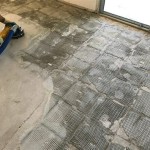
Start by removing all loose or crumbling wood from the damaged areas. Use a chisel, wood scraper, or rotary tool to carefully remove the affected material, working from the outside in. Be sure to wear safety glasses and a dust mask to protect yourself from flying debris and harmful particles.
After removing the damaged wood, thoroughly clean the area with a vacuum cleaner to remove any residual dust, debris, or termite remnants. This step is crucial to ensure proper adhesion of any repair materials.
Next, treat the exposed wood and surrounding areas with a termite control product. Choose a product specifically formulated for treating existing termite infestations. Follow the manufacturer’s instructions carefully, paying attention to application rates and safety precautions. Borate-based products are often recommended for their effectiveness and low toxicity.
Allow the termite control product to dry completely before proceeding with the repair. This may take several hours or even overnight, depending on the product and environmental conditions. Ensure adequate ventilation during the drying process.
Finally, gather all the necessary tools and materials for the repair. This may include wood filler, epoxy wood consolidant, replacement floor boards, adhesive, nails, screws, sandpaper, primer, paint, and a variety of hand tools such as saws, hammers, chisels, and putty knives.
Repair Techniques for Termite-Damaged Floor Boards
The specific repair technique will depend on the extent of the damage and the type of flooring. Minor damage can often be repaired with wood filler or epoxy. Moderate damage may require patching or reinforcement, while severe damage necessitates complete board replacement.
Repairing Minor Damage: For minor surface imperfections or small areas of weakened wood, wood filler or epoxy can be used to restore the damaged area. Clean the damaged area thoroughly and apply the wood filler or epoxy according to the manufacturer’s instructions. Allow the filler or epoxy to dry completely, then sand it smooth to match the surrounding surface. Prime and paint the repaired area to blend it seamlessly with the rest of the floor.
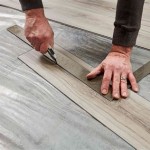
Patching Moderate Damage: For moderate damage, a patch can be used to replace the damaged section of the floor board. Carefully cut out the damaged section using a saw or chisel. Create a patch from a matching piece of wood, ensuring that it fits snugly into the cutout. Apply adhesive to the edges of the patch and insert it into the opening. Secure the patch with nails or screws. Fill any gaps around the patch with wood filler, sand smooth, and finish to match the surrounding floor.
Replacing Severely Damaged Boards: For severe damage, the entire floor board must be replaced. Carefully remove the damaged board using a pry bar and a hammer. Be careful not to damage the surrounding boards. Clean the exposed subfloor and install a new floor board of the same size and type. Secure the new board with adhesive, nails, or screws. Fill any gaps with wood filler, sand smooth, and finish to match the surrounding floor.
When matching replacement floor boards, it is important to consider the species of wood, grain pattern, and finish. Try to find a board that closely matches the existing flooring for a seamless repair. If an exact match is not available, consider refinishing the entire floor to create a uniform appearance.
For tongue-and-groove flooring, the replacement board will need to be carefully fitted into place. Use a tapping block and a hammer to gently tap the board into the groove of the adjacent board. Ensure that the board is flush with the surrounding floor before securing it with adhesive and fasteners.
In some cases, it may be necessary to reinforce the subfloor beneath the damaged floor boards. This is particularly important if the termites have also damaged the subfloor. Reinforce the subfloor by adding additional joists or plywood sheeting. Secure the reinforcement with screws or nails.
After completing the repair, thoroughly inspect the surrounding areas for any signs of ongoing termite activity. If termites are still present, consult with a pest control professional to develop a comprehensive treatment plan.
Preventative measures are crucial to avoid future termite infestations. These measures include maintaining proper drainage around the foundation, eliminating wood-to-soil contact, and regularly inspecting the property for signs of termite activity.
By following these steps, homeowners can effectively repair termite-damaged floor boards and protect their homes from future infestations. Regular maintenance and proactive preventative measures are key to maintaining the structural integrity and value of a home.

A Little Hardwood Floor Repair The Space Between

Termite Damage On Hardwood Floor Quickly Repaired

How To Fix A Termite Damaged Hardwood Floor Root Simple

How To Fix A Termite Damaged Hardwood Floor Root Simple

Repair Termite Hole In Hardwood Floor Hometalk

Termite Damage Repair For Floor Restoration

Fixing Rotted Sill Plate And Termite Damage In Floor Joists

The Types Of Termites That Can Damage Your Hardwood Floors And How To Fix Them

Assessing Termite Damage In Timber Floors

Repair Hole In Damaged Hardwood Floor Slaughterbeck Floors Inc
See Also