How To Fix Termite Damaged Wood Floors In A Camper
Discovering termite damage in a camper's wood floors can be a disheartening experience. Termites feed on cellulose, the primary component of wood, and their activity can weaken the structural integrity of the flooring, creating safety hazards and potentially leading to further damage if left unaddressed. Prompt and effective repair is essential to mitigate the damage, prevent further infestation, and ensure the camper remains habitable and safe for use. This article offers a comprehensive guide on how to assess and fix termite-damaged wood floors in a camper, detailing the necessary steps and considerations for a successful repair.
Before commencing any repair work, a careful assessment of the extent of the termite damage is crucial. This involves a thorough inspection of the wood flooring, including areas beneath cabinets, along walls, and in corners where moisture tends to accumulate. Signs of termite damage include hollow sounding wood, visible holes or tunnels, discarded wings, and the presence of termite droppings (frass). A screwdriver or awl can be used to probe suspected areas and determine the depth and severity of the damage. Documenting the findings through photographs can be helpful for future reference and when consulting with pest control professionals or contractors.
Identifying the Extent of the Damage
The initial step in addressing termite damaged wood floors in a camper is accurately determining the scope of the problem. This involves a multifaceted approach including visual inspection, probing, and potentially, destructive testing. Visual inspection should focus on areas known to be conducive to termite activity, such as areas near water sources, dark and humid spaces, and points of contact between the wood and the ground or exterior of the camper. Look for telltale signs like mud tubes, which termites construct to travel from the soil to the wood source, small holes on the surface of the wood, and blistered or sunken areas which indicate tunneling beneath.
Probing with a sharp instrument such as a screwdriver or awl is a relatively non-destructive method to assess the internal integrity of the wood. Sound wood will offer significant resistance, while termite-damaged wood will be soft and easily penetrated. By systematically probing suspect areas, the boundaries of the affected wood can be roughly mapped out. Care should be taken to avoid causing unnecessary damage during this process. The probing should be directed along the grain of the wood, as termites often follow the grain while excavating tunnels.
In some instances, it may be necessary to perform limited destructive testing to fully understand the extent of the damage. This involves carefully removing small sections of the flooring to expose the internal structure. This technique is particularly useful when the surface of the wood appears intact but there is suspicion of subsurface damage. When removing flooring sections, it is essential to prioritize safety and avoid damaging adjacent structures. Use appropriate tools and techniques to minimize the impact of the removal process. The removed flooring sections should be carefully examined for signs of termite activity, including tunnels, frass, and live termites.
Once the extent of the damage has been mapped out, it is crucial to document these findings thoroughly. This documentation should include a detailed written account of the affected areas, along with photographs and sketches. The documentation will be invaluable when planning the repair strategy and when discussing the issue with pest control professionals. It can also serve as a record of the damage for insurance purposes, if applicable. This initial assessment and documentation phase lays the foundation for a successful and thorough repair process.
Termite Treatment and Eradication
Before undertaking any repairs to the floor, it is crucial to eliminate the termite infestation. Contact a qualified pest control professional to assess the situation and recommend the most appropriate treatment method. Treatment options may include liquid termiticides applied to the soil around the camper, bait stations to attract and eliminate termite colonies, or fumigation in severe cases. Ensure the treatment is specifically designed for the type of termites present, as different species may require different approaches. Following the pest control professional's recommendations regarding safety precautions and re-treatment schedules is vital to prevent future infestations.
The most prevalent method of termite treatment involves the application of liquid termiticides. These termiticides can be either repellent or non-repellent. Repellent termiticides create a barrier in the soil that deters termites from approaching the camper and force them to seek alternative food sources. Non-repellent termiticides, on the other hand, are undetectable to termites, allowing them to tunnel through the treated soil. As they do so, they ingest the termiticide and transfer it back to the colony through contact and trophallaxis (food sharing), ultimately leading to colony collapse. Proper application of liquid termiticides requires specialized equipment and expertise to ensure a uniform and effective barrier is established.
Bait stations represent another effective termite treatment strategy. These stations typically consist of a cellulose-based material impregnated with a slow-acting insecticide. The stations are strategically placed around the perimeter of the camper or in areas where termite activity has been observed. Termites are attracted to the cellulose in the bait and consume it, carrying the insecticide back to the colony. Similar to non-repellent termiticides, the insecticide is spread throughout the colony through trophallaxis, eventually eliminating the entire population. Bait stations require regular monitoring and replenishment to maintain their effectiveness.
In severe cases of termite infestation, fumigation may be the only viable option. Fumigation involves sealing the entire camper in a tent and introducing a fumigant gas that permeates all areas, killing the termites. Fumigation is a highly effective treatment method, but it is also the most disruptive, as it requires the camper to be vacated for several days. It also requires specialized equipment and expertise to ensure the safety of the occupants and the surrounding environment. After fumigation, the camper must be thoroughly ventilated to remove any residual fumigant gas before it can be reoccupied.
Regardless of the treatment method chosen, it is essential to address the underlying conditions that contributed to the termite infestation in the first place. This may involve correcting moisture problems, improving ventilation, removing wood debris around the camper, and ensuring that the wood flooring is not in direct contact with the ground. By addressing these underlying issues, the risk of future termite infestations can be significantly reduced.
Repairing or Replacing the Damaged Flooring
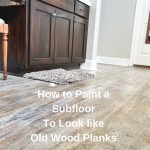
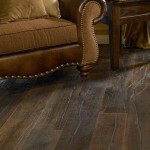
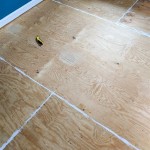
Once the termites have been eradicated and the area is safe to work in, the damaged flooring can be repaired or replaced. The approach depends on the extent of the damage. If the damage is localized, it may be possible to remove the affected sections and replace them with new wood. Ensure the replacement wood is of the same type and thickness as the original flooring to maintain a consistent appearance and structural integrity. Secure the new wood using appropriate adhesives and fasteners. In cases where the damage is widespread, replacing the entire floor may be necessary. This involves removing all existing flooring, inspecting the subfloor for any further damage, and installing new flooring material. Consider using termite-resistant materials for the replacement flooring, such as treated lumber or composite materials.
For localized damage repair, the process typically begins with carefully removing the damaged section of flooring. Use a saw or chisel to cut around the perimeter of the affected area, taking care not to damage the surrounding flooring. Once the damaged section has been removed, thoroughly clean the cavity, removing any debris, termite frass, and loose wood fibers. Apply a wood preservative to the exposed subfloor to protect it from future decay. Cut a replacement piece of flooring to the exact dimensions of the cavity. Ensure the replacement piece is of the same species, grade, and thickness as the original flooring. Apply construction adhesive to the back of the replacement piece and carefully position it in the cavity. Secure the replacement piece with finishing nails or screws, countersinking the fasteners and filling the holes with wood filler. Sand the repaired area smooth and apply a matching finish to blend it with the surrounding flooring.
When widespread damage necessitates complete floor replacement, the process is more involved. Begin by carefully removing all of the existing flooring, including any underlayment. Inspect the subfloor for any signs of damage or decay. If the subfloor is damaged, repair or replace it as necessary. Correct any moisture problems or ventilation issues that may have contributed to the termite infestation. Install a new underlayment to provide a smooth and level surface for the new flooring. Choose a flooring material that is appropriate for a camper, considering factors such as weight, durability, and resistance to moisture and termites. Install the new flooring according to the manufacturer's instructions, using appropriate adhesives and fasteners. Pay close attention to detail, ensuring that the flooring is properly aligned and that all seams are tight. Apply a protective finish to the new flooring to enhance its durability and resistance to wear and tear.
Regardless of whether you are repairing a small section of flooring or replacing the entire floor, it is crucial to prioritize safety throughout the process. Wear appropriate personal protective equipment, such as safety glasses, gloves, and a dust mask. Use power tools safely and follow all manufacturer's instructions. Ensure adequate ventilation to prevent the buildup of dust and fumes. Properly dispose of all waste materials, including damaged flooring, termite frass, and used chemicals. By following these safety precautions, you can minimize the risk of accidents and injuries during the repair process.
After the repair or replacement is complete, regularly inspect the flooring for any signs of new termite activity. Maintaining proper ventilation, controlling moisture levels, and removing potential food sources for termites can help prevent future infestations. Early detection and prompt treatment are key to minimizing the damage caused by termites and protecting the structural integrity of the camper.

Telltale Signs That Your Rv Has Termites

Telltale Signs That Your Rv Has Termites

How To Repair Termite Eaten Wood Flooring In Historic House

Termite Damage Repair For Floor Restoration

Effective Termite Treatment For Your Camper

Camper Rotten Floor Repair Replace Catfish Angler Forum At Usca

How To Detect Get Rid Of Termites Anderson Lumber

How To Detect Get Rid Of Termites Anderson Lumber

Restoring An Abandoned House With Active Termites 6 Month Makeover In 19 Mins

Termite Damage This Is How They Can Ruin Your Home Aaa Pest Control South Florida S Finest Services
See Also