Vinyl Plank Flooring Installation on Concrete: A Comprehensive Guide
Vinyl plank flooring has become a popular choice for both residential and commercial spaces due to its durability, aesthetic appeal, and relatively straightforward installation process. One of the most common substrates for vinyl plank flooring is concrete. Concrete subfloors offer a stable and rigid surface, but proper preparation and installation techniques are crucial to ensure a long-lasting and visually appealing result. This article will provide a comprehensive guide to installing vinyl plank flooring on concrete, covering everything from assessing the concrete slab to the final finishing touches.
Before embarking on a vinyl plank flooring project, understanding the inherent characteristics of concrete is paramount. Concrete is a porous material, meaning it can absorb and release moisture. This moisture content can significantly impact the performance and longevity of the vinyl plank flooring. Additionally, concrete surfaces are rarely perfectly level or smooth, often exhibiting imperfections such as cracks, unevenness, and surface irregularities. These imperfections must be addressed before installation to prevent issues such as uneven flooring, warping, and compromised adhesion.
The decision to install vinyl plank flooring directly on concrete, or to utilize an underlayment, will depend on a variety of factors including the type of vinyl plank flooring, the specific conditions of the concrete slab, and the desired performance characteristics of the finished floor. Thicker vinyl planks, particularly those with attached underlayment, may be more forgiving of minor imperfections in the concrete. However, a separate underlayment can provide additional benefits such as improved sound insulation, enhanced thermal resistance, and increased cushioning underfoot. Selecting the appropriate underlayment, or determining if one is even necessary, is a critical step in the installation process.
Assessing the Concrete Slab: Moisture, Levelness, and Cleanliness
The initial step in any successful vinyl plank flooring installation on concrete is a thorough assessment of the concrete slab. This assessment should focus on three key areas: moisture content, levelness, and cleanliness. Ignoring any of these aspects can lead to significant problems down the line.
Moisture Testing: Concrete, as previously mentioned, is porous. Excess moisture within the slab can cause adhesive failure, warping, and even mold or mildew growth beneath the vinyl plank flooring. Therefore, accurately measuring the moisture content of the concrete is essential. Several methods exist for moisture testing, including calcium chloride tests (also known as moisture vapor emission rate tests), relative humidity tests, and electronic moisture meters.
The calcium chloride test involves placing a pre-weighed container of calcium chloride on the concrete surface under a sealed dome for a specific period, typically 72 hours. The calcium chloride absorbs moisture from the concrete, and the weight gain is used to calculate the moisture vapor emission rate (MVER). A higher MVER indicates a higher moisture content. Manufacturers of vinyl plank flooring typically specify a maximum allowable MVER for installation over concrete. If the MVER exceeds this limit, moisture mitigation measures must be implemented.
Relative humidity (RH) tests involve drilling small holes into the concrete slab and inserting probes to measure the RH within the concrete. Similar to MVER, vinyl plank flooring manufacturers specify a maximum allowable RH level. If the RH exceeds this limit, moisture mitigation is necessary.
Electronic moisture meters provide a quick and relatively easy way to assess moisture levels. However, these meters typically only measure surface moisture and may not provide an accurate representation of the overall moisture content within the slab. Therefore, electronic moisture meters should be used in conjunction with other testing methods for a more comprehensive assessment.
Levelness Assessment: A level concrete slab is crucial for a professional-looking and structurally sound vinyl plank floor. Unevenness in the concrete can lead to flexing of the planks, resulting in popping, cracking, and eventual adhesive failure. To assess levelness, use a long straightedge (at least 6 feet in length) and a level. Place the straightedge on the concrete surface and check for any gaps or variations with the level. Mark any areas that are not level or that exhibit significant deviations.
Acceptable levelness tolerances vary depending on the type of vinyl plank flooring and the manufacturer's recommendations. However, a general guideline is to ensure that the concrete surface does not deviate more than 3/16 inch over a 10-foot span. Areas that exceed this tolerance will need to be addressed through leveling techniques such as self-leveling concrete or patching compounds.
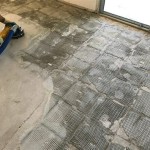
Cleanliness Assessment: The concrete surface must be thoroughly clean before installing vinyl plank flooring. Any dirt, dust, debris, grease, paint, or adhesive residue can interfere with the adhesion of the vinyl planks, leading to premature failure. Use a scraper to remove any loose debris or adhesive residue. Vacuum the entire surface to remove dust and dirt. For stubborn stains or grease, use a suitable concrete cleaner and follow the manufacturer's instructions carefully. Allow the concrete to dry completely before proceeding with the next step.
Preparing the Concrete Surface: Leveling, Patching, and Moisture Mitigation
Once the concrete slab has been assessed, the next step is to prepare the surface to ensure it is suitable for vinyl plank flooring installation. This preparation process typically involves leveling imperfections, patching cracks and holes, and implementing moisture mitigation measures if necessary.
Leveling the Concrete: If the concrete slab exhibits significant unevenness, self-leveling concrete is often the most effective solution. Self-leveling concrete is a pourable mixture that spreads and levels itself, creating a smooth and even surface. Follow the manufacturer's instructions carefully when mixing and applying self-leveling concrete. Proper preparation of the concrete surface is crucial for the self-leveling concrete to bond effectively. This typically involves priming the surface with a bonding agent.
For minor imperfections, patching compounds can be used to fill in low spots and smooth out the surface. Apply the patching compound according to the manufacturer's instructions, ensuring that it is properly feathered out to blend seamlessly with the surrounding concrete. Allow the patching compound to dry completely before proceeding.
Patching Cracks and Holes: Cracks and holes in the concrete must be repaired before installing vinyl plank flooring. Use a concrete crack filler or patching compound to fill in these imperfections. For larger cracks, it may be necessary to widen the crack slightly to create a better bond for the filler. Follow the manufacturer's instructions carefully when applying the crack filler or patching compound. Allow the repair material to dry completely before proceeding.
Moisture Mitigation: If the moisture tests indicate that the concrete slab has excessive moisture content, moisture mitigation measures are essential. Several options are available, including moisture barriers, epoxy coatings, and chemical treatments. The best option will depend on the severity of the moisture problem and the specific requirements of the vinyl plank flooring manufacturer.
Moisture barriers are typically installed as a sheet membrane over the concrete surface. These barriers prevent moisture from migrating upwards and damaging the vinyl plank flooring. Epoxy coatings create a waterproof layer on the concrete surface, preventing moisture from penetrating the floor covering. Chemical treatments react with the moisture in the concrete, converting it into a solid and preventing it from causing problems.
Regardless of the chosen method, it is crucial to follow the manufacturer's instructions carefully when implementing moisture mitigation measures. Improper installation can render the mitigation ineffective and lead to future problems.
Installing the Vinyl Plank Flooring: Planning, Cutting, and Adhering
Once the concrete surface has been properly prepared, the next step is to install the vinyl plank flooring. This process involves careful planning, precise cutting, and secure adhesion to the concrete subfloor.
Planning the Layout: Before installing any planks, it is essential to plan the layout of the flooring. This involves determining the direction of the planks, accounting for any obstacles such as doorways or cabinets, and ensuring that the finished floor will have a balanced and aesthetically pleasing appearance. Start by measuring the room and calculating the number of planks needed. Consider the width of the final row of planks. If the final row will be less than half a plank wide, it is best to adjust the starting row to ensure a more balanced appearance.
Cutting the Planks: Vinyl plank flooring can be easily cut using a utility knife, a scoring tool, or a specialized vinyl plank cutter. For straight cuts, use a straightedge to guide the knife or scoring tool. For more complex cuts, such as around doorways or pipes, use a template or a jigsaw. Always wear safety glasses and gloves when cutting vinyl plank flooring.
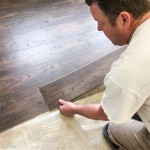
Adhering the Planks: The method of adherence will depend on the type of vinyl plank flooring. Some vinyl planks are designed with a click-lock system, which allows them to be installed without adhesive. Other types of vinyl plank flooring require adhesive to be applied to the concrete subfloor. If adhesive is required, use the adhesive recommended by the vinyl plank flooring manufacturer. Apply the adhesive evenly to the concrete surface using a notched trowel. Allow the adhesive to become tacky before installing the planks. Press the planks firmly into the adhesive, ensuring that they are properly aligned and securely bonded to the concrete.
For click-lock vinyl plank flooring, simply align the planks and engage the locking mechanism. Use a tapping block and a hammer to ensure that the planks are securely locked together. Maintain a consistent expansion gap around the perimeter of the room to allow for expansion and contraction of the flooring.
Finishing Touches: After the vinyl plank flooring has been installed, install baseboards or quarter-round molding to cover the expansion gap around the perimeter of the room. Clean the floor thoroughly to remove any dust or debris. Follow the manufacturer's recommendations for cleaning and maintaining the vinyl plank flooring.

How To Prepare A Concrete Floor For Vinyl Flooring Parrys

Easy Ways To Install Vinyl Plank Flooring On Concrete

Tips For Installing Vinyl Plank Over Concrete Floors Lemon Thistle

How To Install Vinyl Plank Flooring On Concrete Step By Tutorial

Easy Ways To Install Vinyl Plank Flooring On Concrete

10 Beginner Mistakes Installing Vinyl Plank Flooring

How To Install Vinyl Plank Flooring On Concrete Step By Guide

Concrete Subfloor Preparation For The Vinyl Floor Installation How To Diy Mryoucandoityourself

Tips And Tricks For Installing Vinyl Plank Over Concrete Floors Riverbend Interiors

How To Install Vinyl Plank Flooring On Concrete Base
See Also