How to Install Vinyl Plank Flooring Over Wood Subfloor in a Bathroom
Installing vinyl plank flooring over a wood subfloor in a bathroom is a popular and cost-effective way to upgrade the aesthetic appeal and functionality of the space. Vinyl plank flooring offers several advantages, including water resistance, durability, ease of maintenance, and a wide variety of styles that mimic the look of hardwood, tile, or stone. However, a successful installation requires careful preparation, proper techniques, and attention to detail. This article provides a comprehensive guide to installing vinyl plank flooring over a wood subfloor in a bathroom, ensuring a professional and long-lasting result.
Before commencing the installation process, it's imperative to assess the existing conditions of the bathroom. The subfloor must be adequately prepared to ensure a smooth, level, and stable surface for the vinyl plank flooring. Neglecting subfloor preparation is a common cause of issues such as uneven flooring, squeaking, and premature wear and tear.
Preparing the Wood Subfloor
The first step in preparing the wood subfloor is to inspect it thoroughly. Look for signs of water damage, such as staining, warping, or rot. Bathroom environments are inherently humid, and even minor leaks can lead to significant subfloor damage over time. If water damage is detected, the affected areas must be repaired or replaced before proceeding. Ignoring this issue will compromise the integrity of the new vinyl flooring and potentially lead to mold growth and structural problems.
Once the subfloor has been inspected for water damage, carefully check for any unevenness. Use a level or a long straightedge to identify high and low spots. Minor imperfections can often be addressed by sanding down high spots with a belt sander or filling low spots with a self-leveling underlayment designed for wood subfloors. For more significant unevenness, consider using plywood shims to create a level plane.
Loose or squeaky subfloor boards must be secured. Drive screws through the loose boards into the joists below to eliminate movement. If squeaks persist, apply construction adhesive between the subfloor and the joists. Ensure the screw heads are countersunk to avoid creating protrusions that could affect the vinyl plank flooring.
Finally, thoroughly clean the subfloor. Remove any debris, dirt, dust, or paint. Use a vacuum cleaner and a damp mop with a mild cleaning solution. Allow the subfloor to dry completely before commencing the installation of the vinyl plank flooring. A clean surface will ensure proper adhesion of any adhesive used and prevent debris from interfering with the locking mechanisms of the planks.
Selecting the Right Vinyl Plank Flooring
Choosing the appropriate vinyl plank flooring is crucial for a successful bathroom installation. Consider the following factors when making your selection: water resistance, thickness, wear layer, and style.
Water resistance is paramount in a bathroom setting. Opt for vinyl plank flooring that is specifically labeled as waterproof or water-resistant. While some vinyl plank options offer water resistance, others are designed primarily for dry areas. Look for products with a waterproof core to provide maximum protection against water damage.
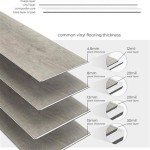
The thickness of the vinyl plank flooring affects its durability and comfort. Thicker planks tend to be more durable and provide a more cushioned feel underfoot. A thickness of 4mm or greater is generally recommended for bathroom installations. The overall thickness also contributes to the product's ability to hide minor imperfections in the subfloor.
The wear layer is a transparent protective coating on the surface of the vinyl plank flooring. The wear layer’s thickness, measured in mils (thousandths of an inch), determines the flooring's resistance to scratches, scuffs, and stains. A wear layer of 12 mils or greater is advisable for bathroom installations, especially in high-traffic areas. Look for products with a urethane finish, which provides enhanced protection and ease of cleaning.
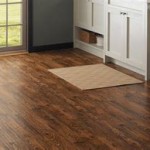
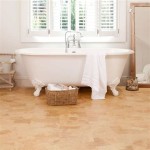
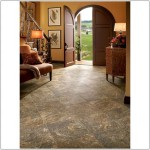
The style of vinyl plank flooring is a matter of personal preference, but it's important to choose a design that complements the overall aesthetic of the bathroom. Consider the color, grain pattern, and texture of the planks. Vinyl plank flooring is available in a wide range of styles that mimic the look of hardwood, tile, or stone. Choose a style that coordinates with the existing fixtures and finishes in the bathroom.
Before purchasing the vinyl plank flooring, accurately measure the bathroom's square footage and add an extra 10-15% for waste. This will ensure that you have enough material to account for cuts, irregularities, and potential errors during installation.
Installing the Vinyl Plank Flooring
Acclimation is a critical step in the vinyl plank flooring installation process. Store the vinyl plank flooring in the bathroom for at least 48 hours prior to installation. This allows the planks to adjust to the room's temperature and humidity, minimizing expansion and contraction after installation. Consistent temperature and humidity conditions lead to a more stable and long-lasting installation.
Start by planning the layout of the vinyl plank flooring. Consider the direction of the planks, the location of seams, and the placement of transition strips. Typically, it's recommended to run the planks parallel to the longest wall in the bathroom. This creates a more visually appealing and spacious look. However, other factors, such as the location of the doorway and the orientation of existing flooring in adjacent rooms, may influence the optimal layout.
Begin the installation along a straight edge, such as a wall or a cabinet. Use spacers to maintain a consistent expansion gap between the planks and the wall. An expansion gap is necessary to accommodate the natural movement of the vinyl plank flooring due to temperature and humidity changes. The size of the expansion gap will vary depending on the manufacturer's recommendations, but a gap of approximately ¼ inch is typical. This gap will be concealed by baseboards or quarter-round molding after installation.
Install the first row of vinyl plank flooring, carefully aligning the planks and engaging the locking mechanisms. Most vinyl plank flooring features a click-lock system that allows the planks to snap together easily. Use a tapping block and a rubber mallet to gently tap the planks into place, ensuring a tight and secure fit. Avoid using excessive force, as this could damage the locking mechanisms.
Continue installing the vinyl plank flooring row by row, staggering the end joints to create a more visually appealing and structurally sound floor. Staggering the joints also helps to distribute the weight and pressure evenly across the floor, reducing the risk of warping or buckling. The amount of stagger will depend on the length of the planks and your personal preference, but a minimum stagger of 6 inches is generally recommended.
When installing vinyl plank flooring around obstacles such as toilets, sinks, and door frames, careful cutting is required. Use a utility knife or a jigsaw to make precise cuts that fit snugly around these obstacles. Measure accurately and take your time to avoid mistakes. It is better to cut slightly larger and trim as needed than to cut too small, requiring a new plank.
For areas where the vinyl plank flooring meets other types of flooring, such as tile or carpet, install transition strips. Transition strips provide a smooth and seamless transition between different flooring types, preventing tripping hazards and protecting the edges of the flooring. Choose transition strips that match the color and style of the vinyl plank flooring.
After the vinyl plank flooring has been installed, remove the spacers and install baseboards or quarter-round molding around the perimeter of the room. Baseboards and quarter-round molding conceal the expansion gap and provide a finished look. Secure the baseboards or quarter-round molding to the wall using nails or screws, avoiding damage to the vinyl plank flooring.
Sealing and Finishing Touches
While most vinyl plank flooring is water-resistant, sealing the perimeter of the room can provide additional protection against water damage, especially in areas prone to moisture exposure, such as around the toilet and shower. Apply a bead of siliconized acrylic caulk along the baseboards and around any fixtures that come into contact with the flooring. This will create a waterproof seal that prevents water from seeping underneath the flooring.
Once the installation is complete, clean the vinyl plank flooring with a damp mop and a mild cleaning solution. Avoid using harsh chemicals or abrasive cleaners, as these could damage the surface of the flooring. Follow the manufacturer's recommendations for cleaning and maintenance to ensure the longevity of the vinyl plank flooring.
Inspect the flooring for any imperfections or gaps and address them as needed. Minor gaps can be filled with color-matched caulk or filler. Ensure all trim is securely fastened and properly aligned. A thorough final inspection will identify any remaining issues and ensure a professional-looking installation.
By following these steps and paying attention to detail, homeowners can successfully install vinyl plank flooring over a wood subfloor in a bathroom, creating a beautiful, durable, and water-resistant floor that will enhance the value and enjoyment of their home.

How To Install Vinyl Plank Flooring In A Bathroom Fixthisbuildthat

20 Tips For A Great Vinyl Plank Flooring Installation

How To Install Vinyl Plank Flooring In A Bathroom Fixthisbuildthat

How To Install Vinyl Plank Flooring In A Bathroom Fixthisbuildthat

How To Install Vinyl Plank Flooring In A Bathroom Fixthisbuildthat

10 Beginner Mistakes Installing Vinyl Plank Flooring

How To Install Vinyl Plank Flooring In A Bathroom As Beginner Home Renovation

Install L And Stick Vinyl Floor Planks In The Bathroom More To Mrs E

How To Install Vinyl Plank Tiles In A Bathroom

Installing Vinyl Plank Flooring How To Fixthisbuildthat
See Also