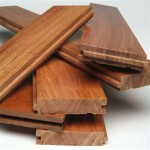
Vinyl Plank Flooring on Concrete Slab: A Comprehensive Guide
Vinyl plank flooring has emerged as a popular choice for homeowners and businesses alike due to its durability, aesthetic appeal, and relatively straightforward installation process. One of the most common subfloors to which vinyl plank is applied is a concrete slab. Understanding the nuances of installing vinyl plank over concrete is crucial for achieving a successful and long-lasting flooring solution. This article provides a detailed overview of the considerations, preparations, and installation techniques involved.
Concrete slabs, while providing a stable and solid foundation, present specific challenges that must be addressed before installing any type of flooring, including vinyl plank. These challenges typically revolve around moisture, unevenness, and surface preparation. Ignoring these factors can lead to a host of problems, such as adhesive failure, mold growth, and premature wear and tear of the vinyl plank itself.
Key Considerations Before Installation
Before initiating the installation process, several critical factors must be thoroughly evaluated. These factors directly impact the success and longevity of the vinyl plank flooring.
Moisture Testing: Excess moisture within the concrete slab is a primary concern. Concrete is porous and can absorb moisture from the ground beneath, leading to elevated humidity levels at the surface. Before installing vinyl plank, a moisture test is imperative. There are several methods for conducting these tests, including calcium chloride tests (also known as moisture vapor emission rate tests) and relative humidity tests. The calcium chloride test involves placing a measured amount of calcium chloride on the concrete surface, sealing it with a dome, and weighing it after a specific period to determine the amount of moisture absorbed. Relative humidity tests involve drilling small holes in the concrete and inserting a probe to measure the humidity levels within the slab. The acceptable moisture levels for vinyl plank installation vary depending on the manufacturer's specifications, but generally, moisture vapor emission rates should be below 3 lbs per 1000 square feet per 24 hours, and relative humidity should be below 75%. If moisture levels exceed these thresholds, mitigation strategies are necessary to prevent future flooring failures.
Slab Levelness: Vinyl plank flooring, unlike some other types of flooring, requires a relatively level subfloor. Significant undulations or inconsistencies in the concrete surface can lead to uneven plank placement, unsightly gaps, and potential stress points that can cause the planks to crack or separate over time. A self-leveling compound can be applied to address any unevenness. This compound is a cement-based mixture that is poured onto the concrete surface and allowed to flow and self-level, creating a smooth and uniform base for the vinyl plank. The depth of the self-leveling compound required will depend on the extent of the unevenness. It is crucial to follow the manufacturer's instructions for mixing and application to ensure proper curing and performance.
Subfloor Cleanliness: A clean and debris-free surface is essential for proper adhesion of the vinyl plank to the concrete slab. Any dirt, dust, paint, adhesive residue, or other contaminants can interfere with the adhesive bond, leading to loose planks and potential floor movement. Thoroughly sweep and vacuum the concrete surface to remove loose debris. Scrubbing the floor with a suitable cleaner and rinsing thoroughly is also recommended to remove any stubborn stains or residue. In some cases, grinding the concrete surface may be necessary to remove old adhesive or paint.
Preparing the Concrete Slab
Once the initial assessment is complete, and any necessary repairs or moisture mitigation steps have been taken, the concrete slab needs to be properly prepared for the vinyl plank installation. This involves several key steps to ensure a smooth, clean, and suitable surface.
Crack Repair: Existing cracks in the concrete slab should be addressed before installing the vinyl plank. Small, hairline cracks can often be filled with a crack filler designed for concrete. Larger cracks, particularly those that are actively moving, may require a more robust repair solution. This may involve widening the crack, cleaning it thoroughly, and filling it with a patching compound or epoxy designed for concrete repair. Addressing cracks is important not only to provide a smooth surface for the vinyl plank but also to prevent moisture from penetrating the slab and causing further damage.
Surface Grinding: In situations where the concrete surface is rough, uneven, or has significant adhesive residue, grinding may be necessary. Concrete grinders are available for rent or purchase and use abrasive diamond wheels to smooth and level the concrete surface. When grinding concrete, it is essential to wear appropriate safety gear, including a dust mask, eye protection, and hearing protection, as the process generates a significant amount of dust. A vacuum system should also be used to collect the dust and prevent it from spreading throughout the work area.
Priming (If Required): Depending on the type of vinyl plank and the adhesive used, a primer may be required. Primers are typically liquid coatings that are applied to the concrete surface to improve adhesion and create a more uniform surface for the adhesive to bond to. The manufacturer's instructions for the vinyl plank flooring and the adhesive will specify whether a primer is necessary and, if so, which type of primer is recommended. Ensure the primer is fully dried before proceeding with the installation.
Installing the Vinyl Plank Flooring
With the concrete slab properly prepared, the actual installation of the vinyl plank flooring can begin. This process typically involves laying out the planks according to a specific pattern and securing them to the concrete using an appropriate adhesive or, in the case of click-lock systems, interlocking the planks together.
Acclimation: Before installation, the vinyl planks should be acclimated to the room's temperature and humidity for at least 48 hours. This allows the planks to expand or contract to their normal size based on the environment, minimizing the risk of gapping or buckling after installation. Store the planks in the room where they will be installed, laying them flat and ideally in their original packaging, to prevent warping or damage.
Layout and Planning: Planning the layout of the vinyl planks is crucial for achieving a visually appealing and structurally sound floor. Start by determining the direction in which the planks will be laid. This decision may be influenced by the shape of the room, the direction of natural light, or personal preference. A chalk line can be used to establish a straight starting line. When laying out the planks, consider the placement of seams and ensure that they are staggered to create a more natural and visually appealing pattern. It's also important to plan for any necessary cuts around walls, doorways, or other obstacles.
Adhesive Application (If Applicable): For vinyl planks that require adhesive, follow the manufacturer's instructions carefully. Use the recommended type of adhesive and apply it evenly to the concrete surface using a notched trowel. The size of the notches on the trowel will determine the amount of adhesive applied. Work in small sections to prevent the adhesive from drying out before the planks are installed. Immediately place the vinyl planks onto the adhesive, pressing firmly to ensure good contact. Use a roller to further secure the planks and remove any air pockets.
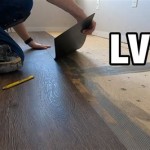
Click-Lock Installation: Click-lock vinyl plank systems are designed to interlock without the need for adhesive. These systems typically have a tongue-and-groove design that allows the planks to snap together. Start by laying the first row of planks along the starting line, ensuring that they are properly aligned. Connect the subsequent rows by engaging the tongue-and-groove joints, using a tapping block and hammer to gently tap the planks together. Ensure that the planks are tightly aligned and that there are no gaps between them.
Cutting and Trimming: Cutting vinyl planks is often necessary to fit them around walls, doorways, and other obstacles. A utility knife with a sharp blade can be used to score the plank, which can then be snapped along the score line. For more precise cuts, a circular saw or jigsaw can be used. When cutting vinyl plank, it is essential to wear safety glasses to protect your eyes from flying debris.
Finishing Touches: Once the vinyl plank flooring is installed, finish the installation by installing baseboards and shoe molding around the perimeter of the room. These moldings will cover the expansion gap between the flooring and the wall and provide a finished look. Ensure that the baseboards and shoe molding are securely attached to the wall, not to the flooring itself, to allow for expansion and contraction of the vinyl plank.
By carefully considering these factors and following the appropriate installation techniques, a durable and aesthetically pleasing vinyl plank floor can be successfully installed over a concrete slab. Regular maintenance, such as sweeping and mopping, will help to keep the floor looking its best for years to come.

How To Prepare A Concrete Floor For Vinyl Flooring Parrys

Easy Ways To Install Vinyl Plank Flooring On Concrete

Tips For Installing Vinyl Plank Over Concrete Floors Lemon Thistle

Easy Ways To Install Vinyl Plank Flooring On Concrete

Easy Ways To Install Vinyl Plank Flooring On Concrete

How To Install Vinyl Plank Flooring On Concrete Step By Guide

Tips For Installing Vinyl Plank Over Concrete Floors Lemon Thistle

How To Install Vinyl Or Laminate Floors In A Basement Over Concrete Slab

Best How To Install Vinyl Plank Flooring Four Generations One Roof

How To Install Vinyl Plank Flooring On Concrete Whole Cabinet Supply
See Also