Can Vinyl Plank Flooring Be Installed Over Plywood Subfloor?
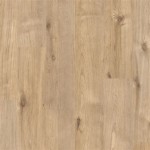
Vinyl plank flooring has risen in popularity as a resilient, aesthetically versatile, and cost-effective flooring option for residential and commercial spaces. Its ability to mimic the appearance of hardwood, stone, and tile, combined with its waterproof properties and ease of maintenance, makes it an attractive alternative to traditional flooring materials. A crucial factor in achieving a successful and long-lasting vinyl plank flooring installation is the preparation and suitability of the subfloor. In many construction scenarios, a plywood subfloor serves as the foundation for the finished flooring. This article explores the feasibility of installing vinyl plank flooring over a plywood subfloor, outlining the necessary steps, considerations, and potential challenges involved.
Before commencing any flooring installation, it's essential to understand the specific requirements and recommendations provided by the vinyl plank flooring manufacturer. These guidelines typically cover aspects such as subfloor flatness, moisture content, and the need for underlayment. Failing to adhere to these instructions can void the warranty and compromise the performance of the flooring.
Subfloor Inspection and Preparation
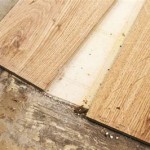
The primary step in any successful vinyl plank flooring installation over a plywood subfloor lies in a thorough inspection and meticulous preparation of the subfloor itself. This process involves identifying and addressing any imperfections or issues that could negatively impact the finished floor. The following aspects should be carefully evaluated:
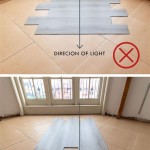
Flatness: A level and flat subfloor is paramount for vinyl plank installation. Unevenness in the subfloor can lead to telegraphing, where imperfections become visible on the surface of the vinyl planks. It can also cause excessive wear and tear on the flooring, shortening its lifespan. To assess flatness, a long straightedge (typically 6 to 10 feet in length) and a level are used. The straightedge is placed on the subfloor in various directions, and the level is used to identify any dips or humps. As a general rule, the subfloor should be flat to within 3/16 inch over a 10-foot span and 1/8 inch over a 6-foot span. Any deviations from this standard should be corrected using self-leveling compound or by sanding down high spots.
Moisture Content: Excessive moisture in the plywood subfloor can cause dimensional changes in the vinyl planks, leading to warping, buckling, and adhesive failure. Prior to installation, the moisture content of the plywood should be measured using a moisture meter. The acceptable moisture content typically varies depending on the manufacturer's recommendations and the specific type of vinyl plank flooring being used. Generally, the moisture content should be below 12%. If the moisture content is too high, it's essential to identify and rectify the source of moisture before proceeding with the installation. This may involve improving ventilation, repairing leaks, or using a moisture barrier.
Structural Integrity: The plywood subfloor must be structurally sound and capable of supporting the weight of the vinyl plank flooring and anticipated foot traffic. Check for signs of rot, delamination, or damage. If the plywood is weak or unstable, it should be repaired or replaced before installing the vinyl planks. Ensure that the plywood sheets are properly secured to the floor joists with screws or nails at appropriate intervals. Loose or squeaky plywood can cause problems with the finished floor.
Cleanliness: The subfloor must be thoroughly cleaned to remove any dirt, dust, debris, or adhesives from previous flooring installations. These contaminants can interfere with the adhesion of the vinyl planks or create an uneven surface. Vacuum the subfloor thoroughly and then wipe it down with a damp cloth or mop. Allow the subfloor to dry completely before proceeding.
Fastener Protrusion: Countersink any protruding nail or screw heads below the surface of the plywood. These protrusions can create bumps or indentations in the vinyl plank flooring. Fill any large holes or gaps in the plywood with wood filler and sand them smooth.
Underlayment Considerations
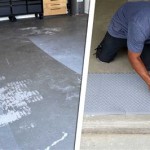
While not always mandatory, the use of an underlayment between the plywood subfloor and the vinyl plank flooring can offer several benefits, depending on the specific type of vinyl plank flooring and the desired performance characteristics. The decision to use an underlayment should be based on factors such as the subfloor condition, the level of sound insulation desired, and the manufacturer's recommendations.
Types of Underlayment: Several types of underlayment are available for vinyl plank flooring, including foam, cork, and rubber. Each type offers different levels of sound insulation, cushioning, and moisture resistance. Foam underlayment is a popular and cost-effective option that provides good cushioning and sound reduction. Cork underlayment offers excellent sound insulation and is a more sustainable choice. Rubber underlayment is a durable and resilient option that is often used in commercial settings. Some vinyl plank flooring products come with an attached underlayment, eliminating the need for a separate layer.
Benefits of Underlayment: Underlayment can provide several benefits, including: * Sound Insulation: Reducing impact noise and airborne sound transmission. * Cushioning: Providing a more comfortable walking surface. * Moisture Resistance: Acting as a barrier against moisture migration from the subfloor. * Smoothing Imperfections: Bridging minor irregularities in the subfloor. * Thermal Insulation: Improving the energy efficiency of the floor.
Installation of Underlayment: When installing underlayment, follow the manufacturer's instructions carefully. Typically, the underlayment is rolled out over the subfloor and secured with tape or staples. Ensure that the seams are tightly butted together and that the underlayment is flat and free of wrinkles.
Vinyl Plank Installation Techniques
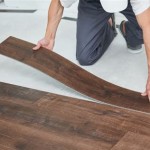
The actual installation of the vinyl plank flooring over the prepared plywood subfloor depends on the type of vinyl plank flooring being used. There are primarily two types of vinyl plank flooring installation methods: glue-down and click-lock (or floating).
Glue-Down Installation: Glue-down vinyl plank flooring requires the use of a special adhesive to bond the planks directly to the subfloor. This method provides a strong and permanent bond, making it suitable for high-traffic areas. The adhesive is applied to the subfloor using a trowel, and the planks are carefully positioned and pressed into the adhesive. It's essential to use the correct type of adhesive recommended by the vinyl plank flooring manufacturer and to follow the manufacturer's instructions regarding application rates and curing times. Glue-down installation typically offers greater stability and resistance to moisture compared to floating installations.
Click-Lock (Floating) Installation: Click-lock vinyl plank flooring features interlocking edges that allow the planks to be connected without the use of adhesive. This method is relatively easy to install and is often preferred by DIY homeowners. The planks are simply clicked together, creating a floating floor that is not directly attached to the subfloor. Click-lock flooring is more forgiving of minor subfloor imperfections and can be installed over a wider range of subfloors. However, it's crucial to ensure that the subfloor is still adequately flat and level to prevent the flooring from shifting or separating over time. For floating installations, expansion gaps should be left around the perimeter of the room to allow for thermal expansion and contraction of the flooring.
General Installation Tips: Regardless of the installation method, several general tips can help ensure a successful vinyl plank flooring installation: * Acclimation: Allow the vinyl plank flooring to acclimate to the room temperature for at least 48 hours before installation. This helps to prevent dimensional changes after installation. * Layout: Plan the layout of the flooring carefully to minimize waste and ensure a visually appealing pattern. * Cutting: Use a utility knife or a flooring cutter to cut the vinyl planks to size. Make clean, precise cuts to ensure a tight fit. * Staggering: Stagger the end joints of the planks to create a more visually appealing and structurally sound floor. * Rolling: After installing the vinyl planks, roll the floor with a heavy roller to ensure proper adhesion and to remove any air pockets.
By meticulously preparing the plywood subfloor, selecting the appropriate installation method, and following the manufacturer's instructions, a durable and aesthetically pleasing vinyl plank floor can be achieved. It is also important to consider the long-term maintenance of the floor to prolong its life and appearance.

How To Prep Wood Subfloor For Luxury Vinyl Plank Flooring Beginners Fix High And Low Spots

How To Install Vinyl Plank Flooring On Plywood Floor

Installing Vinyl Flooring Over Plywood What You Need To Know

Can You Install Luxury Vinyl Plank Flooring Without Underlayment

Do I Need Underlayment For Vinyl Plank Flooring

Can Vinyl Flooring Be Installed Over A Plywood Subfloor

Installing Vinyl Plank Flooring Vapor Barrier On Wood Sub Floor

How To Install Glue Down Luxury Vinyl Plank Flooring On Osb Sub Floor

Complete Guide Underlayment For Vinyl Sheet Flooring

Do I Need An Underlayment For Vinyl Flooring Lx Hausys
See Also