How To Level Plywood Subfloor For Vinyl Plank
Installing vinyl plank flooring over a plywood subfloor offers a durable and aesthetically pleasing surface. However, the success of this installation hinges on the flatness and levelness of the subfloor. Imperfections in the subfloor will telegraph through the vinyl plank, resulting in uneven flooring, compromised locking mechanisms, and premature wear. Consequently, preparing the plywood subfloor is a crucial step in achieving a professional and long-lasting vinyl plank installation.
This article details the process of leveling a plywood subfloor in preparation for vinyl plank flooring. It outlines the necessary materials, tools, and techniques to ensure a smooth, even, and structurally sound foundation. Ignoring these steps can lead to costly repairs and dissatisfaction with the final result.
Identifying Subfloor Imperfections
The first step in leveling a plywood subfloor is a thorough inspection to identify any imperfections. This involves visually examining the surface and physically assessing its flatness and stability. Several tools and techniques are employed to achieve this.
A visual inspection should look for obvious signs of damage, such as water stains, rot, delamination, or protruding fasteners. Water stains can indicate past or present leaks, which must be addressed before proceeding. Rot and delamination compromise the structural integrity of the plywood and require repairs or replacement. Protruding fasteners, such as nails or screws, must be driven flush with the surface or replaced.
To assess flatness, a long, straight edge, ideally at least 8 feet in length, should be used. Place the straight edge across various sections of the subfloor, both parallel and perpendicular to the floor joists. Shine a bright light behind the straight edge to reveal any gaps. These gaps indicate high or low spots that require correction.
A level, used in conjunction with the straight edge, can also identify areas of unevenness. Place the level on top of the straight edge and note any deviations from level. This provides a more precise measurement of the subfloor's slope.
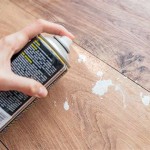
A floor scraper, also known as a “razor scraper,” can be used to remove small imperfections like dried paint drips or glue residue. These seemingly minor irregularities can prevent the vinyl plank from laying flat.
Squeaks in the subfloor often indicate loose plywood sheets. These areas need to be secured to the floor joists to prevent future movement and ensure a stable foundation. Listen carefully while walking across the subfloor to identify these problem spots.
Document all identified imperfections. Note the location, size, and severity of each high spot, low spot, and loose area. This record will guide the leveling process and ensure that all issues are addressed.
Correcting High Spots in the Plywood Subfloor
High spots in the plywood subfloor prevent the vinyl plank from laying flat and can cause uneven wear. Several techniques can be used to address these imperfections, depending on their size and severity.
For minor high spots, a belt sander or a hand plane can be used to gradually remove the excess material. A belt sander with a coarse-grit sandpaper (e.g., 40-grit) is effective for quickly removing material. However, it is important to avoid removing too much material too quickly, as this can create new low spots. Move the sander in a smooth, even motion, overlapping each pass. Regularly check the flatness with the straight edge to monitor progress.
A hand plane is a more precise tool for removing small amounts of material. Adjust the blade to a shallow depth and carefully plane away the high spot. This technique requires more skill and patience but allows for greater control over the material removal.
For larger high spots, a power planer may be necessary. This tool removes material more aggressively than a belt sander or hand plane, so it is essential to use it with caution. Make multiple shallow passes rather than attempting to remove too much material in a single pass. Always wear appropriate safety gear, including eye protection and a dust mask, when using a power planer.
After sanding or planing, thoroughly vacuum the area to remove any dust and debris. Clean the surface with a tack cloth to ensure a clean and smooth substrate for the vinyl plank.
If a high spot is caused by a raised nail or screw, use a nail set or screwdriver to drive the fastener flush with the surface. If this is not possible, remove the fastener and replace it with a shorter one or use a countersinking drill bit to create a recess for the fastener head.
When dealing with larger areas of raised or uneven plywood, consider using a self-leveling compound after addressing the most prominent high spots. This will provide a consistent and smooth surface for the vinyl planks.
Filling Low Spots and Gaps in the Plywood Subfloor
Low spots and gaps in the plywood subfloor are just as problematic as high spots. They create voids beneath the vinyl plank, leading to flexing, cracking, and premature wear. Several methods can be used to fill these imperfections, depending on their size and depth.
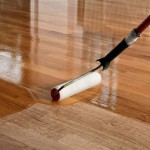
For shallow low spots and small gaps (less than ¼ inch), a floor-leveling compound or patching compound is often sufficient. These compounds are typically cement-based or acrylic-based and are designed to create a smooth, level surface. Follow the manufacturer's instructions for mixing and application.
Before applying the compound, thoroughly clean the area to remove any dust, debris, or loose particles. A vacuum cleaner and a tack cloth are ideal for this purpose. Consider applying a bonding agent to the plywood surface to improve adhesion of the leveling compound. This is particularly important for porous or dusty surfaces.
Apply the leveling compound with a trowel, feathering the edges to blend seamlessly with the surrounding surface. Use a straight edge to ensure that the compound is level and flush with the adjacent plywood. Allow the compound to dry completely according to the manufacturer's instructions.
For deeper low spots and larger gaps (greater than ¼ inch), multiple layers of leveling compound may be necessary. Apply each layer in thin coats, allowing each coat to dry completely before applying the next. This prevents cracking and ensures proper curing of the compound.
Another option for filling larger gaps is to use wood shims or plywood patches. Cut the shims or patches to fit the gaps and secure them with construction adhesive and screws. Ensure that the patches are flush with the surrounding plywood surface. Fill any remaining gaps with leveling compound.
For expansion gaps along the perimeter of the room, avoid filling them completely. These gaps are necessary to allow for expansion and contraction of the flooring materials. Instead, cover them with baseboards or quarter-round molding after the vinyl plank flooring is installed.
After the leveling compound has dried, sand the surface smooth with a fine-grit sandpaper (e.g., 120-grit or 150-grit). This will remove any imperfections and ensure a smooth and even substrate for the vinyl plank.
Securing Loose Plywood Sheets
Loose plywood sheets are a common cause of squeaks and instability in a subfloor. These sheets need to be securely fastened to the floor joists to prevent movement and ensure a solid foundation for the vinyl plank flooring.
Locate the loose areas by walking across the subfloor and listening for squeaks. Mark the areas with chalk or tape. Identify the location of the floor joists beneath the plywood. This can be done by referring to construction plans or by using a stud finder.
Use screws instead of nails to secure the plywood to the joists. Screws provide a stronger and more durable connection. Choose screws that are long enough to penetrate the plywood and at least 1 inch into the joists. Drywall screws are not recommended, as they are brittle and prone to breaking.
Pre-drill pilot holes before driving the screws. This prevents the plywood from splitting, especially near the edges. Space the screws approximately 6 to 8 inches apart along the joists and 12 inches apart in the field (the area between the joists).
If the screws strip out and fail to hold, use longer screws or install wood shims between the plywood and the joists to provide a more solid connection. Apply construction adhesive to the shims before installing them.
If the plywood is severely damaged or delaminated, it may be necessary to replace the entire sheet. Cut out the damaged section with a circular saw, being careful not to cut into the floor joists. Install a new piece of plywood of the same thickness and secure it to the joists with screws.
After securing the plywood sheets, inspect the surface for any protruding screws. Drive them flush with the surface using a screwdriver. Fill any screw holes or imperfections with wood filler or patching compound.
By addressing these key points – identifying imperfections, correcting high spots, filling low spots, and securing loose plywood – a level and stable plywood subfloor can be achieved, ensuring a successful and long-lasting vinyl plank flooring installation. Remember to always consult the vinyl plank manufacturer's instructions for specific subfloor requirements and recommendations.

How To Prep Wood Subfloor For Luxury Vinyl Plank Flooring Beginners Fix High And Low Spots

Floor Prep For Beginners Installing Vinyl Plank

How To Level A Plywood Or Osb Subfloor Using Asphalt Shingles Construction Felt

How To Level A Plywood Subfloor With And Self Leveling Compound

Subfloor Preparation For Flawless Flooring Installation

How To Level A Plywood Or Osb Subfloor Using Asphalt Shingles Construction Felt

How To Prepare The Floor For Vinyl Plank Installation

Wood Floor Shims How To Use Them Remove Squeaky Floors Easiklip

10 Beginner Mistakes Installing Vinyl Plank Flooring Fixthisbuildthat

What Is Loose Lay Vinyl Flooring A Plank Guide Reallyfloors America S Est Hardwood
See Also