How To Level Plywood Subfloor For Tile
Installing tile over a plywood subfloor requires a level and stable surface. Any imperfections in the subfloor, such as dips, humps, or uneven seams, will telegraph through the tile, leading to cracked tiles, uneven grout lines, and an aesthetically unappealing finished floor. Achieving a level subfloor is therefore a crucial step in ensuring a successful and long-lasting tile installation. This article provides a detailed guide on how to properly level a plywood subfloor in preparation for tile.
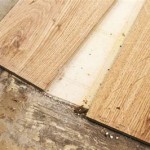
Before commencing any work, it is vital to assess the condition of the existing plywood subfloor. Look for signs of water damage, such as warping, delamination, or rot. Check for loose or squeaky areas, which indicate that the subfloor is not properly fastened to the floor joists. Identify any existing high or low spots using a long straightedge or level. Addressing these underlying issues before leveling will prevent future problems and ensure the longevity of the tile installation.
The tools and materials required for leveling a plywood subfloor are relatively standard. These include a long straightedge (at least 6 feet), a level, a pencil or marker, a tape measure, a circular saw or jigsaw, a self-leveling compound, a patching compound, wood shims, construction adhesive, screws, a power drill, sandpaper or a sanding block, a vacuum cleaner or shop vac, and safety glasses and gloves.
Key Considerations Before Starting
Before starting the leveling process, several critical factors must be considered to ensure a successful and durable tile installation. Addressing these points proactively will minimize potential problems and improve the overall quality of the finished floor.
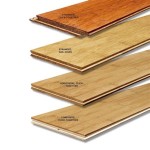
Subfloor Thickness and Condition: The thickness of the plywood subfloor is paramount. Most tile installation guidelines require a minimum subfloor thickness, typically 5/8 inch or 3/4 inch, depending on the joist spacing and the type of tile being installed. Thinner subfloors can deflect under the weight of the tile, leading to cracks and grout failure. If the existing subfloor is too thin, an additional layer of plywood may be necessary. Also, as mentioned previously, assessing the subfloor for water damage, rot, and loose areas is crucial. Damaged sections should be replaced before attempting any leveling.
Joist Spacing: The spacing of the floor joists directly impacts the subfloor's stability. Wider joist spacing increases the risk of subfloor deflection. Consult local building codes and tile manufacturer recommendations to determine the appropriate subfloor thickness based on the joist spacing. If the joist spacing is excessive, consider adding additional joists or reinforcing the existing ones.
Deflection Limits: Understanding deflection limits is critical for ensuring a stable tile installation. Deflection refers to the amount the subfloor bends or sags under a load. Tile installations are particularly sensitive to excessive deflection, which can lead to cracking. Industry standards, such as those outlined by the Tile Council of North America (TCNA), provide guidelines for acceptable deflection limits. These limits are typically expressed as a fraction of the span between the joists (e.g., L/360). Determining the deflection limits for the specific tile being used and ensuring the subfloor meets those requirements are essential for a successful installation.
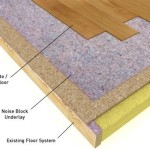
Expansion and Contraction: Plywood, like all wood products, expands and contracts with changes in humidity. This movement can stress the tile installation, potentially leading to cracks. To mitigate this, ensure the plywood is properly acclimated to the environment before installation. Leave a small gap (typically 1/8 inch to 1/4 inch) between the plywood subfloor and the walls to allow for expansion. Employing a suitable underlayment membrane can further help isolate the tile from the subfloor's movement.
Addressing Common Subfloor Imperfections
Depending on the initial assessment, different techniques are required to address specific subfloor imperfections. The following sections detail various methods for correcting common issues.
High Spots: High spots or humps in the subfloor can be addressed by sanding or grinding them down. For minor high spots, a belt sander or orbital sander with coarse-grit sandpaper can be used. For more significant humps, a floor grinder may be necessary. Be careful not to over-sand, as this can create a low spot. Regularly check the area with a straightedge to ensure it is becoming level. After sanding or grinding, vacuum the area thoroughly to remove any dust.
Low Spots: Low spots or dips can be filled with a patching compound or self-leveling compound. For small, shallow dips, a patching compound designed for wood floors can be used. Apply the compound in thin layers, allowing each layer to dry completely before applying the next. Use a taping knife or trowel to feather the edges of the compound into the surrounding surface. For larger or deeper low spots, a self-leveling compound is often the best option. Follow the manufacturer's instructions carefully, ensuring the compound is properly mixed and poured. Self-leveling compounds will flow to fill the low spots and create a level surface.
Uneven Seams: Uneven seams between plywood sheets can create ridges that will telegraph through the tile. These seams can be leveled by sanding down the high side or by using a patching compound to fill in the low side. For minor discrepancies, sanding may be sufficient. For more significant differences, apply a patching compound, feathering it out to create a smooth transition between the sheets.
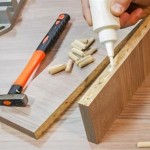
Loose or Squeaky Areas: Loose or squeaky areas indicate that the subfloor is not properly fastened to the floor joists. These areas must be secured before leveling. Locate the loose areas and drive screws through the subfloor into the joists below. Use screws that are long enough to penetrate the joists by at least 1 inch. Add shims between the subfloor and the joists if necessary to eliminate any movement. Apply construction adhesive to the shims before inserting them to create a more secure bond.
Gaps Around Pipes or Fixtures: Gaps around pipes or fixtures should be filled with a suitable filler material to prevent moisture from penetrating the subfloor. Use a waterproof sealant or caulk to seal the gaps. Ensure the filler material is compatible with the tile adhesive and grout being used.
Using Self-Leveling Compound
Self-leveling compound is a popular choice for leveling plywood subfloors, particularly when dealing with larger areas or more significant imperfections. It provides a smooth, level surface that is ideal for tile installation. However, proper application is essential for achieving the desired results.
Preparation: Thorough preparation is crucial for a successful self-leveling compound application. Ensure the subfloor is clean, dry, and free of any loose debris. Vacuum the entire area thoroughly. Seal any cracks or gaps with a suitable sealant to prevent the compound from leaking through. Install a perimeter dam around the edges of the room to contain the compound. This can be done using foam strips or wood battens.
Priming: Most self-leveling compounds require the application of a primer to ensure proper adhesion to the subfloor. Follow the manufacturer's instructions regarding the type of primer to use and the application method. Apply the primer evenly to the entire surface and allow it to dry completely before proceeding.
Mixing: Mixing the self-leveling compound according to the manufacturer's instructions is critical. Use a mixing drill with a suitable mixing paddle. Add the powder to the water in the specified ratio, and mix thoroughly until the mixture is smooth and lump-free. Over-mixing or under-mixing can affect the compound's flow and performance.
Application: Pour the self-leveling compound onto the subfloor, starting in the deepest areas. Use a gauge rake or trowel to spread the compound evenly and to ensure it reaches all areas. Work quickly, as the compound will begin to set relatively quickly. If necessary, use a spiked roller to remove any air bubbles.
Drying and Curing: Allow the self-leveling compound to dry and cure according to the manufacturer's instructions. This typically takes 24 to 72 hours, depending on the product and the environmental conditions. Avoid walking on the surface during the drying and curing process.
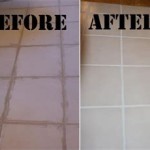
Inspection: After the self-leveling compound has dried and cured, inspect the surface for any imperfections. If any high spots or uneven areas are found, they can be sanded down or patched with a patching compound. Vacuum the surface thoroughly before proceeding with the tile installation.
By following these steps, a homeowner can prepare their subfloor to provide a level, stable base for tile installation. Always consult with local building codes and tile manufacturer recommendations for specifics applicable to the project. Proper preparation will lead to a more successful and visually appealing final result.

How To Prepare A Subfloor For Tile Installation The Home

How To Prepare A Subfloor For Tile Installation The Home

How To Prepare A Subfloor For Tile Installation The Home

How To Prepare Subfloor For Tile The Home

How To Level A Floor For Tile Expert Tips And Advice

How To Level A Plywood Subfloor With And Self Leveling Compound

How To Level A Subfloor Before Laying Tile

How To Prep Wood Subfloor For Luxury Vinyl Plank Flooring Beginners Fix High And Low Spots

Tile Underlayment The Complete Guide For Beginners Diytileguy

How To Install Tile Over A Wood Subfloor 2025 Today S Homeowner
See Also