How to Prepare a Subfloor for Tile Installation
Installing tile can significantly enhance the aesthetics and functionality of a space. However, the longevity and appearance of a tile installation are heavily reliant on the quality and preparation of the underlying subfloor. A properly prepared subfloor provides a stable, level, and clean surface for the tile to adhere to, preventing issues such as cracking, unevenness, and grout problems down the line. This article details the essential steps involved in preparing a subfloor for tile installation, ensuring a professional and durable result.
The initial assessment of the existing subfloor is paramount. This evaluation will determine the extent of preparation required and the appropriate materials to be used. Ignoring pre-existing issues will almost certainly lead to problems after the tile is installed, costing both time and money for repairs.
Key Point 1: Assessing the Existing Subfloor
The first step in preparing a subfloor involves a thorough inspection to identify any existing issues. This includes checking for structural integrity, moisture content, and surface irregularities. The type of subfloor, whether wood or concrete, will dictate the specific inspection procedures and remedial actions required.
Wood Subfloors: Wood subfloors are commonly found in residential settings. When inspecting a wood subfloor, pay close attention to the following:
Deflection: Deflection refers to the amount the subfloor bends or sags when weight is applied. Excessive deflection is a primary cause of tile cracking. To check for deflection, walk across the subfloor in various locations. If there are noticeable dips or bounces, the subfloor may require reinforcement. A general guideline is that the subfloor should not deflect more than 1/360th of the span under normal loading conditions. Deeper analysis may involve using a level and measuring for any sags or unevenness. Correcting deflection issues often involves adding additional support joists or using thicker subfloor panels.
Moisture Content: Wood is susceptible to moisture damage, which can lead to warping, rotting, and mold growth. Use a moisture meter to check the moisture content of the subfloor. The ideal moisture content for wood subfloors before tiling is typically between 6% and 12%. High moisture levels must be addressed before proceeding with tile installation. Sources of moisture, such as plumbing leaks or inadequate ventilation, should be identified and rectified. Allow the wood to dry completely before proceeding, potentially using dehumidifiers or fans to accelerate the process.
Damage and Deterioration: Look for signs of water damage, such as stains, discoloration, or soft spots. Check for insect infestations, such as termites or carpenter ants, which can compromise the structural integrity of the wood. Any damaged or deteriorated sections of the subfloor must be replaced before tiling. This may involve removing and replacing individual boards or panels.
Fastener Issues: Ensure that the subfloor panels are securely fastened to the joists. Loose or missing fasteners can contribute to deflection and instability. Inspect the screws or nails used to secure the subfloor and add additional fasteners as needed. Countersink any protruding fasteners to ensure a flush surface.
Concrete Subfloors: Concrete subfloors are often found in basements, bathrooms, and commercial settings. The inspection process for concrete subfloors differs from that for wood subfloors.
Cracks: Cracks in concrete subfloors are common, but their severity can vary. Hairline cracks may be acceptable, but wider or deeper cracks may indicate structural issues. Wide cracks exceeding 1/8 inch should be evaluated by a structural engineer to determine their cause and whether they require repair. Smaller cracks can be filled with a crack isolation membrane or a suitable patching compound.
Moisture Content: Concrete is porous and can absorb moisture from the ground or surrounding environment. Excessive moisture can interfere with the adhesion of the tile adhesive. Perform a moisture test to determine the moisture vapor emission rate (MVER) or relative humidity (RH) of the concrete. Common methods include the calcium chloride test or the RH probe test. The results of the moisture test will determine the need for a moisture barrier or mitigation system.
Surface Condition: The surface of the concrete subfloor should be clean, level, and free of contaminants such as paint, adhesive residue, or oil stains. These contaminants can prevent proper adhesion of the tile adhesive. Use a scraper, grinder, or chemical stripper to remove any surface coatings or contaminants. If the surface is too smooth, it may require etching or scarifying to provide a better bond for the adhesive.
Levelness: Concrete subfloors are not always perfectly level. Use a level and straightedge to check for any significant dips or humps. Unevenness exceeding 1/4 inch over a 10-foot span should be addressed with a self-leveling compound. Proper leveling is critical to ensure a flat and even tile surface.
Key Point 2: Addressing Subfloor Imperfections
Once the subfloor has been thoroughly assessed, the next step involves addressing any identified imperfections. This may include repairing cracks, leveling uneven surfaces, and reinforcing weak areas. The specific techniques and materials used will depend on the type of subfloor and the nature of the imperfections.
Repairing Cracks in Concrete: Small hairline cracks in concrete subfloors can often be filled with a crack isolation membrane or a cement-based patching compound. These materials help to prevent the cracks from propagating through the tile layer. For wider or deeper cracks, more extensive repairs may be necessary. This may involve widening the crack, cleaning it out, and filling it with a hydraulic cement or epoxy crack filler. In some cases, reinforcing the area with steel rebar or a similar material may be required.
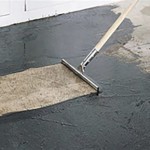
Leveling Uneven Surfaces: Self-leveling compounds are commonly used to level uneven concrete subfloors. These compounds are typically cement-based mixtures that are poured onto the subfloor and allowed to flow and self-level before hardening. Before applying a self-leveling compound, ensure that the subfloor is clean and primed according to the manufacturer's instructions. Use a notched squeegee or trowel to spread the compound evenly and remove any air bubbles. Allow the compound to cure completely before proceeding with tile installation.
Reinforcing Wood Subfloors: Weak or deflecting wood subfloors can be reinforced by adding additional joists or bridging between existing joists. This helps to distribute the load more evenly and reduce deflection. In some cases, it may be necessary to add a layer of underlayment, such as cement backer board or plywood, to provide a more stable and rigid surface for the tile. When installing underlayment, ensure that it is properly fastened to the subfloor with screws or nails. Stagger the joints between the underlayment panels to avoid creating weak points.
Removing Old Adhesives and Coatings: Old adhesives, paint, or other coatings can interfere with the adhesion of the tile adhesive. These materials should be removed completely before tiling. Mechanical methods, such as scraping or grinding, can be used to remove stubborn coatings. Chemical strippers may also be effective, but it is important to choose a stripper that is compatible with the subfloor material and to follow the manufacturer's instructions carefully. After removing the old coatings, clean the subfloor thoroughly to remove any residue.
Key Point 3: Preparing the Surface for Tile Installation
The final step in preparing a subfloor involves ensuring that the surface is clean, smooth, and properly primed for tile installation. This will promote optimal adhesion of the tile adhesive and ensure a long-lasting and aesthetically pleasing result. This involves cleaning, priming, and potentially installing a decoupling membrane.
Cleaning the Subfloor: Before installing tile, the subfloor must be thoroughly cleaned to remove any dust, debris, or contaminants. Use a broom, vacuum cleaner, or damp mop to remove any loose particles. For stubborn stains or grease, a mild detergent or degreaser may be necessary. Ensure that the subfloor is completely dry before proceeding with priming or tile installation.
Priming the Subfloor: Priming the subfloor helps to improve the adhesion of the tile adhesive and to seal the surface, preventing excessive moisture absorption. Choose a primer that is compatible with the subfloor material and the tile adhesive. Apply the primer evenly to the subfloor using a brush, roller, or sprayer. Allow the primer to dry completely according to the manufacturer's instructions before proceeding with tile installation. Some primers may require multiple coats for optimal performance.
Installing a Decoupling Membrane (Optional): A decoupling membrane is a thin layer of material that is installed between the subfloor and the tile. It helps to isolate the tile from the subfloor, preventing cracks and movement from transferring to the tile layer. Decoupling membranes are particularly useful for installations over concrete subfloors or in areas with significant temperature or humidity fluctuations. Follow the manufacturer's instructions for installing the decoupling membrane. Typically, the membrane is adhered to the subfloor with a thin-set mortar and the tile is then installed over the membrane using a similar mortar.
Proper subfloor preparation is essential for a successful tile installation. By carefully assessing the existing subfloor, addressing any imperfections, and preparing the surface for tile installation, the likelihood of future problems will be minimized and the longevity of the tiled surface maximized. Careful attention to detail during the subfloor preparation stage will ultimately result in a more durable and visually appealing tile installation.

How To Prepare A Subfloor For Tile Installation The Home

How To Prepare A Subfloor For Tile Installation The Home

How To Prepare A Subfloor For Tile Installation The Home

Prep A Subfloor For Tile Fine Homebuilding

How To Prepare A Subfloor For Tile Installation The Home

How To Prepare Subfloor For Tile The Home

How To Prepare Subfloor For Tile George Ceramic

Condo Blues How To Prep A Wood Subfloor For New Tile

How To Prepare Your Subfloor For Tiling And Avoid Costly Mistakes Rock Wood Interiors

How To Prepare Your Subfloor For Tiling And Avoid Costly Mistakes Rock Wood Interiors
See Also