How To Prep Subfloor For Tile Bathroom Floor
Proper preparation of the subfloor is paramount for a successful and long-lasting tile installation in a bathroom. A poorly prepared subfloor can lead to cracked tiles, grout failure, and water damage, resulting in costly repairs. This article will outline the essential steps required to ensure the subfloor is structurally sound, level, and ready to receive tile.
The subfloor provides the foundational support for the entire bathroom floor assembly. It acts as a bridge between the floor joists and the finished flooring. The choice of subfloor material, typically plywood or oriented strand board (OSB), depends on local building codes and the anticipated load. The subfloor must be able to withstand the weight of the tile, grout, mortar, and bathroom fixtures, as well as the constant moisture present in the bathroom environment.
Thorough inspection of the existing subfloor is the initial and arguably most critical step. This involves identifying and addressing any existing issues before proceeding with any further preparation. Ignoring these problems will only exacerbate them later, potentially compromising the integrity of the entire tiled floor.
Subfloor Inspection and Repair
The inspection process should begin by visually assessing the subfloor for signs of damage. Look for water stains, mold growth, soft spots, or any areas where the subfloor is visibly warped or delaminated. These are indicators of potential water damage that needs to be rectified. Water damage can weaken the subfloor's structural integrity, making it unsuitable for tile installation. A flashlight can be helpful in illuminating dark corners and hard-to-reach areas.
Once a visual inspection has been completed, a more hands-on approach is necessary. Use a screwdriver or awl to probe any suspicious areas. If the tool penetrates the wood easily, it suggests that the subfloor is rotten and needs to be replaced. Pay particular attention to areas around the toilet, shower, and sink, as these are the most prone to water damage.
Walk across the subfloor and listen for any squeaking or creaking. These noises often indicate loose fasteners or movement between the subfloor and the floor joists. Loose nails or screws should be replaced with longer, corrosion-resistant fasteners. If the squeaking persists, it may be necessary to add shims between the floor joists and the subfloor to eliminate any gaps.
If water damage is extensive, replacing the affected section of the subfloor is essential. Carefully cut out the damaged area using a circular saw, taking care not to cut into the floor joists. Install a new piece of subfloor of the same thickness and material, ensuring it is securely fastened to the floor joists. Apply a bead of construction adhesive along the edges of the new subfloor to prevent moisture from seeping in.
If mold is present, it must be treated and removed before proceeding. Use a mold-killing solution and follow the manufacturer's instructions carefully. Ensure proper ventilation during the cleaning process. In severe cases of mold infestation, it may be necessary to consult with a professional mold remediation specialist.
Leveling the Subfloor
A level subfloor is crucial for a professional-looking tile installation. Uneven surfaces can cause tiles to crack, grout lines to be inconsistent, and lippage (uneven tile edges) to occur. Leveling the subfloor ensures that the tiles are installed on a flat and stable surface, providing optimal support and preventing future problems.
Start by using a long level (at least 6 feet) to identify any high or low spots on the subfloor. Mark these areas with a pencil or chalk. A self-leveling compound can be used to fill in low spots and create a smooth, level surface. Before applying the self-leveling compound, it is essential to clean the subfloor thoroughly to remove any dust, debris, or contaminants. A primer may also be required to ensure proper adhesion of the self-leveling compound.
Mix the self-leveling compound according to the manufacturer's instructions. Pour the mixture onto the low areas of the subfloor and use a gauge rake or trowel to spread it evenly. Allow the self-leveling compound to dry completely before proceeding to the next step. It may be necessary to apply multiple coats to achieve the desired level.
For high spots, a belt sander or floor grinder can be used to remove excess material. Be careful not to sand too aggressively, as this can damage the subfloor. Check the level frequently during the sanding process to ensure that the surface is becoming more even. After sanding, clean the subfloor thoroughly to remove any dust.
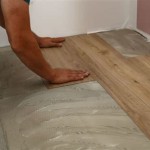
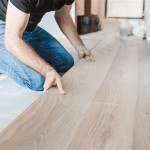
In situations where the subfloor is severely uneven, it may be necessary to install a layer of cement backer board. This provides a solid, stable, and level surface for tile installation. Cement backer board is water-resistant and will not rot or deteriorate like wood. It is also more dimensionally stable than plywood or OSB, reducing the risk of cracking or warping.
When installing cement backer board, stagger the seams to prevent cracking. Secure the backer board to the subfloor with thin-set mortar and screws designed for cement backer board. The screws should be spaced according to the manufacturer's instructions. Tape and mud the seams between the backer board sheets to create a smooth, continuous surface.
Surface Preparation and Moisture Protection
Once the subfloor has been inspected, repaired, and leveled, it is essential to prepare the surface for tile installation. This involves cleaning the subfloor thoroughly and applying a waterproofing membrane to protect it from moisture. A clean and waterproof subfloor is essential for ensuring proper adhesion of the mortar and preventing water damage to the underlying structure.
Begin by sweeping or vacuuming the subfloor to remove any dust, debris, or loose particles. Then, use a damp mop or sponge to clean the surface. Avoid using excessive water, as this can damage the subfloor. For stubborn stains or residue, a mild detergent can be used. Allow the subfloor to dry completely before proceeding.
After cleaning, inspect the subfloor for any remaining imperfections. Fill any small cracks or holes with a patching compound designed for wood or cement backer board. Sand the patched areas smooth to create a uniform surface. Remove any dust created by sanding.
A waterproofing membrane is essential for protecting the subfloor from moisture in the bathroom environment. Water can seep through grout lines and cracks in the tile, causing damage to the subfloor and potentially leading to mold growth. A waterproofing membrane creates a barrier that prevents water from penetrating the subfloor, extending the life of the tile installation and protecting the underlying structure.
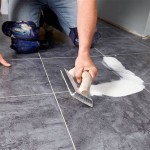
There are several types of waterproofing membranes available, including liquid-applied membranes and sheet membranes. Liquid-applied membranes are applied with a brush, roller, or trowel, creating a seamless, waterproof barrier. Sheet membranes are pre-cut to size and adhered to the subfloor with thin-set mortar. Choose a waterproofing membrane that is compatible with the type of tile and mortar being used.
When applying a liquid-applied waterproofing membrane, follow the manufacturer's instructions carefully. Apply multiple coats, allowing each coat to dry completely before applying the next. Pay particular attention to corners, seams, and areas around pipes and drains, as these are the most vulnerable to water damage.
When installing a sheet membrane, apply a layer of thin-set mortar to the subfloor using a notched trowel. Press the membrane firmly into the mortar, ensuring that there are no air pockets. Overlap the seams by at least 2 inches and seal them with a seam roller. After the membrane has been installed, apply a second layer of thin-set mortar to the top of the membrane to provide a bonding surface for the tile.
Allow the waterproofing membrane to cure completely before proceeding with tile installation. This may take several hours or even days, depending on the type of membrane and the ambient humidity. Consult the manufacturer's instructions for specific curing times.
Ensuring the subfloor is properly prepared is a foundational step for any successful bathroom tile installation. Taking the time to inspect, repair, level, and waterproof the subfloor will contribute significantly to the longevity and aesthetic appeal of the finished tile floor. By following these guidelines, one can mitigate potential problems and achieve a durable, professional-looking result.

How To Prepare A Subfloor For Tile Installation The Home

How To Prepare A Subfloor For Tile Installation The Home

Preparing The Bathroom Floor For Tiling Blog Homeandawaywithlisa

How To Prepare Subfloor For Tile The Home

How To Install Cement Board On A Floor Diy Family Handyman

Prepping A Bathroom Floor For Tile Jlc

Condo Blues How To Prep A Wood Subfloor For New Tile

Floor And Grout Conditioning In Our Bathroom Remodel Merrypad

How To Prepare A Subfloor For Tile Installation The Home

Tiling On Wooden Floors Part 2 Sub Floor Preparation Bathroom Guru
See Also