Installing Vinyl Flooring in Bathrooms: A Comprehensive Guide
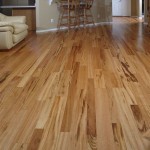
Vinyl flooring is a popular choice for bathrooms due to its water resistance, durability, and affordability. Its versatility in design, with options mimicking tile, wood, and stone, makes it suitable for various aesthetic preferences. Correct installation, however, is crucial to ensuring longevity and preventing water damage issues. This guide provides a comprehensive overview of the process, from preparation to completion.
The successful installation of vinyl flooring hinges on meticulous preparation. Rushing this stage can lead to uneven surfaces, compromised adhesion, and ultimately, a floor that is susceptible to moisture penetration. The following sections detail each step with necessary precision.
Preparing the Bathroom for Vinyl Flooring Installation
The initial step involves a thorough clearing of the bathroom. All fixtures, including the toilet, vanity, and any freestanding cabinets, must be removed if possible. While removing the toilet is ideal, it can be worked around if complete removal is not feasible. In such cases, careful masking and protection of the fixture are essential. If removing the vanity and cabinets isn't possible, you must find an overlapping edge and make a cut that allows the flooring to fit underneath the fixture.
Next, the existing flooring must be addressed. Depending on the type of flooring currently installed, removal may be necessary. Existing tile, for example, should generally be removed to provide a smooth, level subfloor. Sheet vinyl or linoleum may also require removal if it is damaged, loose, or uneven. If the existing flooring is in good condition and level, it may be possible to install the vinyl directly over it, but this is less desirable and requires careful consideration of potential issues like trapped moisture.
Once the existing flooring is addressed, the subfloor must be inspected and prepared. The subfloor is the foundation upon which the vinyl flooring will be laid, and its condition directly affects the final result. Look for signs of damage, such as cracks, holes, rot, or unevenness. Any imperfections must be repaired before proceeding. Small cracks can be filled with a patching compound designed for subfloors. Larger holes or areas of rot may require replacing sections of the subfloor entirely. OSB and even plywood subfloors are susceptible to water damage, so you may need to seal your subfloor with a waterproof sealant.
Leveling the subfloor is critical. Unevenness can cause the vinyl flooring to buckle, crack, or wear prematurely. Use a self-leveling compound to achieve a uniformly smooth surface. Follow the manufacturer's instructions carefully when applying the compound, ensuring it is spread evenly and allowed to dry completely before proceeding.
Finally, thoroughly clean the prepared subfloor. Remove all dust, debris, and residual adhesives using a vacuum cleaner and a damp mop. A clean surface promotes optimal adhesion of the vinyl flooring.
Selecting and Cutting Vinyl Flooring
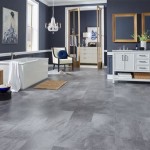
The selection of vinyl flooring is a matter of personal preference, but several factors should be considered. Vinyl flooring comes in various forms, including sheet vinyl, vinyl tiles, and vinyl planks. Sheet vinyl offers the best water resistance due to its seamless construction, making it an excellent choice for bathrooms. Vinyl tiles and planks are easier to install and replace individually, but they have seams that can be susceptible to moisture if not properly sealed.
When choosing vinyl flooring, pay attention to the wear layer. The wear layer is a clear, protective coating that determines the flooring's resistance to scratches, stains, and general wear and tear. A thicker wear layer provides greater durability, especially in high-traffic areas like bathrooms. Consider the level of foot traffic and potential for moisture exposure when selecting the appropriate wear layer thickness.
Accurate measurement is paramount for efficient cutting and minimal waste. Measure the bathroom's length and width at the widest points, accounting for any alcoves or irregularities. Add a few extra inches to these measurements as a safety margin for trimming and fitting. This is particularly important with sheet vinyl, where a single, continuous piece must cover the entire floor area.
Transfer the measurements to the vinyl flooring using a measuring tape and a straight edge. For sheet vinyl, unroll the material on a flat surface, such as a driveway or garage floor, and mark the cutting lines with a pencil or marker. For vinyl tiles or planks, measure and cut each piece individually as needed during the installation process. Cutting vinyl can be achieved with a utility knife and a straight edge. Make several light passes rather than trying to cut through the material in one go. This helps to ensure a clean, straight cut. For more intricate cuts around pipes or fixtures, use a jigsaw or a specialized vinyl cutter. Always prioritize safety by wearing appropriate protective gear, such as gloves and eye protection, when cutting vinyl flooring.
Installing the Vinyl Flooring
The installation process varies depending on the type of vinyl flooring selected. Sheet vinyl typically requires a full adhesive bond to the subfloor, while vinyl tiles and planks may utilize a peel-and-stick application or a modified loose-lay installation. Always refer to the manufacturer's instructions for specific installation guidelines.
For sheet vinyl installation, begin by dry-fitting the material in the bathroom. Position the vinyl sheet over the prepared subfloor and trim any excess material along the walls and around fixtures. Leave a small gap (approximately 1/4 inch) between the vinyl and the walls to allow for expansion and contraction. This gap will be covered by the baseboards or trim later.
Once the vinyl sheet is properly positioned and trimmed, fold back one half of the sheet, exposing the subfloor. Apply the recommended adhesive to the exposed subfloor using a notched trowel. Ensure that the adhesive is spread evenly and thoroughly, following the manufacturer's instructions for the appropriate trowel size and spread rate. Allow the adhesive to tack up slightly before carefully unfolding the vinyl sheet and pressing it firmly into the adhesive. Use a flooring roller to smooth out the vinyl and ensure full contact with the adhesive. Repeat this process for the other half of the vinyl sheet.
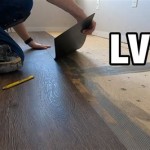
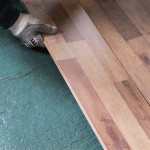
For vinyl tiles or planks, the installation process is generally simpler. Peel-and-stick tiles and planks have an adhesive backing that is exposed by removing a protective liner. Position the tile or plank carefully over the subfloor and press it firmly into place. Ensure that each tile or plank is aligned properly and that there are no gaps between the pieces. For modified loose-lay installations, a perimeter adhesive is typically used to secure the edges of the flooring to the subfloor.
After the vinyl flooring is installed, use a seam roller to firmly press the seams between the tiles or planks. This helps to create a water-resistant seal and prevent moisture from penetrating the subfloor. For sheet vinyl, use a seam sealer to seal the seams where multiple sheets are joined together.
Allow the adhesive to cure completely before replacing the fixtures and trim. Follow the manufacturer's recommendations for curing time, which may vary depending on the type of adhesive used. Once the adhesive is fully cured, reinstall the toilet, vanity, and any other fixtures that were removed. Install new baseboards or trim to cover the expansion gap around the perimeter of the room. Caulk around the toilet, vanity, and any other areas where the flooring meets a vertical surface to prevent water from seeping behind the flooring.
After installation, regular cleaning and maintenance are essential to prolong the life of the vinyl flooring. Sweep or vacuum the floor regularly to remove dirt and debris. Mop the floor with a mild detergent and water, avoiding harsh chemicals or abrasive cleaners. Wipe up spills immediately to prevent staining. With proper installation and maintenance, vinyl flooring can provide a durable, water-resistant, and aesthetically pleasing flooring solution for bathrooms.

How To Install Vinyl Plank Flooring In A Bathroom Fixthisbuildthat

Dos And Don Ts For Installing Vinyl Plank Floors In The Bathroom Advice Homeowners

How To Install Sheet Vinyl Floor Decor Adventures

Vinyl Planks In Bathrooms Residential Inspiration Flooring

How To Lay Vinyl Floor In A Bathroom Dove Cottage

Installing Vinyl Plank Flooring Lifeproof Waterproof Rigid Core Sustain My Craft Habit

How To Install Vinyl Plank Floors In A Bathroom Over Tile

How To Install Vinyl Plank Flooring In A Bathroom

How To Install Vinyl Plank Flooring In A Bathroom Fixthisbuildthat

How To Install Sheet Vinyl Floor Decor Adventures
See Also