How To Level A Concrete Floor With Plywood
Concrete floors, while durable and often a cost-effective building material, are rarely perfectly level. Variations in the original pour, settling, and even previous damage can create uneven surfaces that pose problems for installing flooring, placing furniture, or simply navigating the space comfortably. While self-leveling concrete is a popular option, there are situations where leveling with plywood becomes a more practical or cost-effective alternative. This method primarily addresses moderate to significant discrepancies in floor height and can provide a stable and uniform base for a variety of flooring materials.
This article will detail the process of leveling a concrete floor using plywood, outlining the necessary tools and materials, preparation steps, and the installation procedure. This method is well-suited for areas where you require a slight height increase or have unevenness that simple patching cannot adequately address. This process is best suited for competent DIYers or experienced contractors.
Understanding the Scope and Limitations
It's crucial to gauge the extent of the unevenness before committing to a plywood leveling solution. Simple imperfections, such as minor cracks or surface roughness, may be better addressed with concrete patching compounds. Plywood leveling is most effective when dealing with variations of a half-inch or more across an area. Using a long level (4-6 feet) will help identify the high and low points of the floor. This process involves placing the level on the floor and measuring the gap between the level and the floor surface with a measuring stick. Mapping out these variations will inform the planning and execution phases of the project.
Consider the overall floor height after the plywood is installed. If the added height poses issues with door clearances or transitions to adjacent rooms, alternative leveling methods might be more appropriate. Moreover, assess the load-bearing capacity of the existing concrete floor. The added weight of the plywood and subsequent flooring materials should not exceed the floor's structural limits. This is especially critical in older buildings or those with known structural concerns. If there are any doubts, consult a structural engineer.
Ventilation and moisture are also important factors. Concrete can wick moisture, especially if the slab is in direct contact with the ground. Trapping moisture beneath the plywood can lead to mold growth and structural damage. Ensuring proper ventilation and applying a moisture barrier are crucial steps in preventing these problems.
Gathering Tools and Materials
A well-prepared workspace with all the necessary tools will streamline the leveling process and minimize potential delays. Here's a comprehensive list of essential tools and materials:
*Plywood:
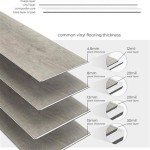
Choose the appropriate thickness and grade of plywood based on the severity of the unevenness and the intended use of the space. Exterior-grade plywood is recommended, even for interior applications, as it offers superior moisture resistance. Consider using ¾ inch or thicker plywood for substantial leveling. *Moisture Barrier:
A polyethylene film or a liquid-applied moisture barrier will prevent moisture from migrating from the concrete into the plywood. *Fasteners:
Concrete screws or construction adhesive (specifically designed for adhering wood to concrete) are necessary to secure the plywood to the floor. Choose fasteners of appropriate length to penetrate the plywood and sufficiently anchor into the concrete without risking damage to pipes or conduits beneath the slab. *Shims:
Wood or plastic shims are essential for achieving a perfectly level surface. *Self-Leveling Compound (Optional):
In cases of extreme unevenness, a thin layer of self-leveling compound may be applied before installing the plywood to fill in deeper depressions and create a more uniform base. *Level:
A long level (4-6 feet) is crucial for identifying high and low spots and ensuring the plywood is installed level. A laser level can be beneficial for larger areas. *Measuring Tape:
Accurate measurements are essential for cutting the plywood and placing shims. *Saw:
A circular saw or table saw is needed for cutting the plywood to size. *Drill/Impact Driver:
Used for installing concrete screws. *Concrete Drill Bit:
Essential for pre-drilling holes in the concrete to accommodate the screws. *Caulk Gun (if using construction adhesive):
For applying construction adhesive evenly. *Straight Edge:
For guiding cuts and ensuring straight lines. *Hammer/Mallet:
Useful for tapping shims into place. *Safety Glasses and Dust Mask:
Protect eyes and lungs from dust and debris. *Ear Protection:
To mitigate noise levels during drilling and cutting. *Vacuum Cleaner:
For cleaning the concrete surface before and after each step.Step-by-Step Installation Process
Following a systematic approach is key to achieving a successful and level plywood subfloor. The installation consists of several stages of preparation, measuring, cutting, and securing the wood to the concrete.
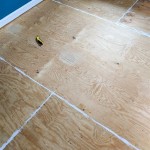
1. Surface Preparation:
Begin by thoroughly cleaning the concrete floor. Remove any debris, dust, dirt, or loose particles. Use a vacuum cleaner and a scraper to ensure a clean, solid surface. Repair any significant cracks or damage with a concrete patching compound and allow it to dry completely according to the manufacturer's instructions. This prepares the concrete for optimal adhesion of the moisture barrier and ensures stability for the plywood.2. Moisture Barrier Installation:
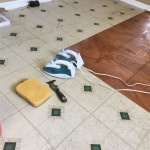
Apply a moisture barrier to the concrete floor. If using polyethylene film, overlap the seams by at least 6 inches and tape them with waterproof tape. If using a liquid-applied moisture barrier, follow the manufacturer's instructions for application and drying time. This step is vital to prevent moisture-related issues down the line.3. Mapping and Shimming:
Use the long level to identify high and low spots on the floor. Mark these areas clearly with a pencil or marker. Place shims at strategic intervals along the low spots to bring them up to the desired level. The frequency and thickness of the shims will depend on the severity of the unevenness. Use the level to check the height of the shims and add or subtract shims as needed until the entire area is relatively level. Ensure the shims are stable and won't shift during the plywood installation. Using construction adhesive under the shims can further secure them in place.4. Plywood Cutting and Placement:
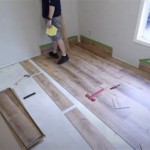
Measure and cut the plywood sheets to fit the area. Leave a small expansion gap (approximately 1/4 inch) between the plywood and the walls to allow for expansion and contraction due to temperature and humidity changes. Stagger the seams of the plywood sheets to increase the overall strength and stability of the subfloor. Lay the plywood sheets over the shims, ensuring they are properly supported. Walk across the plywood to identify any areas that feel unstable or that require additional shims.5. Securing the Plywood:
Once the plywood is properly positioned and shimmed, it's time to secure it to the concrete floor. Pre-drill holes through the plywood and into the concrete using a concrete drill bit. The depth of the holes should be appropriate for the length of the concrete screws being used. Space the screws according to the manufacturer's recommendations, typically every 12-16 inches along the edges and every 16-24 inches in the field. If using construction adhesive, apply it in a serpentine pattern on the concrete surface before placing the plywood. Then, secure the plywood with concrete screws as described above.6. Seam Treatment:
After the first layer of plywood is secured, inspect the seams. Gaps larger than 1/8 inch should be filled with wood filler or a patching compound designed for plywood. Sand the seams smooth to create a seamless transition between the plywood sheets. This step is particularly important if you plan to install a thin flooring material, as any imperfections in the subfloor will be visible.7. Second Layer (Optional):
For particularly uneven floors or for added stability, consider installing a second layer of plywood. Stagger the seams of the second layer relative to the first layer. This will help distribute the weight and reduce the risk of flexing. Secure the second layer to the first layer with wood screws, spacing them according to the manufacturer's recommendations. The second layer ensures a truly level surface.8. Final Inspection and Preparation for Flooring:
Once the plywood is installed and secured, conduct a final inspection to ensure the surface is level, stable, and free of any protruding fasteners or imperfections. Sand any rough edges or high spots. Clean the plywood surface thoroughly to remove any dust or debris before installing the final flooring material. At this point, the plywood subfloor is ready to receive the chosen flooring, ensuring a level and professional result.
How To Level A Plywood Subfloor With And Self Leveling Compound

How To Install A Wood Subfloor Over Concrete Rona

Concrete Over Plywood Upgrade Wood Subfloor Into

How To Prep Wood Subfloor For Luxury Vinyl Plank Flooring Beginners Fix High And Low Spots

How To Level A Plywood Or Osb Subfloor Using Asphalt Shingles Construction Felt

No More Dips Installing Self Leveling Concrete On Our Wood Subfloors Diy Lvp Floor Prep

How To Install A Wood Subfloor Over Concrete Rona

Condo Blues Ten Things You Need To Know Level And Repair An Uneven Floor

This Is Hard To Do Building New Framed Floor Over Concrete

How To Install A Wood Subfloor Over Concrete Rona
See Also