Laying Sheet Vinyl Flooring in a Bathroom: A Comprehensive Guide
Sheet vinyl flooring is a popular choice for bathrooms due to its waterproof nature, durability, and relative affordability. When installed correctly, it provides a seamless, low-maintenance surface that can withstand the moisture and humidity prevalent in bathroom environments. This article provides a detailed guide to laying sheet vinyl flooring in a bathroom, covering essential preparation, installation techniques, and finishing touches.
Planning and Preparation: The Foundation for a Successful Installation
The initial phase of laying sheet vinyl flooring is arguably the most critical. Thorough planning and meticulous preparation are paramount to achieving a professional and long-lasting result. This phase involves accurate measurement, careful subfloor assessment, selection of appropriate materials, and the gathering of necessary tools.
First, accurately measure the bathroom's length and width at the farthest points. Account for any alcoves, doorways, or other irregularities. Add a few extra inches to each dimension to allow for trimming and ensure sufficient material. This extra allowance is particularly important for complex bathroom layouts.
Next, assess the existing subfloor. Sheet vinyl requires a smooth, level, and stable surface. Irregularities in the subfloor will telegraph through the vinyl, resulting in an uneven and unsightly finish. Common subfloor materials include plywood, OSB (oriented strand board), and concrete. Inspect the subfloor for any signs of damage, such as warping, rot, or cracks. Repair or replace any damaged sections before proceeding.
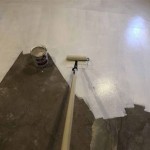
If the existing subfloor is uneven, it will need to be leveled. This can be achieved using a self-leveling compound or by applying a layer of plywood underlayment. Self-leveling compounds are suitable for minor imperfections, while plywood underlayment is preferable for more significant variations in height. When using plywood underlayment, ensure it is securely fastened to the existing subfloor with screws or nails, and that the seams are filled with wood filler and sanded smooth.
Clean the subfloor thoroughly. Remove any debris, dust, or existing adhesive residue. A clean subfloor is essential for ensuring proper adhesion of the sheet vinyl. Vacuum the surface and then wipe it down with a damp cloth. Allow the subfloor to dry completely before proceeding.
Gather the necessary tools and materials. This includes the sheet vinyl flooring, a sharp utility knife with plenty of new blades, a measuring tape, a straightedge (at least 4 feet long), a pencil, a notched trowel (if adhesive is required), seam sealer (if applicable), a floor roller, and safety glasses. The type of adhesive required will depend on the specific sheet vinyl flooring being used, so consult the manufacturer's instructions.
Acclimate the sheet vinyl to the bathroom environment for at least 24 hours before installation. This allows the vinyl to adjust to the temperature and humidity of the room, minimizing the risk of expansion or contraction after installation. Unroll the vinyl in a large, open area, such as a garage or spare room, to allow it to relax and flatten.
Installation Process: Laying the Sheet Vinyl
With the planning and preparation complete, the next stage involves the actual installation of the sheet vinyl flooring. This requires careful handling of the vinyl, precise cutting, and secure adhesion to the subfloor.
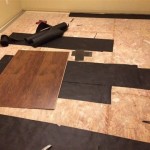
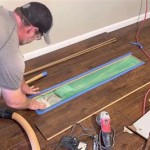
Unroll the sheet vinyl in the bathroom, positioning it so that there is excess material extending up the walls. This excess material will be trimmed later to create a clean, finished edge. Ensure the vinyl is properly aligned and that the pattern (if any) is oriented correctly.
Using a straightedge and a sharp utility knife, carefully cut the vinyl around any fixtures, such as toilets, sinks, and pipes. Make small, precise cuts to avoid damaging the vinyl. It is often helpful to create a paper template of the fixture and then transfer the template to the vinyl.
Once the vinyl is cut to fit around the fixtures, it's time to adhere it to the subfloor. Depending on the type of sheet vinyl, either a full-spread adhesive or a perimeter adhesive may be required. Consult the manufacturer's instructions for guidance.
If using a full-spread adhesive, fold back half of the vinyl sheet and apply the adhesive to the exposed subfloor using a notched trowel. Spread the adhesive evenly, following the manufacturer's recommendations for trowel size and application rate. Allow the adhesive to tack up slightly before rolling the vinyl back into place.
If using a perimeter adhesive, apply the adhesive around the perimeter of the room, as well as around any fixtures or obstacles. Roll the vinyl into place, ensuring it is firmly adhered to the subfloor.
Use a floor roller to smooth out any air bubbles or wrinkles in the vinyl. Start at the center of the room and work your way outwards. Apply firm, even pressure to ensure proper adhesion. Pay particular attention to seams and edges.
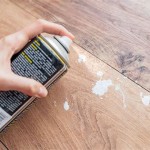
If the bathroom requires more than one sheet of vinyl, create a seamless seam using a seam sealer. Clean the edges of the vinyl sheets and apply the seam sealer according to the manufacturer's instructions. This will create a waterproof and durable seam.
Finishing Touches: Completing the Installation
The final stage involves trimming the excess vinyl, installing trim, and cleaning the finished floor to achieve a professional appearance. Attention to detail in this phase ensures a polished and long-lasting result.
Using a sharp utility knife and a straightedge, carefully trim the excess vinyl around the perimeter of the room. Leave a small gap (about 1/8 inch) between the vinyl and the wall to allow for expansion and contraction. This gap will be covered by trim.
Install baseboards or quarter-round trim around the perimeter of the room. This trim will conceal the gap between the vinyl and the wall, and it will also protect the edges of the vinyl from damage. Choose a trim style that complements the overall décor of the bathroom. Secure the trim to the wall with nails or adhesive.
Seal the gap between the trim and the floor with caulk. This will prevent water from seeping under the vinyl and damaging the subfloor. Choose a caulk that is specifically designed for use in bathrooms and that is mildew-resistant.
Clean the finished floor thoroughly. Remove any debris, adhesive residue, or caulking. Use a mild detergent and warm water. Avoid using harsh chemicals or abrasive cleaners, as they can damage the vinyl.
Inspect the finished floor for any imperfections. Touch up any areas that need attention. Allow the adhesive and caulk to dry completely before using the bathroom.
In summary, laying sheet vinyl flooring in a bathroom requires careful planning, meticulous preparation, and precise installation techniques. By following these steps, it is possible to achieve a professional and long-lasting result that will enhance the beauty and functionality of the bathroom.

How To Install Sheet Vinyl Floor Decor Adventures

How To Install Sheet Vinyl Floor Decor Adventures

How To Install Sheet Vinyl Floor Decor Adventures

How To Install Sheet Vinyl Flooring

How To Install Vinyl Sheet Flooring A Erfly House

How To Install Vinyl Sheet Flooring A Erfly House

How To Lay Vinyl Sheet In A Bathroom Flooring Factory

Diy How To Lay Vinyl Or Lino Flooring

How To Install Sheet Vinyl Floor Decor Adventures

How To Install Sheet Vinyl Lino Flooring In A Bathroom Easy Step By Diy Guide
See Also