How to Lay Tile Over OSB Subfloor in a Bathroom Floor Plan
Laying tile in a bathroom renovation is a popular method for achieving a durable, water-resistant, and aesthetically pleasing floor. While concrete or cement board are often preferred subfloor materials, situations may arise where laying tile directly over Oriented Strand Board (OSB) becomes necessary. This process demands careful preparation and specific installation techniques to mitigate the risks associated with OSB's inherent properties. OSB expands and contracts with moisture fluctuations, potentially leading to tile cracking or grout failure if not properly addressed. This article outlines the steps involved in successfully laying tile over an OSB subfloor in a bathroom, providing guidance for achieving a long-lasting and visually appealing result. The suitability of tiling over OSB depends heavily on the structural integrity, thickness, and condition of the existing OSB subfloor.
Before commencing the tiling project, a thorough assessment of the existing OSB subfloor is paramount. The subfloor must be structurally sound, meaning it should not exhibit any signs of deflection or movement when walked upon. Any areas of weakness, such as soft spots or delamination, must be addressed before proceeding. This might involve replacing the affected sections of OSB or adding additional support from below. The thickness of the OSB is also a crucial factor. Generally, a minimum thickness of 3/4 inch is recommended for adequate support, though thicker OSB may be required, especially in areas with high foot traffic or where heavier fixtures, such as a bathtub or vanity, will be located. Consulting local building codes and manufacturer recommendations regarding subfloor requirements is advisable.
Once the subfloor has been deemed structurally sound and of adequate thickness, preparation involves cleaning and leveling the surface. Any debris, dirt, or adhesive residue should be removed thoroughly. This can be achieved using a scraper, vacuum cleaner, and a suitable cleaning solution. Leveling the surface is critical for achieving a professional-looking tile installation. Minor imperfections can be corrected using a self-leveling underlayment specifically designed for use over OSB. More significant variations in the subfloor's level may require the application of shims or patching compounds before applying the self-leveling underlayment. Proper preparation significantly minimizes the risk of tile cracking or uneven grout lines in the future. Ignoring this step can lead to costly repairs and unsatisfactory results.
Key Point 1: Subfloor Reinforcement and Stabilization
Reinforcing and stabilizing the OSB subfloor forms a foundational step in ensuring the long-term success of the tile installation. This process aims to minimize the movement and flexibility inherent in OSB, thereby reducing the likelihood of tile cracking and grout failure. One common method involves screwing down the OSB to the floor joists more frequently than the original installation. Adding screws every 6-8 inches along the joists provides increased rigidity and reduces deflection. Ensure that the screws are long enough to penetrate the joists adequately without protruding through the underside of the subfloor. Another approach involves adding a layer of plywood underlayment over the OSB. This underlayment, typically 1/4 inch or 1/2 inch thick, adds further stability and provides a smoother surface for the tile installation. The plywood should be glued and screwed to the OSB, using a construction adhesive specifically designed for bonding wood to wood. Staggering the seams of the plywood relative to the seams of the OSB further enhances the subfloor's rigidity. The choice between reinforcing with more screws or adding a plywood underlayment depends on the existing condition of the OSB and the desired level of stability. In situations where the OSB shows signs of significant movement or deflection, a combination of both methods may be necessary.
Following reinforcement, it's important to address any gaps or seams in the OSB. These gaps can create weak points in the subfloor, potentially leading to tile cracking. Fill any gaps larger than 1/8 inch with a flexible patching compound specifically designed for use on wood subfloors. Smooth the patching compound flush with the surrounding surface and allow it to dry completely according to the manufacturer's instructions. For smaller gaps, a thin layer of self-leveling underlayment may be sufficient. Paying attention to these details ensures a uniform and stable surface for the tile installation.
Key Point 2: Employing Uncoupling Membranes
The next vital step is the installation of an uncoupling membrane. This membrane acts as a buffer between the OSB subfloor and the tile, allowing for independent movement between the two surfaces. OSB is susceptible to expansion and contraction due to changes in moisture content and temperature, which can exert stress on the tile layer, leading to cracks and grout failure. The uncoupling membrane absorbs these stresses, preventing them from transferring to the tile. Several types of uncoupling membranes are available, including sheet membranes and liquid-applied membranes. Sheet membranes typically consist of a plastic or rubber material with a textured surface that allows for the thin-set mortar to bond securely. These membranes are typically applied using a modified thin-set mortar, ensuring proper adhesion to both the OSB subfloor and the membrane itself. Liquid-applied membranes form a waterproof layer that also decouples the tile from the subfloor. These membranes are applied with a roller or brush, creating a seamless barrier that protects the OSB from moisture and allows for independent movement. Regardless of the type of uncoupling membrane chosen, it is crucial to follow the manufacturer's instructions carefully to ensure proper installation and performance. Overlapping the membrane seams according to the product specifications is essential to prevent moisture penetration and maintain the integrity of the decoupling layer. An uncoupling membrane significantly reduces the risk of tile cracking and ensures a more durable and long-lasting tile installation over an OSB subfloor.
In addition to its decoupling properties, some uncoupling membranes also provide waterproofing benefits, making them an ideal choice for bathroom applications. Bathrooms are inherently prone to moisture exposure, and protecting the subfloor from water damage is crucial for preventing mold growth and structural issues. If the chosen uncoupling membrane does not provide waterproofing, consider applying a separate waterproofing membrane over the OSB before installing the decoupling layer. Ensure that the waterproofing membrane is compatible with the chosen decoupling membrane and follow the manufacturer's instructions for proper application. Proper waterproofing, in conjunction with decoupling, significantly enhances the durability and longevity of the tile installation in a bathroom environment.
Key Point 3: Selecting the Right Mortar and Grout
Choosing the appropriate mortar and grout is critical for achieving a successful tile installation over an OSB subfloor. Due to OSB's flexibility and potential for movement, a modified thin-set mortar specifically designed for use with wood subfloors and uncoupling membranes is essential. These mortars typically contain polymers that enhance their flexibility and bond strength, allowing them to accommodate the movement of the OSB without cracking or losing adhesion. Avoid using unmodified thin-set mortars, as these are more rigid and prone to cracking when subjected to movement. When selecting a modified thin-set mortar, consider the type of tile being installed. Larger tiles may require a different type of mortar than smaller tiles, so consult the tile manufacturer's recommendations. Follow the mortar manufacturer's instructions carefully when mixing the mortar, ensuring the correct water-to-mortar ratio. Mixing the mortar too wet or too dry can compromise its performance and lead to adhesion issues. Apply the mortar evenly to both the subfloor and the back of the tile, using the appropriate trowel size to achieve proper mortar coverage. Back-buttering the tiles, especially larger ones, ensures optimal adhesion and minimizes the risk of voids beneath the tile.
The choice of grout is equally important. In a bathroom environment, a waterproof or water-resistant grout is highly recommended to prevent moisture penetration and staining. Epoxy grout is an excellent option due to its superior water resistance and durability. However, epoxy grout can be more challenging to install than cement-based grout due to its faster setting time and higher viscosity. Cement-based grouts are a more common choice, but it is essential to select a grout that is specifically formulated for use in wet environments and sealed properly following installation. Sealing the grout with a high-quality grout sealer helps to prevent water absorption, staining, and mold growth. Reapply the grout sealer periodically, as recommended by the manufacturer, to maintain its effectiveness. Selecting the right mortar and grout, in conjunction with proper installation techniques, ensures a watertight and durable tile installation that can withstand the demands of a bathroom environment.
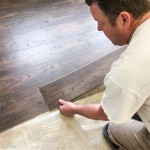
During the actual tile laying process, maintain consistent grout lines using spacers to ensure a uniform appearance. Gently press each tile into the mortar bed, ensuring full contact and proper alignment. After the mortar has cured according to the manufacturer's instructions, remove the tile spacers and apply the chosen grout according to the manufacturer's guidelines. Clean excess grout from the tile surface promptly to prevent it from hardening and becoming difficult to remove. Once the grout has cured, apply a grout sealer to protect it from moisture and staining. Regular cleaning and maintenance will help to prolong the life and beauty of the newly tiled bathroom floor.
In summary, successfully laying tile over an OSB subfloor in a bathroom requires meticulous preparation, careful material selection, and adherence to best practices. Focusing on subfloor reinforcement, employing an uncoupling membrane, and choosing appropriate mortar and grout are essential for mitigating the risks associated with OSB's inherent properties. Throughout each stage of the project, consult manufacturer instructions and adhere to local building codes to ensure a safe, durable, and aesthetically pleasing result.

How To Install Cement Board On A Floor Diy Family Handyman

Bathroom Subfloor Prep For Tile Pelican Parts Forums

Kitchen Bath Prepping Wood Framed Floors For Tile Jlc

How To Prepare A Subfloor For Tile Installation The Home

Tile Underlayment The Complete Guide For Beginners Diytileguy

How To Prepare A Subfloor For Tile Installation The Home

Tile Underlayment The Complete Guide For Beginners Diytileguy

Subfloor Requirements Before You Tile Ingofloor

Tile Over Concrete Subfloor An Easy Diy Tutorial

Bathroom Subfloor Features Benefits Cost And Types
See Also