Laying Pergo Flooring - A Step-By-Step Guide
Pergo flooring is a popular choice for homeowners due to its durability, ease of installation, and affordable price. If you're planning to install Pergo flooring in your home, follow these steps to ensure a successful project.
1. Preparation
Before you begin, make sure you have all the necessary tools and materials. You will need a tape measure, a level, a utility knife, a hammer, and a tapping block. You will also need underlayment, a vapor barrier, and Pergo flooring planks.
2. Measure the Room
The first step is to measure the room to determine how much flooring you will need. Measure the length and width of the room, and multiply those numbers to get the square footage. Add 10% to the square footage to account for waste.
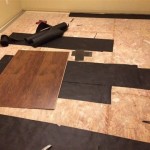
3. Install the Underlayment
The underlayment is a thin layer of material that goes between the subfloor and the Pergo flooring. It helps to reduce noise and protect the flooring from moisture. Roll out the underlayment over the subfloor, and use tape to secure it in place.
4. Install the Vapor Barrier
The vapor barrier is a thin layer of plastic that goes over the underlayment. It helps to prevent moisture from seeping up through the subfloor and damaging the flooring.
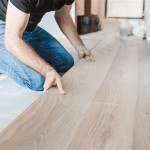
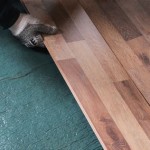
5. Lay the First Row of Planks
The first row of planks should be laid along one of the longest walls in the room. Start by measuring and cutting the first plank to fit. Place the plank in place, and use a hammer and tapping block to tap it into place. Continue laying the planks in the row, tapping each one into place.
6. Continue Laying the Planks
Once you have the first row of planks in place, you can continue laying the planks in the rest of the room. Start by laying the planks in the second row, and then continue laying the planks in the remaining rows.
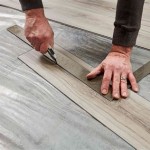
7. Trim the Planks
Once you have all the planks in place, you will need to trim the planks around the edges of the room. Measure and cut the planks to fit, and then use a hammer and tapping block to tap them into place.
8. Install the Moldings
The moldings are the finishing touch for your Pergo flooring. They cover the gaps between the flooring and the walls. Measure and cut the moldings to fit, and then use a nail gun to attach them to the wall.
9. Enjoy Your New Floor
Once the moldings are in place, your Pergo flooring is complete. You can now enjoy your new floor for years to come.

Mannington Restoration Wide Hillside Hickory Stone 28211 Laminate Flooring

Mannington Restoration Wide Hillside Hickory Stone 28211 Laminate Flooring

Mannington Restoration Hillside Hickory Stone Flooring Market

Introduction To Flooring Ladies Diy Training Center

Mannington Restoration Wide Haven Coffee 28612 Laminate Flooring

Top 10 Best Flooring By In Portsmouth Va November 2024 Yelp

Home Decorators Collection Woodland Beach Break 12 Mil X 7 1 In W 48 L Lock Waterproof Luxury Vinyl Plank Flooring 23 8 Sq Ft Case Vtrhdbeabre7x48 The

Mannington Restoration Wide Blacksmith Oak Steam 28300 Laminate Flooring

Home Decorators Collection Woodland Beach Break 12 Mil X 7 1 In W 48 L Lock Waterproof Luxury Vinyl Plank Flooring 23 8 Sq Ft Case Vtrhdbeabre7x48 The

Top Safety Guide Channel For Sliding Interior And Exterior Doors Straightaway
See Also