How to Remove Engineered Wood Flooring
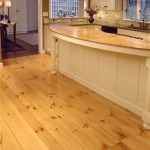
Engineered wood flooring offers a blend of aesthetic appeal and relative affordability, making it a popular choice for residential and commercial spaces. However, circumstances may arise where its removal becomes necessary. This could be due to water damage, a desire for a flooring upgrade, or simply preparing the subfloor for a different type of flooring installation. Removing engineered wood flooring is a project that can be undertaken by a homeowner, although it requires patience, the right tools, and a methodical approach. The level of difficulty primarily depends on how the flooring was initially installed – whether it was glued down, nailed, or installed as a floating floor.
The removal process varies significantly depending on the installation method. Glued-down engineered wood presents the most challenging scenario, requiring significant effort and specialized tools. Nailed-down floors are less difficult but still require careful attention to avoid damaging the subfloor. Floating floors, which are typically clicked together, are the easiest to remove, often requiring minimal effort.
Before commencing the removal process, it is crucial to identify the installation method. Look for clues such as visible nails or staples along the perimeter of the room. If these are present, the flooring is likely nailed down. If no visible fasteners are apparent, try lifting a corner of the flooring. If it appears to be directly adhered to the subfloor, it is likely glued down. If the flooring easily separates and seems to be interlocked with adjacent planks, it is a floating floor.
Preparing for the Removal Process
Prior to starting the removal process, adequate preparation is essential to ensure a safe and efficient workflow. This involves gathering the necessary tools and materials, protecting the surrounding area, and taking necessary safety precautions.
The required tools will vary depending on the installation method, but some general tools will be needed regardless. These include: a pry bar, a hammer, a utility knife, a scraper (for glued-down floors), safety glasses, work gloves, a dust mask or respirator, and trash bags or buckets for debris removal. For nailed-down floors, a nail puller or punch may be helpful. For glued-down floors, a floor scraper, a heat gun, or a chemical adhesive remover may be necessary. If using power tools, such as a reciprocating saw or power scraper, ensure they are in good working order and that appropriate safety gear is used.
Protecting the surrounding area is crucial to prevent damage and simplify cleanup. Cover any adjacent flooring with drop cloths or plastic sheeting. Seal doorways with plastic sheeting to contain dust and debris. Clear the room of all furniture and other obstructions. Ensure adequate ventilation, especially if using adhesive removers, which often release fumes.
Safety is paramount throughout the removal process. Always wear safety glasses to protect your eyes from flying debris. Work gloves will protect your hands from splinters and sharp edges. A dust mask or respirator is essential to prevent inhalation of dust and airborne particles, especially when dealing with older flooring that may contain asbestos (particularly in the adhesive). It is also advisable to wear knee pads to reduce strain and discomfort during prolonged periods of kneeling or working close to the floor.
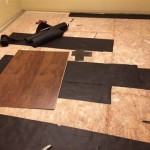
Removing Floating Engineered Wood Flooring
Floating engineered wood flooring is designed for easy installation and removal. The planks or tiles are typically interlocked using a tongue-and-groove system, creating a “floating” surface that is not directly attached to the subfloor.
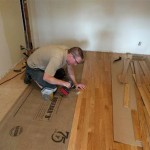
Begin by identifying a starting point, typically along a wall or in a corner of the room. Remove the baseboards or quarter-round molding along the perimeter of the room. This is usually done using a pry bar, being careful not to damage the wall or the molding itself, if you intend to reuse it. Score along the top edge of the molding with a utility knife to prevent the paint from chipping.
Once the molding is removed, you should be able to access the edges of the flooring planks. Carefully lift the edge of the first plank using a pry bar or a flat-head screwdriver. Once you have enough leverage, gently pull the plank upwards and outwards, disengaging it from the adjacent planks. In some cases, you may need to use a rubber mallet to gently tap the planks apart from the underside.
Continue removing the planks one by one, working your way across the room. As you remove each plank, stack them neatly to facilitate disposal or reuse. Pay attention to the interlocking mechanism of the planks to understand how they connect and disconnect. This will make the removal process smoother and easier.
Once all the planks have been removed, inspect the subfloor for any debris or damage. Sweep or vacuum the subfloor to remove any dust, dirt, or remnants of the underlayment. If there are any damaged areas in the subfloor, repair them before installing new flooring.
Removing Nailed-Down Engineered Wood Flooring
Nailed-down engineered wood flooring is secured to the subfloor using nails or staples. This method provides a more secure and stable installation compared to floating floors, but it also makes removal more challenging.
Similar to removing floating floors, begin by removing the baseboards or quarter-round molding around the perimeter of the room. Score the top edge with a utility knife before prying them off to prevent paint damage.
Locate the first plank you want to remove. Using a pry bar and hammer, carefully lift the edge of the plank. Work slowly and apply steady pressure to avoid splintering the wood or damaging the subfloor. The goal is to expose the nails or staples that are holding the plank in place.
Once you have exposed the fasteners, use a nail puller, a punch, or the claw of a hammer to remove them. A nail puller is designed specifically for removing nails without damaging the surrounding wood. A punch can be used to drive the nail heads below the surface of the wood, allowing you to pry the plank loose. If using a hammer, be careful not to strike the wood directly, as this can cause dents and scratches. Use a block of wood as a cushion to protect the flooring.
Continue removing the nails or staples from the plank, working your way along its length. Once all the fasteners have been removed, carefully lift the plank from the subfloor. If the plank is still difficult to remove, check for any remaining fasteners that may have been missed.
Repeat this process for each plank, working your way across the room. As you remove each plank, inspect the subfloor for any damage caused by the nails or staples. Fill any holes or imperfections with wood filler or patching compound.
After removing all the planks, thoroughly clean the subfloor by sweeping or vacuuming to remove any debris, dust, or remnants of nails or staples. The subfloor should be smooth and clean before installing new flooring.
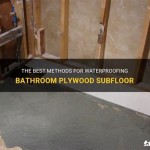
Removing Glued-Down Engineered Wood Flooring
Glued-down engineered wood flooring presents the most challenging removal scenario. The adhesive creates a strong bond between the flooring and the subfloor, making it difficult to separate the two without causing damage.
As with the other methods, start by removing the baseboards or quarter-round molding around the perimeter of the room. Score along the top of the molding to avoid paint damage when prying it off.
The key to removing glued-down flooring is to break the bond between the flooring and the adhesive. This can be achieved through various methods, including using a floor scraper, a heat gun, or a chemical adhesive remover.
A floor scraper is a long-handled tool with a sharp blade that is designed to scrape away the flooring from the subfloor. Use the scraper to pry up the edges of the planks and then push the blade under the plank to separate it from the adhesive. This method requires significant physical effort and can be time-consuming, but it is often the most effective way to remove firmly adhered flooring.
A heat gun can be used to soften the adhesive, making it easier to scrape away the flooring. Apply heat to a small area of the flooring for a few seconds, then immediately use the scraper to lift the plank. Be careful not to overheat the flooring, as this can damage the wood or release harmful fumes. Work in small sections and move the heat gun continuously to prevent scorching.
Chemical adhesive removers are designed to dissolve the adhesive, making it easier to remove the flooring. Follow the manufacturer's instructions carefully when using these products. Ensure adequate ventilation and wear appropriate protective gear, such as gloves and a respirator. Apply the adhesive remover to a small area of the flooring and allow it to soak in for the recommended time. Then, use the scraper to lift the plank. Repeat the process as needed.
Regardless of the method used, work slowly and carefully to avoid damaging the subfloor. Apply steady pressure and avoid using excessive force, as this can cause the subfloor to crack or splinter. If the adhesive is particularly stubborn, you may need to use a combination of methods to remove the flooring.
Once all the flooring has been removed, there will likely be residual adhesive remaining on the subfloor. This adhesive must be removed before installing new flooring. Use a floor scraper or chemical adhesive remover to remove the remaining adhesive. If using a chemical remover, follow the manufacturer's instructions carefully and ensure adequate ventilation.
After removing the adhesive, thoroughly clean the subfloor by scraping, sweeping, and vacuuming. The subfloor should be smooth, clean, and free of any debris or residue before installing new flooring. Consider using a self-leveling compound to create a perfectly even surface if the subfloor has been significantly damaged during the removal process.

How To Remove Hardwood Flooring The Easy Way

How To Remove Glued Wood Flooring And Engineered On Concrete

How To Remove Engineered Hardwood Floor Without Damage

How To Remove Engineered Hardwood Floor Without Damage

How To Remove Hardwood Flooring The Easy Way

How To Remove Hardwood Flooring The Easy Way

How To Remove Glued Wood Flooring Easy Diy Steps Faqs And Abbotts At Home

Guide To Removing And Replacing Real Wood Floors Diy Advice

How To Remove Glued Wood Flooring Easy Diy Steps Faqs And Abbotts At Home

Engineered Hardwood Flooring Removal
See Also