Replacing Laminate Flooring: A Step-by-Step Guide
Laminate flooring, a popular choice for many homes, offers durability and ease of installation. However, over time, it may become damaged or outdated, necessitating replacement. Here's a comprehensive guide to help you tackle this task:
Planning and Gathering Materials:
Measure the room to determine the amount of flooring needed. Purchase laminate planks that match the existing style or opt for a different look. Gather tools such as a pry bar, spacers, a circular saw, a hammer, and a tapping block.
Removing the Existing Flooring:
Start by removing any baseboards or moldings. Use a pry bar to carefully lift the planks, starting from a corner. Always wear safety glasses and gloves while handling laminate flooring.
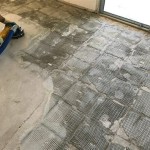
Preparing the Subfloor:
Inspect the subfloor for any unevenness or damage. If necessary, use a leveler to smooth out the surface. Ensure the subfloor is clean and dry before proceeding.
Installing the Underlayment:
Lay down the underlayment according to the manufacturer's instructions. This layer provides cushioning and soundproofing, enhancing the comfort and longevity of the new flooring.
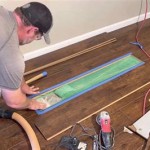
Installing the First Row:
Start laying the laminate planks along one wall. Use spacers to maintain an even gap around the perimeter. Tap the planks together using a tapping block and hammer, ensuring they are tightly fitted. Trim any excess length using a circular saw.
Continuing the Installation:
Continue installing rows of laminate planks, aligning them carefully and tapping them into place. Stagger the joints to prevent weak points in the flooring.
Trimming and Fitting:
Use a circular saw to cut planks to fit around obstacles such as doorways or pipes. Ensure a snug fit by using a tapping block and hammer.
Installing Baseboards and Moldings:
Once the flooring is complete, reinstall the baseboards or moldings. Use adhesive or nails to secure them firmly.
Tips for Success:
- Use a moisture barrier between the subfloor and underlayment in areas prone to moisture.
- Allow the flooring to acclimate to the room temperature for 24-48 hours before installation.
- Avoid using harsh chemicals or abrasive cleaners on the flooring.
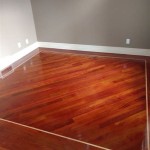
Conclusion:
Replacing laminate flooring can be an achievable DIY project with proper planning and execution. By following these steps carefully, you can enjoy a refreshed and durable flooring that will enhance the aesthetics and comfort of your home.

How To Remove Laminate Flooring Bob Vila

How To Easily Replace A Damaged Laminate Floor Plank Interior Design Wonderhowto

How Do I Remove Laminate Flooring Factory Direct

How To Remove Laminate Flooring Budget Dumpster

How To Replace Laminate Flooring Episode 7 Howtospecialist Build Step By Diy Plans

How To Repair Laminate Flooring Forbes Home

How To Replace Laminate Floor In Your House Thediyplan

How To Replace Warped Water Damaged Laminate Floor Boards

The Easiest Way To Remove Laminate Flooring

Replacing Lvp Flooring After Water Damage Elite Restoration
See Also