Guide To Installing Engineered Hardwood Flooring
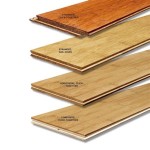
Engineered hardwood flooring is a popular choice for homeowners who want the look of hardwood floors without the high cost. It's also a good option for homes with moisture issues, as it's more resistant to water damage than solid hardwood. If you're thinking about installing engineered hardwood flooring in your home, here's a step-by-step guide to help you get started.
Step 1: Prepare the subfloor
The first step is to prepare the subfloor. This involves making sure that the subfloor is level, flat, and dry. If the subfloor is not level, you'll need to level it using a self-leveling compound. If the subfloor is not flat, you'll need to sand it down until it is smooth. And if the subfloor is not dry, you'll need to let it dry out before you can install the flooring.
Step 2: Install the underlayment
Once the subfloor is prepared, you can install the underlayment. The underlayment is a layer of material that goes between the subfloor and the flooring. It helps to reduce noise, insulate the floor, and provide a moisture barrier. There are many different types of underlayment available, so be sure to choose one that is appropriate for your needs.
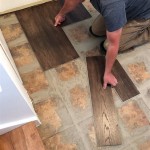
Step 3: Install the flooring
Now it's time to install the flooring. Start by laying out the planks in a dry fit to make sure that they fit together properly. Once you're satisfied with the layout, you can start gluing the planks down. Be sure to use a flooring adhesive that is specifically designed for engineered hardwood flooring.
Step 4: Trim the flooring
Once the flooring is glued down, you'll need to trim it around the edges of the room. You can use a miter saw to cut the planks at a 45-degree angle. This will create a clean, finished look.
Step 5: Sand and finish the flooring
The final step is to sand and finish the flooring. This will help to smooth out the surface of the floor and protect it from scratches and wear. You can use a belt sander or a random orbital sander to sand the floor. Once the floor is sanded, you can apply a finish of your choice. There are many different types of finishes available, so be sure to choose one that is appropriate for your needs.
Conclusion
Installing engineered hardwood flooring is a relatively simple process that can be completed in a few days. By following the steps in this guide, you can ensure that your flooring is installed correctly and looks great for years to come.

The Ultimate Guide To Engineered Hardwood Flooring Precision

How To Install Lock Engineered Hardwood Flooring

How To Install Lock Engineered Hardwood Flooring

Installation Guide How To Install Engineered Timber Flooring

Installing Hardwood Floors On A Budget Dumpster

Diy Engineered Hardwood Floor Installation Guide Four Generations One Roof Blog

Engineered Wood Floor Laying Flooring Installation Method

Installing Engineered Hardwood Flooring Your Guide Purezawood

Installing Engineered Hardwood On Concrete Twenty Oak

Tips For Installing An Engineered Hardwood Floor From The Forest Llc
See Also