Vinyl Plank Flooring: An Easy Install Guide for a Stunning Floor
Transforming your home's interior with vinyl plank flooring is a rewarding endeavor that can be tackled with ease. This comprehensive guide will walk you through the essential aspects of vinyl plank flooring installation, empowering you with the knowledge and confidence to achieve a professional-looking finish.
Materials and Tools
Gather the necessary materials and tools before commencing your installation:
- Vinyl planks: Calculate the square footage of your space and purchase sufficient planks for the area.
- Underlayment: An underlayment will provide a moisture barrier and enhance the floor's comfort and sound absorption.
- Trim molding: Trim pieces will cover expansion gaps along walls and enhance the overall aesthetics.
- Measuring tape and pencil: For precise measurements and marking.
- Utility knife: For cutting planks to size.
- Tapping block and pull bar: Essential for locking planks together and ensuring a tight fit.
- Adhesive tape: To secure underlayment and planks where necessary.
Preparation
Proper preparation is crucial for a successful installation:
- Remove existing flooring: If replacing existing flooring, it should be completely removed.
- Clean the subfloor: The subfloor should be clean, level, and dry. Repair any unevenness or damage.
- Install underlayment: If using underlayment, lay it perpendicular to the direction of plank installation.
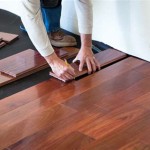
Installation
Follow these steps for hassle-free installation:
- Start in a corner: Place the first plank in the corner of the room, aligning it parallel to the wall.
- Interlock planks: Angle the second plank and lock it into the first plank's end. Continue locking planks together row by row.
- Fit around obstacles: Measure and cut planks to fit around obstacles, such as door frames and pipes.
- Tap into place: Use the tapping block and pull bar to ensure a tight fit between planks.
- Install trim molding: Install trim pieces around the perimeter of the room to enhance aesthetics and create expansion gaps.
- Sweep or vacuum regularly: Remove loose dirt and debris.
- Mop occasionally: Use a damp mop with mild detergent to clean the floor without damaging the finish.
- Avoid abrasive cleaners: Harsh chemicals can dull the finish, so avoid using them on vinyl planks.
- Protect from sunlight: Prolonged exposure to sunlight can cause discoloration, so use curtains or blinds to minimize direct sunlight.
Maintenance and Care
To keep your vinyl plank flooring looking its best, follow these maintenance tips:
Conclusion
Installing vinyl plank flooring is a straightforward and rewarding task that can transform your home's interior. By following the steps outlined in this guide, you can confidently achieve a professional-looking finish that will complement your décor and enhance your living space for years to come.

A Beginner S Guide To Installing Vinyl Plank Flooring Dumpsters Com

Beginner S Guide How To Install Vinyl Plank Flooring Anika Diy Life

A Complete Guide How To Stagger Vinyl Plank Flooring Whole Cabinet Supply

How To Install Vinyl Plank Flooring Few Simple Steps Guide

Installing Vinyl Floors A Do It Yourself Guide The Honeycomb Home Flooring Diy Plank

Post Nbl Express Eco Flooring

10 Beginner Mistakes Installing Vinyl Plank Flooring

Installing Vinyl Floors A Do It Yourself Guide The Honeycomb Home

Installing Vinyl Floors A Do It Yourself Guide The Honeycomb Home

How To Install Vinyl Plank Flooring Quick And Simple
See Also