Installing Vinyl Wood Flooring: A Comprehensive Guide
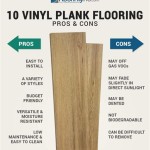
Vinyl wood flooring is a versatile and durable flooring option that has become increasingly popular in recent years. Its realistic wood-like appearance, coupled with its water resistance and ease of maintenance, make it an ideal choice for various rooms in your home. To ensure a successful installation, it is crucial to follow the proper steps and techniques.
1. Preparation and Planning
Before you begin the installation, it is essential to prepare the subfloor. Ensure it is level, clean, and dry. Repair any uneven areas or cracks. Plan the layout of the planks and consider the room's dimensions and the direction of the light to achieve the desired aesthetic effect.
2. Required Tools and Materials
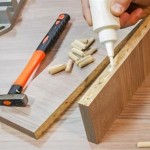
Gather the necessary tools and materials, including vinyl wood planks, underlayment, a utility knife, a straightedge, a tapping block, a spacer bar, and a moisture barrier if necessary. Refer to the manufacturer's instructions for specific tools and materials required.
3. Acclimating the Planks
Allow the vinyl wood planks to acclimate to the room's temperature and humidity for at least 24 hours before installation. This process ensures that the planks are in equilibrium with the environment and reduces the risk of expansion or contraction after installation.
4. Installing the Underlayment
In most cases, an underlayment is recommended beneath the vinyl wood flooring. It provides additional soundproofing, reduces the transmission of noise, and creates a smoother surface for the flooring. Roll out the underlayment and secure it with tape or staples.
5. Laying the First Row of Planks
Begin by laying the first row of planks along the longest wall in the room. Use a spacer bar to ensure an even gap along the edges. Lock the planks together by angling the edge of one plank and inserting it into the groove of the adjacent plank. Tap the planks into place using a tapping block.
6. Continuing the Installation
Continue laying subsequent rows of planks, staggering the seams for added strength. Use the straightedge and utility knife to cut the planks to fit around obstacles or at the end of rows. Ensure the planks are tightly locked together and there are no gaps or overlaps.
7. Trimming and Finishing
Once all the planks are installed, trim any excess material around the edges of the room using the utility knife. Install baseboards, quarter rounds, or other transition moldings to cover the expansion gap and provide a finished look to the flooring.
Conclusion
Installing vinyl wood flooring requires careful planning and precision. By following these essential steps and techniques, you can achieve a professional-looking, durable, and visually appealing floor that will enhance the aesthetics of your home for years to come.

How To Install Vinyl Flooring Planks

Installing Vinyl Plank Flooring How To Fixthisbuildthat

Laying Vinyl Planks The Right Way Expert Guide By Fantastic Handyman

How To Install Vinyl Plank Flooring In A Bathroom Fixthisbuildthat

How To Install Floating Vinyl Plank Flooring In 5 Easy Steps Riverbend Interiors

10 Beginner Mistakes Installing Vinyl Plank Flooring

How To Install Luxury Vinyl Plank Flooring Installing

Installing Vinyl Floors A Do It Yourself Guide The Honeycomb Home

How To Install Vinyl Plank Flooring As A Beginner Home Renovation

A Complete Guide How To Stagger Vinyl Plank Flooring Whole Cabinet Supply
See Also