Laying Vinyl Plank Flooring for a Stunning Finish
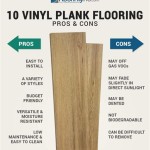
Vinyl plank flooring is a stylish and durable option that can transform the look of any room. Whether you're a seasoned DIYer or a complete novice, laying vinyl plank flooring is a project that can be completed in a weekend with the right tools and preparation. Follow these essential steps to ensure a professional-looking finish that will last for years to come.
Step 1: Prepare the Subfloor
The subfloor is the foundation of your vinyl plank flooring, so it's essential to prepare it properly. Remove any existing flooring, baseboards, and quarter rounds. The subfloor should be level, smooth, and dry. If the subfloor is not level, you may need to use a self-leveling compound to smooth it out. If the subfloor is not dry, you may need to use a moisture barrier to prevent moisture from damaging the flooring.
Step 2: Install the Underlayment
An underlayment is a thin layer of material that is installed between the subfloor and the vinyl plank flooring. It provides cushioning and helps to reduce noise. There are several different types of underlayment available, so choose one that is appropriate for your needs. Roll out the underlayment over the subfloor, making sure to overlap the seams.
Step 3: Start Laying the Vinyl Planks
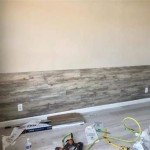
Start laying the vinyl planks from one corner of the room and work your way out. The first row should be straight and level, so use a chalk line to mark a guide. Click the planks together tightly, making sure that the edges are flush. Continue laying the planks in rows, staggering the joints between the rows. If you need to cut a plank to fit, use a utility knife or a circular saw.
Step 4: Trim the Planks
Once the vinyl planks are installed, you will need to trim them around the edges of the room. Use a utility knife or a circular saw to cut the planks to size. Be sure to leave a small gap around the edges of the room to allow for expansion and contraction.
Step 5: Install the Baseboards and Quarter Rounds
Once the vinyl plank flooring is installed, you can install the baseboards and quarter rounds. Baseboards cover the gap between the floor and the wall, while quarter rounds cover the gap between the baseboards and the floor. Use a miter saw to cut the baseboards and quarter rounds to size, and then nail them in place.
Step 6: Enjoy Your New Floor!
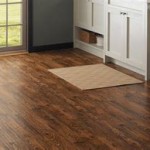
Your new vinyl plank flooring is now complete! Stand back and admire your handiwork. With proper care and maintenance, your new floor will last for years to come.

A Complete Guide How To Stagger Vinyl Plank Flooring Whole Cabinet Supply

How To Stagger Vinyl Plank Flooring Step By Guide World Floorcoverings

What Are The Advantages Of Loose Lay Vinyl Plank Impression Floors

Installing Vinyl Floors A Do It Yourself Guide The Honeycomb Home

A Beginner S Guide To Installing Vinyl Plank Flooring Dumpsters Com

Luxury Wood Vinyl Plank Highland Homes Flooring Options

Installing Vinyl Plank Flooring Lifeproof Waterproof Rigid Core Sustain My Craft Habit

Tips For Installing Vinyl Plank Over Concrete Floors Lemon Thistle

Installing Vinyl Plank Flooring How To Fixthisbuildthat

Installing Lifeproof Vinyl Plank Flooring Our Diy Guide Exquisitely Unremarkable
See Also