Vinyl Plank Flooring: A Step-by-Step Guide for Installing on Concrete
Transforming your home's flooring with vinyl plank flooring is a rewarding project that can significantly enhance the aesthetics and durability of your living spaces. This comprehensive guide will provide a step-by-step roadmap, ensuring a successful installation of vinyl plank flooring on concrete subfloors.
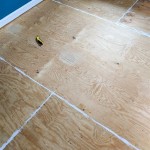
Step 1: Prepare the Concrete Surface
Flawless vinyl plank flooring installation begins with a well-prepared concrete surface. Ensure the concrete is level, smooth, and free from moisture or debris. Use a concrete leveler if necessary to correct any unevenness. Address moisture issues such as condensation or leaks before proceeding with the installation.
Step 2: Install a Moisture Barrier
To prevent moisture from damaging the flooring, apply a moisture barrier over the concrete. This layer, typically made of polyethylene sheeting or plastic underlayment, creates a barrier against moisture vapor transmission.
Step 3: Install the Underlayment
Underlayment provides cushioning and support for the vinyl plank flooring. Select an underlayment compatible with your flooring choice and install it according to the manufacturer's instructions. Use a utility knife or scissors to trim the underlayment to fit the room precisely.
Step 4: Determine the Starting Point
Decide on the starting point for your installation, typically the center of the room or a prominent wall. Measure and mark a center line perpendicular to the entrance of the room to guide the first row of planks.
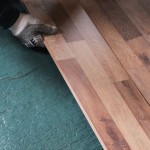
Step 5: Install the First Row
Start laying the first row of vinyl planks along the center line. Follow the manufacturer's instructions for joining the planks together, ensuring they interlock securely. Use a tapping block and hammer to ensure a tight fit.
Step 6: Continue Installation
Continue installing the remaining rows of vinyl planks, staggering the end joints by at least 6 inches. Dry-fit the planks before securing them to prevent misalignment. Maintain a consistent expansion gap around the perimeter of the room, using spacers to ensure the flooring can expand and contract freely.
Step 7: Trim and Finish
Once the flooring is installed, use a utility knife to trim the planks around obstacles such as walls, cabinets, and door frames. Install moldings, such as baseboards or quarter rounds, to cover the expansion gap and enhance the finished look.
Tips for Success
- Use high-quality materials and tools for optimal results.
- Allow the vinyl planks to acclimate to the room temperature for at least 24 hours before installing.
- Follow the manufacturer's instructions meticulously to ensure compatibility and warranty coverage.
- Use a heavy-duty roller to firmly press the planks into place.
- Maintain the recommended expansion gap around the perimeter to prevent buckling or damage.

How To Prepare A Concrete Floor For Vinyl Flooring Parrys

How To Install Vinyl Plank Flooring On Concrete Step By Tutorial

Tips For Installing Vinyl Plank Over Concrete Floors Lemon Thistle

Vinyl Plank Flooring Interior Design Fynes Designs

How To Install Vinyl Flooring On Concrete 4 Steps Diy Geeks

Vinyl Plank Flooring Interior Design Fynes Designs

Installing Vinyl Plank Flooring Step By Guide Homeserve Usa

Vinyl Plank Flooring Interior Design Fynes Designs

Laying Vinyl Planks The Right Way Expert Guide By Fantastic Handyman

Installing Laminate Flooring Over Concrete The Ultimate Guide Aa Floors
See Also