Installing Trafficmaster Flooring: A Comprehensive Guide
Trafficmaster flooring is renowned for its durability, ease of maintenance, and versatility. Whether you're embarking on a residential or commercial flooring project, installing Trafficmaster can transform your space with its exceptional performance and aesthetic appeal. This comprehensive guide will provide you with step-by-step instructions, essential tips, and troubleshooting advice to ensure a successful installation.
Pre-Installation Preparation
Before starting the installation process, it's crucial to conduct thorough preparation. Ensure that the subfloor is clean, dry, and level. Leveling compounds or underlayment may be necessary to address any imperfections. Allow the subfloor to dry before proceeding further.
Gathering Materials
For a successful installation, gather the necessary materials, including Trafficmaster flooring, underlayment (if required), moisture barrier, adhesive, trowel, spacers, and a utility knife. Ensure you have the correct adhesive type compatible with your chosen Trafficmaster flooring and subfloor.
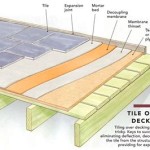
Moisture Barrier Installation
In areas prone to moisture or humidity, a moisture barrier is essential. Overlap the barrier by 6 inches at the seams and seal them with adhesive tape. This barrier will protect your flooring from potential moisture damage, ensuring its longevity.
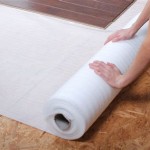
Underlayment Installation (Optional)
For added comfort, sound insulation, and protection against moisture, consider installing an underlayment beneath the Trafficmaster flooring. Place the underlayment over the moisture barrier and secure it according to the manufacturer's instructions.
Adhesive Application
Using the appropriate trowel, apply the adhesive to the subfloor. Follow the manufacturer's instructions for coverage and timing. Avoid applying too much adhesive, as this can lead to flooring movement or buckling.
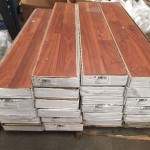
Plank Placement
Starting from a corner, place the first plank and use spacers to maintain uniform gaps between the planks. Ensure that the planks are aligned properly and pressed firmly into the adhesive. Continue installing the planks row by row, staggering the ends for stability.
Edge Trimming
When reaching a wall or obstacle, measure and cut the planks to fit the space. Use a utility knife or flooring cutter to make precise cuts. If necessary, use a jigsaw for intricate cuts.
Rolling and Compacting
Once the flooring is installed, use a roller or weighted object to compress the planks and ensure a tight bond with the adhesive. This step is crucial for securing the flooring and preventing movement. Allow the adhesive to cure according to the manufacturer's recommended time.
Finishing Touches
After the adhesive has cured, remove the spacers and clean any excess adhesive from the flooring surface. Install transition moldings, baseboards, or quarter rounds to complete the installation and enhance the overall aesthetics.
Troubleshooting
If you encounter any issues during or after the installation, consult these troubleshooting tips:
- Buckling: Ensure the subfloor is level and apply the adhesive evenly. Avoid excessive moisture exposure.
- Uneven gaps: Use spacers consistently and double-check the alignment of each plank before pressing it into the adhesive.
- Adhesive bleed-through: Use the correct adhesive type and coverage. If bleed-through occurs, remove it with a clean cloth.
- Plank separation: Ensure the adhesive has cured fully before removing the spacers. Use a roller or weighted object to compact the planks.
Conclusion
By following these comprehensive instructions and troubleshooting tips, you can achieve a successful Trafficmaster flooring installation that will enhance the beauty and functionality of your space. Remember to carefully prepare the subfloor, use appropriate materials, and follow the manufacturer's guidelines for adhesive application and curing times. With proper care and maintenance, your Trafficmaster flooring will provide years of exceptional performance and aesthetic appeal.

Trafficmaster Floor Installation Budget Friendly Home Remodeling

Trafficmaster Ceramica 12 X 24 Vinyl Tile Floor Installation

Trafficmaster Allure Vinyl Plank Flooring Installation

Trafficmaster Floor Installation Budget Friendly Home Remodeling

Allure By Trafficmaster Flooring Install Grip Strip Planking

Trafficmaster Allure Vinyl Plank Flooring Installation

Trafficmaster Allure Ultra Resilient Flooring Installation Review

Trafficmaster High Point Chestnut 4 Mil X 6 In W 36 L Grip Strip Water Resistant Luxury Vinyl Plank Flooring 24 Sqft Case 83313 The Home

Home Traffic Master Angle Tap Installation

Trafficmaster White Maple 4 Mil X 6 In W 36 L Grip Strip Water Resistant Luxury Vinyl Plank Flooring 24 Sqft Case 97011 The Home
See Also