Installation of Pergo Flooring: A Comprehensive Guide to Enhance Your Home's Interior
Pergo flooring, renowned for its durability, aesthetic appeal, and ease of maintenance, has become a popular choice for homeowners seeking to revamp their living spaces. Installing Pergo flooring can be a rewarding do-it-yourself project, yielding both aesthetic and functional benefits. This article delves into the essential aspects of Pergo flooring installation, guiding you through each step to ensure a successful outcome.
1. Preparation: Laying the Foundation for Success
Before embarking on the installation process, thorough preparation is crucial. This involves clearing the installation area, removing existing flooring and baseboards, and ensuring a level and clean subfloor. Any imperfections or unevenness should be addressed using leveling compound or a self-leveling underlayment to create a smooth and stable base.
2. Underlayment: Enhancing Comfort and Longevity
An underlayment serves as a cushioning layer between the subfloor and the Pergo flooring. Its primary purpose is to absorb impact, reduce noise, and compensate for minor subfloor irregularities. Choose an underlayment that is compatible with your specific Pergo flooring product and meets your desired level of comfort and sound reduction.
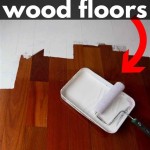
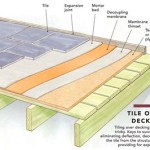
3. Moisture Barrier: Protecting Your Investment
In areas prone to moisture, such as kitchens and bathrooms, it is essential to install a moisture barrier between the subfloor and the underlayment. This barrier prevents moisture from seeping through and damaging the flooring. Use a polyethylene sheet with a thickness of at least 6 mils for optimal protection.
4. Installation Methods: Floating or Adhesive
Pergo flooring offers two primary installation methods: floating and adhesive. Floating floors are installed without the use of glue or adhesives, with the planks simply locking together. This method is ideal for DIY enthusiasts and allows for easy repairs if necessary. Adhesive installation, on the other hand, involves applying adhesive to the subfloor and then attaching the Pergo planks. It is a more permanent solution, providing enhanced stability and moisture resistance.
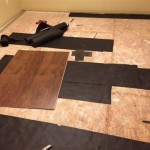
5. Planning the Layout: Maximizing Aesthetics and Efficiency
Before starting the installation, plan the layout to minimize waste and ensure a visually pleasing result. Determine the starting point and orientation of the planks, considering the room's shape and furniture placement. Use spacers to maintain consistent gaps between the planks and walls or obstacles.
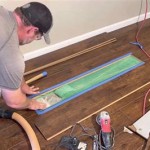
6. Cutting and Fitting: Precision in Every Plank
To accommodate irregular shapes or corners, cutting the Pergo planks may be necessary. Utilize a miter saw or a circular saw with a fine-tooth blade for precise cuts. Measure carefully and ensure the cuts are clean and perpendicular to the plank's length. Use a tapping block to gently tap the planks into place, avoiding excessive force.
7. Trims and Moldings: Finishing Touches for a Polished Look
Once the flooring is installed, trims and moldings serve to conceal expansion gaps around the perimeter of the room and provide a finished appearance. Install baseboards along the walls and transition moldings where the flooring meets other flooring types, such as tile or carpet. Use a brad nailer or adhesive to secure the trims and moldings in place, ensuring a seamless and professional-looking installation.
Conclusion
With careful preparation, attention to detail, and the right tools, installing Pergo flooring in your home can be a fulfilling and rewarding experience. By following the steps outlined in this article, you can enhance the beauty, durability, and comfort of your living space while enjoying the satisfaction of a job well done. Remember to refer to the specific instructions provided by the Pergo flooring manufacturer for your chosen product, as slight variations may exist depending on the type of flooring and installation method.

How To Install Pergo Flooring Easy Diy From Start Finish

Installing Pergo Floors In Your Home Yourself Giant Floor Carpeting Scranton Wilkes Barre Bartonsville

6 Steps For Installing Laminate Flooring The Home

Cost Of Pergo Flooring Installation In 2024 Forbes Home

Common Mistakes When Laying Laminate Flooring Next Day Floors

How To Install Diy Laminate Hardwood And Vinyl Flooring Pergo

How To Install Lock Engineered Hardwood Flooring

How To Install Laminate Flooring On Staircase Step By Guide

Determining The Direction To Lay Install Hardwood Laminate Or Luxury Vinyl Plank Flooring

Tips For Diy Flooring Projects Everything You Need To Know
See Also