A Step-by-Step Guide to Installing Engineered Hardwood Flooring
Engineered hardwood flooring, a popular choice among homeowners, provides the aesthetic appeal of natural hardwood with enhanced durability and moisture resistance. Installing engineered hardwood flooring is a satisfying project that can transform your living space with a touch of elegance and sophistication.
Step 1: Planning and Preparation
Before embarking on the installation process, careful planning and preparation are crucial. Start by determining the amount of flooring required and purchasing additional materials to account for waste. Gather essential tools, including a tape measure, a circular saw, a pry bar, and a rubber mallet.
Step 2: Acclimation
To prevent buckling or warping, engineered hardwood flooring must be acclimated to the room's temperature and humidity for at least 48 hours before installation. Stack the planks loosely in the room and remove the straps to allow air circulation.
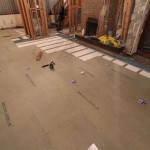
Step 3: Subfloor Preparation
Ensure that the subfloor is clean, level, and dry. Remove any debris, level out any uneven areas, and repair any damaged sections. A level subfloor is essential for a flat and stable flooring installation.
Step 4: Laying the Underlayment
Underlayment provides a moisture barrier, reduces noise, and helps level the subfloor. Roll out the underlayment perpendicular to the direction in which the flooring will be installed. Use a utility knife to cut the underlayment to fit the room's dimensions.
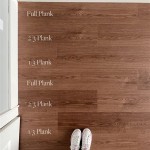
Step 5: Starting the Installation
Begin installing the flooring by laying the first row of planks along a straight wall. Use a spacer to maintain an expansion gap of about 1/4 inch around the perimeter of the room. Secure the planks using a nail gun or a flooring stapler.
Step 6: Continuing the Installation
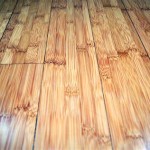
Continue the installation by staggering the joints of the planks in each row. Use a rubber mallet and tapping block to gently tap the planks into place. Ensure that the planks are secured tightly but not excessively.
Step 7: Cutting and Fitting
As you reach corners and obstacles, you'll need to cut the planks to fit. Use a circular saw to make precise cuts and a pry bar to remove any excess material. Be careful not to cut too much, as gaps between the planks will compromise the structural integrity of the flooring.
Step 8: Finishing Touches
Once the installation is complete, remove the spacers and install baseboards or moldings around the perimeter to conceal the expansion gap and provide a finished look. Vacuum or sweep the floor to remove any dust or debris.
Tips for a Successful Installation
- Ensure that the subfloor is properly prepared and free of moisture.
- Use a high-quality underlayment to enhance durability and comfort.
- Acclimate the flooring to the room's conditions before installation.
- Stagger the joints of the planks to prevent buckling or warping.
- Secure the planks tightly but avoid excessive force.
- Use a tapping block to avoid damaging the planks while tapping them into place.
Conclusion
Installing engineered hardwood flooring can be a rewarding experience that enhances the beauty and value of your home. By following these steps carefully, you can achieve a professional-looking installation that will provide years of enjoyment and durability.

Guide How To Install Engineered Hardwood Floors

How To Install Lock Engineered Hardwood Flooring

How To Install Lock Engineered Hardwood Flooring

A Comprehensive Guide On Engineered Wood Flooring Installation Mersey

How To Install Lock Engineered Hardwood Flooring

How To Install Engineered Hardwood Floors 4 Easy Installation Options

Installing Engineered Hardwood On Concrete Twenty Oak

Diy Engineered Hardwood Floor Installation Guide Four Generations One Roof Blog

Engineered Wood Flooring Project Step By Guide To Laying An Floor

How Much Does It Cost To Install Engineered Hardwood Floors Floorings
See Also