How to Install Cork Flooring: A Comprehensive Guide
Cork flooring is a unique and sustainable flooring option that offers numerous benefits, including durability, moisture resistance, and thermal insulation. Installing cork flooring is a relatively straightforward process that can be completed by DIY enthusiasts with basic tools and some preparation. Here is a detailed guide to help you install cork flooring successfully:
1. Preparation
Before beginning the installation, it's crucial to ensure that your subfloor is level, dry, and free of any irregularities. If necessary, you may need to level the subfloor using leveling compound or plywood. Additionally, make sure that the subfloor is clean by sweeping or vacuuming to remove any debris or dust.
2. Acclimation
Cork flooring needs to acclimate to the temperature and humidity of the room where it will be installed. Place the closed boxes of cork flooring in the room for at least 48 hours before installation to allow the planks to adjust to the environment.
3. Layout
Start by determining the center point of the room and then lay out the first row of planks perpendicular to the longest wall. Use spacers to maintain even gaps between the planks and the walls. Continue laying the subsequent rows, ensuring that the joints between the planks are staggered by at least 6 inches.
4. Cutting Planks
You will need to cut planks to fit around obstacles or to complete the last row. Measure and mark the planks before cutting them using a utility knife or a power saw. For precise cuts, use a miter saw or a table saw.
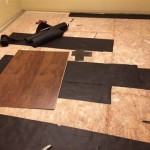
5. Adhesion
Cork flooring can be installed using glue-down or floating methods. For glue-down installation, apply a thin layer of adhesive to the subfloor and then lay the cork planks. Use a heavy roller to press the planks firmly into place. For floating installation, use an underlayment and connect the planks using a locking system.
6. Transitions
If you are transitioning from cork flooring to another type of flooring, you will need to install transition strips or moldings. Measure and cut the transitions to fit the space and secure them using nails or adhesive.
7. Sealer
Once the cork flooring is installed, apply a sealer to protect the surface and enhance its durability. Use a roller or a paintbrush to apply the sealer evenly and allow it to dry completely.
Tips:
- Use a chalk line to ensure straight cuts and alignment.
- Wear kneepads for comfort while working on the floor.
- Keep a damp cloth on hand to wipe away any excess adhesive or sealer.
- Allow the flooring to cure for at least 24 hours before walking or placing furniture on it.
- Regular maintenance, including vacuuming or mopping, will help preserve the beauty and longevity of your cork flooring.
By following these steps and incorporating these tips, you can successfully install cork flooring in your home and enjoy its unique benefits for years to come.

How To Install A Floating Cork Floor Young House Love

Cork Flooring Tiles Or Floating Floor Icork

Complete Guide To Cork Flooring Installation Deerfoot Carpet

How To Install A Floating Cork Floor Young House Love

How To Install Cork Floor Forna Floating Flooring Icork
:max_bytes(150000):strip_icc()/cork_flr_construction-56a4a1dd5f9b58b7d0d7e81b.jpg?strip=all "What Is Cork And Where Does It Come From")
What Is Cork And Where Does It Come From

Discontinued Cali Cork Flooring Floated Lock Installation

How To Install Cork Flooring

Complete Guide To Cork Flooring Installation Deerfoot Carpet

How To Install A Floating Cork Floor Young House Love
See Also