Tranquility Flooring Installation: A Comprehensive Guide for Homeowners
Installing Tranquility flooring can transform the look and feel of your home, providing a luxurious and durable surface that enhances both style and comfort. This guide will walk you through the essential aspects of Tranquility flooring installation, from preparation to completion, ensuring a successful and satisfactory result.
1. Preparation
Before embarking on the installation process, proper preparation is crucial. Ensure that the subfloor is level, smooth, and dry. Remove any existing flooring or carpeting and check for any imperfections that need to be addressed. A moisture barrier may be necessary to prevent moisture from damaging the flooring from below.
2. Tools and Materials
Gather the necessary tools and materials for the installation. These may include a measuring tape, utility knife, jigsaw, hammer, nails or adhesive, a tapping block, and a flooring underlayment.
3. Acclimation
Before installing the flooring, allow it to acclimate to the temperature and humidity of the room where it will be installed. This process typically takes 24 to 48 hours and ensures that the flooring will expand and contract naturally once installed, preventing buckling or gaps.
4. Layout the Flooring
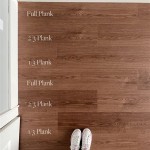
Start by laying out the first row of flooring along a straight wall. Ensure that the edges are flush against the wall and use spacers to maintain consistent gaps throughout the installation. Work your way across the room, staggering the joints of adjacent rows to create a more stable and durable floor.
5. Cutting the Flooring
Use a jigsaw or utility knife to cut the flooring planks to fit around obstacles such as doorways, corners, or pipes. Measure carefully and make precise cuts to ensure a seamless fit.
6. Nailing or Gluing
Depending on the type of Tranquility flooring you have chosen, you will either nail or glue the planks into place. For nailing, use flooring nails and a tapping block to drive the nails through the tongue of the planks. For gluing, apply adhesive to the subfloor and press the planks firmly into place.
7. Trim and Baseboards
Once the flooring is installed, cut and install trim to cover the expansion gap around the perimeter of the room. Additionally, install baseboards to conceal the transition between the flooring and the walls, giving the room a finished and polished look.
8. Maintenance
Regular maintenance is essential to preserve the beauty and longevity of your Tranquility flooring. Sweep or vacuum regularly to remove dirt and prevent scratches. Use a damp mop with a neutral cleaner for occasional deep cleaning. Avoid using harsh chemicals or abrasive cleaning products.
Additional Tips
- Consider hiring a professional flooring installer if you are not confident in DIY projects. - Always use high-quality materials and follow the manufacturer's instructions carefully. - If you encounter any problems during installation, don't hesitate to seek professional advice. - With proper care and maintenance, Tranquility flooring can provide years of beauty and value to your home.

Tranquility Vinyl Floor Installation

Tranquility Xd 4mm Rail Tie Oak Waterproof Luxury Vinyl Plank Flooring 7 08 In Wide X 48 Long Ll

Tranquility 3mm Classic Red Oak Waterproof Luxury Vinyl Plank Flooring 7 56 In Wide X 48 Long Ll

Tranquility Ultra 5mm River Walk Oak Waterproof Luxury Vinyl Plank Flooring 6 In Wide X 48 Long Ll

Tranquility Ultra 5mm Fieldstone Oak Waterproof Luxury Vinyl Plank Flooring 6 65 In Wide X 48 Long Ll

Tranquility 5mm Rustic Acacia Resilient Vinyl Flooring Contemporary Living Room Other By Ll Houzz

Ethos Signature Luxury Vinyl Plank Lvp Tranquility Floors Alberta Hardwood

Tranquility Ultra 5mm Copper Ridge Waterproof Luxury Vinyl Plank Flooring 6 65 In Wide X 48 Long Ll

Tranquil Collection New Smooth Hardwood Flooring

Mohawk Tranquility Seeker 9 Lvp Tsv21 Discount Woodwudy Whole Flooring
See Also
