How to Lay Vinyl Plank Flooring on Concrete
Installing vinyl plank flooring on concrete is a relatively simple process that can be completed in a few hours. By following these steps, you can achieve a professional-looking floor that will last for years to come.
Materials You Will Need
- Vinyl plank flooring
- Underlayment
- Adhesive
- Spacers
- Utility knife
- Tapping block
- Measuring tape
- Chalk line
Step 1: Prepare the Concrete
The first step is to prepare the concrete. This involves cleaning the surface thoroughly to remove any dirt or debris. Once the concrete is clean, you should check for any cracks or uneven areas. If there are any cracks, you should fill them with a concrete patching compound. If there are any uneven areas, you should level them out using a self-leveling concrete compound.
Step 2: Install the Underlayment
Once the concrete is prepared, you can install the underlayment. The underlayment will provide a cushion for the vinyl plank flooring and help to reduce noise. There are a variety of different types of underlayment available, so you should choose one that is appropriate for your needs. Once you have chosen an underlayment, you can install it by rolling it out over the concrete and taping the seams.
Step 3: Apply the Adhesive
Once the underlayment is installed, you can apply the adhesive. The adhesive should be applied to the concrete using a notched trowel. Be sure to apply the adhesive evenly and to avoid getting it on the vinyl plank flooring. Once the adhesive has been applied, you should let it dry for about 10 minutes.
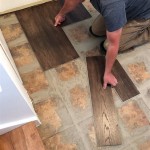
Step 4: Lay the Vinyl Plank Flooring
Once the adhesive has dried, you can start laying the vinyl plank flooring. Start by laying the first plank in the corner of the room. Use spacers to ensure that there is a small gap between the plank and the wall. Once the first plank is in place, you can continue laying the rest of the planks by snapping them together. Be sure to stagger the joints of the planks to create a more natural look.
Step 5: Tap Down the Planks
Once the vinyl plank flooring is laid, you should tap it down into place using a tapping block. This will help to ensure that the planks are securely attached to the concrete. Be sure to tap the planks evenly so that they do not buckle or crack.
Step 6: Trim the Excess Flooring
Once the vinyl plank flooring is tapped down, you should trim the excess flooring around the edges of the room. You can do this using a utility knife. Be sure to score the flooring before cutting it to avoid chipping or breaking it.
Step 7: Clean the Floor
Once the excess flooring has been trimmed, you should clean the floor. You can do this using a broom or a vacuum cleaner. Be sure to remove all of the dust and debris from the floor.
Enjoy Your New Floor!
Once the floor is clean, you can enjoy your new vinyl plank flooring. Vinyl plank flooring is a durable and easy-to-maintain flooring option that will last for years to come.

How To Prepare A Concrete Floor For Vinyl Flooring Parrys

Easy Ways To Install Vinyl Plank Flooring On Concrete

How To Install Vinyl Plank Flooring On Concrete Step By Guide

How To Install Vinyl Plank Flooring On Concrete Step By Tutorial

Tips For Installing Vinyl Plank Over Concrete Floors Lemon Thistle

10 Beginner Mistakes Installing Vinyl Plank Flooring

Laying Vinyl Planks The Right Way Expert Guide By Fantastic Handyman

Tips And Tricks For Installing Vinyl Plank Over Concrete Floors Riverbend Interiors

How To Install Vinyl Plank Flooring On Concrete Base

Concrete Subfloor Preparation For The Vinyl Floor Installation How To Diy Mryoucandoityourself
See Also