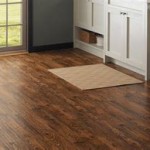
Installing Glue Down Vinyl Plank Flooring On Concrete
Installing glue-down vinyl plank flooring on concrete is a relatively easy project that can be completed in a weekend. By following these steps, you can ensure a professional-looking and durable floor.
Before you begin, you will need to gather the following materials:
- Vinyl plank flooring
- Concrete adhesive
- Notched trowel
- Tape measure
- Utility knife
- Chalk line
- Hammer
- Nail set
- Protective eyewear
- Gloves
Once you have gathered your materials, you can begin the installation process.
Step 1: Prepare the concrete
The first step is to prepare the concrete by cleaning it thoroughly. This will remove any dirt, dust, or debris that could interfere with the adhesion of the glue. Once the concrete is clean, you will need to allow it to dry completely.
Step 2: Measure and cut the planks
Once the concrete is dry, you can begin measuring and cutting the planks. To do this, you will need to measure the length and width of the room. Once you have the measurements, you can use a chalk line to mark the cutting lines on the planks. Be sure to cut the planks square, as this will help to ensure a tight fit.
Step 3: Apply the adhesive
Once the planks are cut, you can begin applying the adhesive. To do this, you will need to use a notched trowel to spread the adhesive evenly over the concrete. Be sure to apply the adhesive in the direction of the planks.
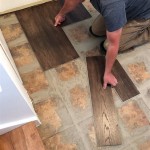
Step 4: Install the planks
Once the adhesive is applied, you can begin installing the planks. To do this, simply place the planks in the adhesive and press them down firmly. Be sure to stagger the joints of the planks as you go. This will help to create a stronger floor.
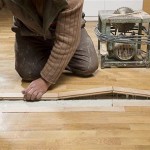
Step 5: Trim the planks
Once the planks are installed, you will need to trim the edges of the floor. To do this, you will need to use a utility knife to score the planks along the edges of the room. Once the planks are scored, you can simply snap them off.
Step 6: Clean the floor
Once the floor is trimmed, you will need to clean it. To do this, simply sweep or vacuum the floor to remove any dirt or debris. Once the floor is clean, you can enjoy your new vinyl plank flooring.
By following these steps, you can install glue down vinyl plank flooring on concrete like a pro. With a little effort, you can create a beautiful and durable floor that will last for years to come.

How To Install Glue Down Vinyl Plank

Laying Vinyl Planks The Right Way Expert Guide By Fantastic Handyman

How To Prepare A Concrete Floor For Vinyl Flooring Parrys

Easy Ways To Install Vinyl Plank Flooring On Concrete

How To Install Glue Down Flooring Over Concrete Subfloor Ll Formerly Lumber Liquidators

How To Install Plank Vinyl Glue Down

How To Prepare Concrete For Glued Down Vinyl Floors Parrys Flooring Solutions

How To Install L And Stick Vinyl Plank Flooring The Nifty Nester

Floor Prep More Critical Than Ever For Lvt Lvp Trends Installation

How To Install Glue Down Vinyl Plank Flooring Step By Tutorial
See Also