How to Lay Vinyl Flooring on Uneven Concrete
Installing vinyl flooring on uneven concrete requires additional preparation steps to ensure a smooth and stable surface. Here's a comprehensive guide to help you achieve a professional-looking finish:
Materials You'll Need:
* Vinyl flooring * Underlayment (moisture barrier and leveling) * Self-leveling compound * Measuring tape * Level * Trowel * Notched spreader * Adhesive * Vinyl flooring roller * Seam rollerStep 1: Prepare the Concrete Surface
* Clean the concrete thoroughly to remove any dirt, debris, or old flooring adhesive. * Check for high spots or irregularities using a level. * Grind down any high spots using a concrete grinder or scarifier. * Fill any cracks or holes with a concrete patching compound. * Allow the concrete to cure for the recommended time.Step 2: Apply Self-Leveling Compound
* Mix the self-leveling compound according to the manufacturer's instructions. * Divide the area into smaller sections. * Pour the compound onto the uneven section and spread it evenly using a trowel. * Ensure the compound fills all gaps and depressions. * Let the compound cure completely following the manufacturer's guidelines.Step 3: Install Underlayment
* Lay the moisture barrier over the entire floor. * Overlap the seams and tape them together. * Install the leveling underlayment over the moisture barrier. * Ensure the underlayment covers the entire floor without gaps.Step 4: Measure and Cut Vinyl Flooring
* Determine the layout of the vinyl planks, allowing for expansion gaps. * Mark and cut the first plank to fit along the longest wall. * Continue cutting and placing the planks, staggering the joints for strength.Step 5: Apply Adhesive
* Using a notched spreader, apply adhesive to the back of the vinyl planks. * Follow the manufacturer's instructions for adhesive type and application thickness.Step 6: Install Vinyl Flooring
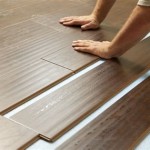
* Carefully position the first plank on the adhesive and press it into place. * Tap the plank gently with a flooring roller to secure it. * Continue installing the planks, locking them together and tapping them in place.Step 7: Roll and Seal the Floor
* Use a vinyl flooring roller to apply pressure to the entire floor. * This helps bond the planks together and remove any air bubbles. * Apply seam roller to all joints to ensure they are sealed properly.Step 8: Allow Time to Cure
* Follow the manufacturer's curing guidelines for the adhesive used. * Avoid walking on the floor or placing furniture until the adhesive has fully cured.Tips for Working with Uneven Concrete:
* Use a laser level to accurately identify high and low spots on the concrete. * Apply multiple layers of self-leveling compound if necessary to achieve a completely flat surface. * Ensure the underlayment is thick enough to compensate for any remaining irregularities in the concrete. * Allow ample time for each step of the installation process to ensure a secure and long-lasting finish.
Vinyl Plank Flooring On Uneven Concrete

Vinyl Plank Flooring On Uneven Concrete

10 Beginner Mistakes Installing Vinyl Plank Flooring

How Can I Prepare Uneven Concrete Basement Floor For Vinyl Planks Home Improvement Stack Exchange

Should We Be Concerned About Vinyl Plank Installed Over Uneven Floors

Easy Ways To Install Vinyl Plank Flooring On Concrete

How Can I Prepare Slightly Uneven Tiled Floor For Vinyl Planks Home Improvement Stack Exchange

Vinyl Plank Flooring On Uneven Concrete Quick Fix

How To Prepare A Concrete Floor For Vinyl Flooring Parrys

Vinyl Planks Installed Over Uneven Floor How Do I Fix It Now Doityourself Com Community Forums
See Also