How to Lay Lino on Uneven Floor
Installing linoleum on an uneven floor may seem like a daunting task, but with careful preparation and the right techniques, you can achieve a smooth and professional-looking result. Here's a step-by-step guide to help you navigate this process:
1. Prepare the Floor:
The key to a successful linoleum installation lies in a well-prepared subfloor. Remove any existing flooring, nails, or debris. Ensure that the floor is structurally sound and level within 1/8 inch over a 10-foot span. Fill any gaps or holes with a leveling compound and allow it to cure as per the manufacturer's instructions.
2. Install an Underlayment:
An underlayment provides a smooth and stable base for the linoleum. Roll out the underlayment, starting from the center of the room and working your way outwards. Overlap the underlayment edges by a few inches and tape them together using a strong adhesive tape. Trim any excess underlayment around the edges of the room.
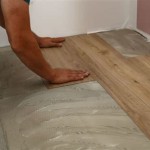
3. Measure and Cut the Linoleum:
Measure the room carefully and cut the linoleum to size, leaving a few inches of overhang on all sides. Use a sharp utility knife and a straight edge to ensure precise cuts. Label each piece of linoleum with its corresponding area of the room to avoid confusion during installation.
4. Check for Unevenness:
Lay the linoleum pieces on the floor to identify any areas of unevenness. Use a level to ensure that the linoleum is flat and level in all directions. If you encounter any uneven spots, mark them with a pencil.
5. Level the Uneven Areas:
To level the uneven areas, apply a thin layer of self-leveling compound over the marked spots. Use a notched trowel to distribute the compound evenly and smooth it out. Allow the compound to cure completely as per the manufacturer's instructions.
6. Secure the Linoleum:
Once the floor is level, you can secure the linoleum in place. Apply a thin layer of linoleum adhesive to the back of the linoleum and to the underlayment. Carefully place the linoleum in the desired position and press it down firmly to ensure good adhesion. Roll over the linoleum with a heavy roller to remove any air bubbles.
7. Trim and Seal the Edges:
Trim the excess linoleum around the edges of the room using a sharp utility knife. Seal the edges with a linoleum cove base or baseboard to create a neat and finished look. Apply a layer of sealant to the joints between the linoleum and the cove base to prevent moisture penetration.
Tips for Success:
- Use a sharp utility knife and a straight edge for precise cuts.
- Check for unevenness carefully and level the areas before installing the linoleum.
- Apply the adhesive evenly and press the linoleum down firmly to ensure good adhesion.
- Roll over the linoleum with a heavy roller to remove air bubbles.
- Trim the excess linoleum and seal the edges neatly.
By following these steps and tips, you can successfully lay linoleum on an uneven floor, creating a smooth and professional-looking finish that will enhance the aesthetics and functionality of your space.

10 Beginner Mistakes Installing Vinyl Plank Flooring

How Can I Prepare Slightly Uneven Tiled Floor For Vinyl Planks Home Improvement Stack Exchange

Laying Vinyl Planks The Right Way Expert Guide By Fantastic Handyman

How To Lay Sheet Vinyl Flooring

Should We Be Concerned About Vinyl Plank Installed Over Uneven Floors

How To Install Vinyl Plank Flooring On Uneven Floor

How To Lay Vinyl Flooring Checkatrade

Vinyl Plank Flooring On Uneven Concrete

Contractor Wants To Lay Vinyl Plank Over Uneven Subflooring

Preparing To Install Luxury Vinyl Flooring A How Guide
See Also