Essential Aspects of Installing Pergo Laminate Flooring: A Step-By-Step Guided Design
Transforming your living space with the elegance and durability of Pergo laminate flooring is a rewarding endeavor that requires careful planning and precise execution. Here's a comprehensive guide to help you navigate the installation process seamlessly:
1. Preparation: A Solid Foundation
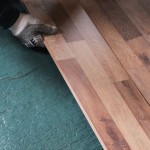
Before embarking on the installation, it's crucial to prepare the subfloor thoroughly. Ensure it's flat, clean, and dry. Remove any existing flooring and moldings, and level uneven areas with a leveling compound or plywood. Installing an underlayment helps absorb impact and reduce noise while providing a moisture barrier.
2. Acclimation: Letting the Flooring Adapt
Pergo laminate flooring comes with a moisture content that's optimized for your specific climate. Before installation, it's essential to acclimate the planks to the temperature and humidity levels of your home. This ensures the planks won't buckle or shrink over time.
3. Installation Methods: Floating vs. Glue-Down
Pergo laminate flooring offers two primary installation methods: floating and glue-down. Floating installations simply snap the planks together using a patented locking system, making it ideal for DIY enthusiasts. Glue-down methods involve bonding the planks to the subfloor with adhesive, providing enhanced stability and moisture resistance for high-traffic areas.
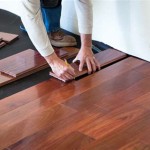
4. Laying the First Row: A Precise Start
Begin the installation by carefully laying the first row of planks along a straight wall. Use spacers to maintain uniform spacing and ensure the planks are perpendicular to the wall. Check for level and adjust as needed using a tapping block and hammer.
5. Continuing the Installation: Building on the Foundation
Continue laying subsequent rows, snapping the planks into place using the locking system. Stagger the end joints of the planks for a more natural appearance. Gently tap the planks together with a tapping block to ensure a tight fit.
6. Cutting and Shaping for a Perfect Fit
Using a laminate cutter or a fine-toothed saw, cut the planks to fit around obstacles such as doorways and corners. Measure carefully and use a straightedge for precise cuts. For angled cuts, use a miter saw or a utility knife with a scoring guide.
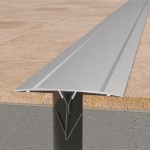
7. Finishing Touches: Moldings and Transitions
Once the flooring is installed, add finishing touches such as baseboards and transition moldings. These moldings conceal expansion gaps and provide a professional-looking transition from one flooring type to another. Use a caulk gun to fill any gaps and create a seamless look.
8. Maintenance: Preserving the Beauty
To maintain the pristine appearance of your Pergo laminate flooring, regular cleaning is essential. Use a microfiber mop or a damp cloth with a mild cleaner specifically designed for laminate flooring. Avoid harsh chemicals or abrasive cleaners that can damage the surface.

How To Install Pergo Flooring Easy Diy From Start Finish

How To Install Hardwood Flooring Pergo

How To Install Pergo Flooring Easy Diy From Start Finish

How To Install Pergo Flooring Easy Diy From Start Finish

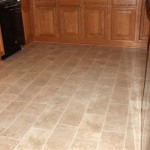
Pergo Installation Essentials Guide For Laminate Flooring

Install Pergo Laminate Flooring For A Farmhouse Look Twelve On Main

How To Install A Pergo Floor By Yourself

Install Pergo Laminate Flooring For A Farmhouse Look Twelve On Main

How To Install Laminate Flooring On Staircase Step By Guide

How To Install Pergo Flooring Easy Diy From Start Finish
See Also