How to Install Lifeproof Rigid Core Luxury Vinyl Flooring
Lifeproof rigid core luxury vinyl flooring is a popular choice for homeowners due to its durability, water resistance, and ease of installation. If you're planning to install Lifeproof flooring in your home, here are the essential steps to follow:
1. Prepare the Subfloor
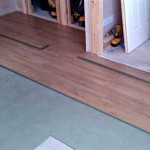
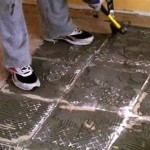
The first step is to prepare the subfloor by making sure it is level, flat, and clean. Remove any existing flooring, baseboards, and quarter rounds. Repair any uneven areas or cracks in the subfloor. If necessary, install a layer of underlayment to provide cushioning and sound insulation.
2. Determine the Layout
Before you start installing the flooring, determine the layout of the room. Plan the placement of the planks so that the seams are staggered and do not line up directly across from each other. Use a chalk line or laser level to mark the starting point for the first row of planks.
3. Install the First Row
Start by installing the first row of planks along the longest wall of the room. Use spacers along the edges of the planks to ensure even gaps. Tap the planks together using a rubber mallet or tapping block. Make sure the planks are locked securely in place.
4. Continue Installing the Flooring
Continue installing the flooring row by row, working your way across the room. Stagger the seams of the planks to create a more natural look. Use spacers to maintain even gaps between the planks. Tap the planks together securely using a rubber mallet or tapping block.
5. Cut and Fit Planks
As you reach obstacles such as walls, doorways, or cabinets, you will need to cut the planks to fit. Use a sharp utility knife or a flooring cutter to score the planks and snap them into place. Measure the length of the plank needed and cut it accordingly.
6. Install Baseboards and Trim
Once the flooring is installed, you can install the baseboards and trim. Baseboards cover the expansion gap between the flooring and the wall. Trim can be used to create a decorative finish around doorways, windows, and other areas.
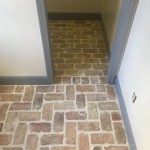
7. Enjoy Your New Floor
Congratulations on installing your new Lifeproof rigid core luxury vinyl flooring! Take some time to admire your work and enjoy the beauty and durability of your new floor.
Additional Tips
- Allow the flooring to acclimate to the room temperature for at least 24 hours before installing.
- Use a moisture barrier underlayment to prevent moisture from damaging the flooring.
- Install the flooring in a well-ventilated area to avoid exposure to harmful fumes.
- Follow the manufacturer's instructions carefully for specific installation requirements.

Installing Vinyl Plank Flooring Lifeproof Waterproof Rigid Core Sustain My Craft Habit

Diy How To Install Rigid Core Vinyl Plank Flooring Home Decorators Oak

How To Install Lifeproof Vinyl Flooring

Installing Lifeproof Vinyl Plank Flooring Our Diy Guide Exquisitely Unremarkable

How To Install Luxury Vinyl Plank Flooring Quick And Simple Casa Watkins Living

Installing Vinyl Plank Flooring Lifeproof Waterproof Rigid Core Sustain My Craft Habit

How To Install Luxury Vinyl Plank Flooring Quick And Simple Casa Watkins Living

Diy How To Install Rigid Core Vinyl Plank Flooring Home Decorators Oak

20 Tips For A Great Vinyl Plank Flooring Installation

How To Install Lifeproof Flooring The Home
See Also