The Best Way to Remove Tile Adhesive from Concrete Floor
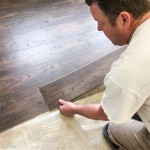
Removing tile adhesive from a concrete floor can be a laborious task, but it is essential to do it properly in order to ensure a smooth and even surface for new flooring. There are several methods that can be used to remove tile adhesive from concrete, and the best method will depend on the type of adhesive that was used and the condition of the concrete.
Here are the steps involved in each method:
Method 1: Using a Floor Scraper
A floor scraper is a hand-held tool with a sharp blade that can be used to scrape away tile adhesive from concrete. This method is best suited for small areas or for removing thin layers of adhesive.
- Wear safety glasses and gloves.
- Hold the floor scraper at a 45-degree angle to the concrete.
- Apply pressure and scrape away the adhesive.
- Continue scraping until all of the adhesive has been removed.
- Clean the concrete surface with a damp cloth.
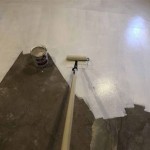
Method 2: Using a Chemical Stripper
Chemical strippers are available at most hardware stores. They are applied to the adhesive and allowed to sit for a period of time, which will soften the adhesive and make it easier to remove. This method is best suited for large areas or for removing thick layers of adhesive.
- Wear safety glasses and gloves.
- Apply the chemical stripper to the adhesive according to the manufacturer's instructions.
- Allow the stripper to sit for the specified amount of time.
- Use a floor scraper or putty knife to remove the softened adhesive.
- Clean the concrete surface with a damp cloth.
Method 3: Using a Heat Gun
A heat gun can be used to heat up the adhesive, which will make it easier to remove. This method is best suited for small areas or for removing thin layers of adhesive.
- Wear safety glasses and gloves.
- Hold the heat gun about 6 inches away from the adhesive.
- Apply heat until the adhesive begins to soften.
- Use a floor scraper or putty knife to remove the softened adhesive.
- Clean the concrete surface with a damp cloth.
Method 4: Using a Grinder
A grinder can be used to grind away the adhesive. This method is best suited for large areas or for removing thick layers of adhesive. However, it is important to note that using a grinder can create dust, so it is important to wear a dust mask and eye protection.
- Wear safety glasses, a dust mask, and gloves.
- Attach a grinding wheel to the grinder.
- Set the grinder to a low speed.
- Grind away the adhesive until it has been removed.
- Clean the concrete surface with a damp cloth.
Tips for Removing Tile Adhesive from Concrete
- Always test the method in an inconspicuous area before applying it to the entire floor.
- Be patient and take your time. Removing tile adhesive can be a time-consuming process.
- Use the appropriate safety gear, including safety glasses, gloves, and a dust mask.
- Clean the concrete surface thoroughly after removing the adhesive.

How To Remove Old Floor Tile Adhesive All Stripped

How To Remove Carpet Glue From Concrete 4 Proven Ways Network

How To Remove Ceramic Tile Adhesive From Concrete Floor Alliance Flooring Directory

How To Remove Adhesive From Concrete Floors 5 Diy Ways Get Glue Off

Mastering Flooring Adhesive Removal Concrete Construction

3 Easy Ways To Remove Tile Mortar Thinset From Cement Floor Tilemortar

How To Remove Carpet Glue From Concrete 4 Proven Ways Network

Best Ways To Take Out Even Impossible Remove Glue From Floors

The Correct Way To Remove Adhesive From Concrete Floors

How To Remove Adhesive Tiles From Concrete Floor
See Also