Essential Aspects of Vinyl Tile Flooring: A Simple Installation Guide for Your Bathroom
Vinyl tile flooring has become a popular choice for bathroom renovations due to its durability, water resistance, and ease of installation. Here's a comprehensive guide to help you navigate the essential aspects of vinyl tile flooring and provide a step-by-step guide for its successful installation in your bathroom.
Understanding Vinyl Tile Flooring
Vinyl tile flooring is a type of flooring made from polyvinyl chloride (PVC), a synthetic material known for its resilience and resistance to wear and tear. It comes in a wide range of styles, colors, and patterns, mimicking the look and feel of natural materials like wood, stone, and ceramic tiles.
Benefits of Vinyl Tile Flooring for Bathrooms
- Waterproof: Vinyl tiles are completely waterproof, making them an excellent choice for bathrooms prone to moisture and spills.
- Durable: Vinyl is incredibly durable, able to withstand heavy foot traffic and resist scratches, dents, and fading.
- Easy to clean: Vinyl flooring requires minimal maintenance and can be easily cleaned with just a damp mop.
- Comfortable: Vinyl tiles provide a warm and comfortable surface to walk on, making them ideal for barefoot areas like bathrooms.
- Affordable: Vinyl tile flooring is relatively affordable compared to other flooring options, offering a cost-effective way to upgrade your bathroom.
Choosing the Right Vinyl Tiles
When selecting vinyl tiles for your bathroom, consider factors such as:
- Style: Vinyl tiles come in a variety of designs, from classic wood-look planks to intricate stone patterns.
- Size: Tiles range in size from small squares to larger planks, choose a size that complements the dimensions of your bathroom.
- Thickness: The thickness of vinyl tiles can vary, thicker tiles are more durable and provide better sound insulation.
- Durability: Vinyl tiles are rated according to their resistance to wear and tear, choose a tile with a rating suitable for bathroom traffic.
- Slip-resistance: For safety, consider vinyl tiles with a textured or non-slip finish.
Materials and Tools Needed for Installation
- Vinyl tiles
- Underlayment (optional)
- Adhesive or glue
- Notched trowel
- Caulk gun and caulk
- Utility knife
- Measuring tape
- Pencil or chalk
Step-by-Step Installation Guide
- Prepare the Subfloor: Ensure the subfloor is clean, level, and dry. If needed, use an underlayment to smooth out any imperfections.
- Lay Out the Tiles: Determine the starting point and dry lay the vinyl tiles to visualize the pattern and ensure there are no gaps or overlaps.
- Apply Adhesive: Using a notched trowel, spread the adhesive evenly onto the subfloor, following the manufacturer's instructions.
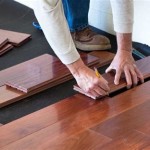
- Place the Tiles: Place the vinyl tiles one at a time, firmly pressing them into the adhesive. Ensure they are aligned and level.
- Cut and Fit: Use a utility knife to cut the tiles to fit around obstacles like toilets or vanities.
- Grout or Caulk: If desired, apply grout or caulk to the joints between the tiles for a finished look and to prevent moisture penetration.
- Seal the Floor: After allowing the adhesive to dry thoroughly, apply a sealant to protect the floor from moisture and wear.
Additional Tips
- Allow the floor to acclimate to the room temperature for several hours before installation.
- Use a level to ensure the tiles are laid evenly.
- Trim any excess vinyl around the edges with a utility knife.
- Clean the floor thoroughly after installation.
- Maintain the floor by sweeping or mopping regularly and avoiding harsh chemicals.
Conclusion
Installing vinyl tile flooring in your bathroom is a cost-effective and straightforward project that can enhance the style, comfort, and durability of your space. By carefully considering the important aspects of vinyl tile flooring and following the step-by-step installation guide, you can achieve a beautiful and functional bathroom that will last for years to come.

How To Install Vinyl Plank Flooring In A Bathroom Fixthisbuildthat

How To Install Vinyl Plank Floors In A Bathroom Over Tile

Achieve High End Hardwood Looks For Your Dream Bath In Lvt

How To Install Sheet Vinyl Floor Decor Adventures
How To Lay Vinyl Flooring Sheets Tiles And Planks Tarkett

How To Install A Floating Tile Floor

How To Install Vinyl Plank Flooring In A Bathroom As Beginner Home Renovation

How To Install Vinyl Floor Tiles Homebase

Achieve High End Hardwood Looks For Your Dream Bath In Lvt

How We Installed Our Press And Stick Vinyl Floor Tiles
See Also


