Installation Vinyl Flooring Plank: A Step-by-Step Guide
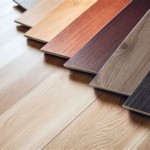
Transform your flooring with the allure of vinyl planks. These versatile and stylish tiles offer an array of benefits, including durability, water resistance, and ease of maintenance. Embark on a seamless installation journey with this comprehensive guide that covers every essential aspect of vinyl plank flooring installation.
Pre-Installation Preparations
Before embarking on the installation, meticulous preparation is key. Ensure that the subfloor is level, clean, and free of any debris or imperfections. Remove baseboards and trim, taking care to mark their locations for reinstallation.
Allow the vinyl planks to acclimate to the room temperature for 24-48 hours before installation. This will help prevent buckling or gaps once installed.
Selecting the Installation Method: Floating or Glue-Down
Vinyl planks can be installed using two main methods: floating or glue-down. Floating installations utilize a click-lock system, where planks interlock without the need for adhesives. Glue-down installations involve applying adhesive to the subfloor before laying down the planks.
Floating installations are suitable for most residential applications, while glue-down installations provide additional stability and are recommended for high-traffic areas or commercial spaces.
Installation Techniques
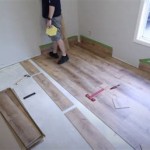
For Floating Installations:- Start in a corner of the room and work outwards.
- Angle the first plank slightly and insert the tongue of the plank into the groove of the previous plank.
- Tap or roll the plank into place, ensuring a secure interlock.
- Continue along the wall, interlocking planks as you go.
- For the last row, measure and cut the planks to fit, leaving a small expansion gap around the perimeter.
- Apply adhesive evenly to the subfloor, following the manufacturer's instructions.
- Lay the first plank in place, pressing it firmly into the adhesive.
- Continue laying planks, staggering the joints and pressing them into place. Use a tapping block or roller to ensure good adhesion.
- Trim any excess adhesive around the edges of the planks.
- Allow the adhesive to dry completely before walking on the floor.
Finishing Touches
Once the vinyl planks are installed, complete the floor by reinstalling the baseboards and trim. Use a caulk gun to fill any gaps between the floor and the walls or baseboards.
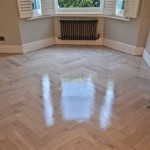
Clean the floor thoroughly to remove any dust or debris. Enjoy your new, stylish, and durable vinyl plank flooring!
Maintenance and Care
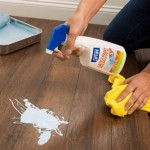
Vinyl plank flooring requires minimal maintenance to maintain its beauty and longevity. Regular sweeping, vacuuming, or mopping with a damp cloth or microfiber mop will suffice. Avoid using harsh chemicals or abrasive cleaners, as they can damage the surface.
Protect the floor from furniture by using felt pads or rugs under heavy items. This will help prevent scratches and indentations.

How To Install Vinyl Plank Flooring For Beginners Step By Guide

Simple To Use Step By Guide For Installing Vinyl Plank Everywhere

Installing Vinyl Plank Flooring For Beginners Anika S Diy Life

A Beginner S Guide To Installing Vinyl Plank Flooring Dumpsters Com

Step By Guide To Installing Luxury Vinyl Planks

A Step By Installation Guide For Luxury Vinyl Flooring

How To Install Vinyl Plank Flooring The Home

3 Best Steps For Vinyl Plank Installation Guide Millenniumhardwood

Installing Vinyl Plank Flooring How To Fixthisbuildthat

Installing Vinyl Floors A Do It Yourself Guide The Honeycomb Home
See Also