How to Lay Vinyl Floor Tiles on Floorboards
Vinyl floor tiles are a popular choice for their durability, affordability, and ease of installation. They come in a wide range of colors and styles, so you can find the perfect match for your home. If you're planning to install vinyl floor tiles on floorboards, here's a step-by-step guide to help you get the job done right.
Step 1: Prepare the Floorboards
The first step is to prepare the floorboards for the vinyl tiles. Remove any existing flooring, such as carpet or linoleum. Clean the floorboards thoroughly with a vacuum cleaner and mop. Make sure the floorboards are level and smooth. If there are any gaps or cracks, fill them with a wood filler.
Step 2: Plan the Layout
Once the floorboards are prepared, you can start planning the layout of the vinyl tiles. Measure the room and determine how many tiles you will need. Lay out the tiles in a dry fit to make sure you like the arrangement. Once you're happy with the layout, mark the starting point on the floor.
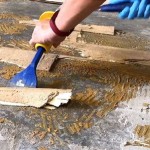
Step 3: Apply Adhesive
Using a trowel, apply a thin layer of adhesive to the floorboards. Start at the starting point and work your way out. Make sure to apply the adhesive evenly and avoid getting it on the tiles.
Step 4: Install the Tiles
Place the first tile in the corner of the room and press it firmly into the adhesive. Continue installing the tiles, working your way out from the corner. Use a tapping block and a hammer to tap the tiles into place. Make sure the tiles are level and flush with each other.
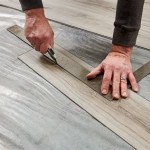
Step 5: Cut the Tiles
Once you reach the end of the room, you may need to cut the tiles to fit. Use a utility knife or a tile cutter to cut the tiles to the desired size. Be careful not to cut the tiles too small, or they will not fit properly.
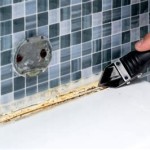
Step 6: Grout the Joints
Once the tiles are installed, you can grout the joints between them. Use a grout float to apply the grout to the joints. Make sure to press the grout firmly into the joints and remove any excess grout.
Step 7: Allow the Floor to Dry
Allow the floor to dry completely before walking on it. The drying time will vary depending on the type of adhesive and grout you used. Once the floor is dry, you can enjoy your new vinyl floor tiles.
Tips for Laying Vinyl Floor Tiles on Floorboards
- Use a level to make sure the floorboards are level before installing the tiles.
- Apply a thin layer of adhesive to the floorboards. Too much adhesive can make the tiles difficult to remove later.
- Tap the tiles into place firmly. This will help to ensure that they are level and flush with each other.
- Cut the tiles carefully to fit around the edges of the room.
- Grout the joints between the tiles to seal them and prevent water damage.
- Allow the floor to dry completely before walking on it.

Vinyl Plank Tiles In A Bathroom How To Install

How To Install Vinyl Floors

10 Beginner Mistakes Installing Vinyl Plank Flooring

Determining The Direction To Lay Install Hardwood Laminate Or Luxury Vinyl Plank Flooring

20 Tips For A Great Vinyl Plank Flooring Installation

Laying Vinyl Planks The Right Way Expert Guide By Fantastic Handyman

How To Install Vinyl Flooring Over Hardwood Floors Wood Floor Fitting

Installing Vinyl Floors A Do It Yourself Guide The Honeycomb Home

How To Install L And Stick Vinyl Plank Flooring The Nifty Nester

Guide To Lay Vinyl Flooring Over Floorboards
See Also