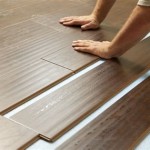
How to Masterfully Install Vinyl Flooring in Compact Bathroom Spaces
Transforming your small bathroom with vinyl flooring is a smart and stylish renovation project that's surprisingly feasible for DIY enthusiasts. Vinyl's durability, water resistance, and endless design options make it an ideal choice for high-traffic areas like bathrooms. Here's a comprehensive guide to help you navigate the installation process with ease.
Planning and Preparation: Setting the Stage for Success
Prior to embarking on your installation, meticulous planning and preparation are crucial. Accurately measure your bathroom's floor area to determine the required amount of vinyl flooring. Select a flooring style that complements your bathroom's décor and consider its durability and slip resistance for optimal functionality.
Before laying down the vinyl, ensure the subfloor is level, smooth, and free of any debris or imperfections. Repair any damaged areas or uneven spots to create a solid foundation for your new flooring.
Installation Techniques: Laying the Foundation Step by Step
Step 1: Start with a Straight Edge
Begin by establishing a straight starting point along one wall of your bathroom. This will serve as the reference for ensuring straight and even rows.
Step 2: Apply Adhesive or Underlayment
Depending on the type of vinyl flooring you've chosen, apply the appropriate adhesive or underlayment according to the manufacturer's instructions. Ensure a consistent and even spread to prevent any adhesive issues.
Step 3: Lay the Vinyl Planks or Tiles
Carefully align and press each vinyl plank or tile into place, starting from your established starting point. Interlock the planks or tiles securely, ensuring they are flush with each other.
Step 4: Trim and Fit
When you reach obstacles such as walls, fixtures, or corners, use a sharp utility knife to trim the vinyl flooring for a precise fit. Carefully mold the flooring around these areas.
Finishing Touches: Ensuring a Seamless Transition
Step 5: Secure the Perimeter
To ensure a secure finish, use quarter-round molding or other suitable trim to cover the expansion gaps around the perimeter of the vinyl flooring. This will prevent moisture from seeping under the flooring and maintain its integrity.
Step 6: Protect and Preserve
To maintain the longevity of your vinyl flooring, apply a sealant or polyurethane coating to protect it from scratches and wear. This will also enhance its water resistance and make cleaning a breeze.
Additional Considerations: Enhancing the Installation Process
Acclimatization: Allow your vinyl flooring to acclimatize to the room temperature for 24-48 hours before installation to minimize expansion or contraction.
Overlapping: When laying down vinyl planks, stagger the joints for added strength and stability. Avoid aligning the seams directly over each other.
Expansion Gaps: Leave a small expansion gap around the perimeter of the flooring to accommodate for temperature fluctuations and prevent buckling.
Conclusion: A Transformed Bathroom at Your Fingertips
With careful planning, preparation, and attention to detail, installing vinyl flooring in your small bathroom can be a rewarding and achievable project. By following these steps and incorporating the additional considerations, you can transform your bathroom into a stylish, functional, and inviting space that you'll enjoy for years to come.

How To Install Vinyl Plank Tiles In A Bathroom

How To Install Vinyl Plank Floors In A Bathroom Over Tile

How To Install Vinyl Plank Flooring In A Bathroom Fixthisbuildthat

Small Bathroom Tile Upgrade How To

How To Install Vinyl Plank Floors In A Bathroom Over Tile

How To Install Vinyl Plank Tiles In A Bathroom

How To Install Vinyl Plank Flooring In A Bathroom Fixthisbuildthat

Watch Us L Stick A Small Bathroom Floor With Luxury Vinyl Tile

How To Install Vinyl Plank Flooring In A Bathroom Fixthisbuildthat

Dos And Don Ts For Installing Vinyl Plank Floors In The Bathroom Advice Homeowners
See Also


