How to Install Vinyl Plank Flooring on Steps
Transforming your stairs with vinyl plank flooring is a great way to update your home's style while enhancing durability and functionality. Here's a comprehensive guide to help you achieve professional-looking results:
Materials You'll Need:
- Vinyl plank flooring
- Underlayment
- Stair nosing or reducer molding
- Transition pieces
- Caulk
- Adhesive
- Tape measure
- Utility knife
- Circular saw
- Notched trowel
Preparations:
1. Remove existing flooring and clean the subfloor. The subfloor should be level and free from debris.
2. Install underlayment to provide a moisture barrier and sound absorption.
Installing Vinyl Planks on Steps:
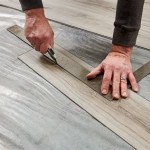
1. Measure and cut the first plank to fit the bottom step. Use a circular saw for precise cuts.
2. Apply adhesive to the subfloor using a notched trowel. Spread the adhesive evenly to ensure proper bonding.
3. Place the plank on the adhesive and press firmly. Use a rubber mallet if necessary.
4. Continue installing the planks on the remaining steps, overlapping the ends slightly.
5. When reaching the top step, cut the plank to fit and secure it with adhesive.
Installing Stair Nosing or Reducer Molding:
1. Measure and cut the stair nosing or reducer molding to fit the nose of each step.
2. Apply adhesive to the back of the molding and press it into place.
3. Secure the molding with nails or screws for added stability.
Installing Transition Pieces:
1. Measure and cut the transition pieces to connect the vinyl plank flooring to other floor coverings, such as carpet or tile.
2. Use adhesive or nails to secure the transition pieces.
Finishing Touches:
1. Caulk the gaps between the vinyl planks and the stair nosing or molding to prevent moisture penetration and enhance the finished look.
2. Clean the installed flooring to remove any adhesive residue or debris.
Tips:
- Start from the bottom step and work your way up.
- Use a level to ensure that the planks are installed evenly.
- Trim the planks slightly shorter than the actual dimensions to allow for expansion and contraction.
- Allow the adhesive to dry completely before using the stairs.
- Protect the newly installed flooring from heavy foot traffic or furniture for 24 hours.
Remember, installing vinyl plank flooring on steps requires precision and attention to detail. By following these steps carefully, you can achieve a durable and aesthetically pleasing result that will enhance the beauty and functionality of your home for years to come.

How To Install Luxury Vinyl Plank Laminate Flooring On Stairs

How To Install Laminate On Stairs Step By For Beginners

How To Install Vinyl Plank Flooring On Stairs In 6 Steps

How To Install Vinyl Plank Flooring On Stairs

How To Install Vinyl Flooring On Stairs

How To Install Lvp Stairs Diy

How To Install Luxury Vinyl Flooring On Stairs

Pros And Cons Of Installing Vinyl Flooring On Stairs Lx Hausys

How To Make A Vinyl Plank Stair Nosing

Luxury Vinyl Tile Seamless Upstairs And Downstairs Solution
See Also


