Installing Lifeproof Vinyl Plank Flooring: A Comprehensive Guide
Transform your home with the beauty and durability of Lifeproof vinyl plank flooring. With its easy installation process, stunning visuals, and exceptional water resistance, Lifeproof flooring is a top choice for homeowners looking to upgrade their spaces.
Before You Begin: Essential Considerations
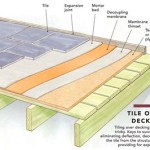
Before embarking on your Lifeproof flooring installation, it's crucial to gather the necessary tools and ensure your subfloor is adequately prepared. You'll need a tape measure, utility knife, spacers, and a flooring cutter. Your subfloor should be level, dry, and smooth to provide a solid foundation for your new flooring.
Step 1: Acclimate Your Flooring
Allow your Lifeproof flooring planks to acclimate to your home's temperature and humidity for at least 48 hours before installation. This ensures they lay flat and avoid buckling or gapping later on.
Step 2: Plan Your Layout
Determine the starting point and direction of your flooring. Lay out the planks along a straight wall and use spacers to maintain consistent gaps between each plank.
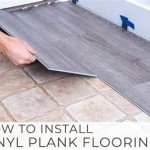
Step 3: Installing the First Row
Apply a thin layer of flooring adhesive to the subfloor according to the manufacturer's instructions. Place the first plank along the starting point and tap it into place using a tapping block or a mallet.
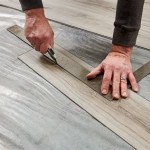
Step 4: Continue Installation
Continue installing the planks row by row, aligning the tongue and groove edges and tapping them together. Use a pry bar to gently click the planks into place if needed.
Step 5: Trim Around Obstacles
When you reach obstacles such as walls, doorways, or cabinetry, measure and cut the planks accordingly using a flooring cutter or utility knife.
Step 6: Install Transitions
If transitioning to another flooring type or area, use appropriate transition moldings to create a seamless finish. Secure the moldings with nails or screws.
Step 7: Final Touches
Once your flooring is installed, remove the spacers and clean the floor thoroughly to remove any dust or debris. Apply baseboards or quarter-round moldings to complete the look.
Additional Tips
- Always follow the manufacturer's instructions carefully.
- Measure twice, cut once to ensure accurate plank placement.
- Use a tapping block or mallet to avoid damaging the planks.
- Allow your flooring to cure for at least 24 hours before moving furniture back into the room.
Conclusion
Installing Lifeproof vinyl plank flooring is a rewarding project that can transform the look and feel of your home. By following these steps carefully and taking your time, you can create a beautiful and durable floor that will last for years to come.

How To Install Lifeproof Flooring The Home

How To Install Lifeproof Flooring The Home

How To Install Lifeproof Vinyl Flooring

How To Install Lifeproof Flooring The Home

How To Install Vinyl Plank Flooring Lifeproof Lvp

How To Install Lifeproof Flooring The Home

Why We Chose Lifeproof Vinyl Flooring And How To Install It

Why We Chose Lifeproof Vinyl Flooring And How To Install It

How To Install Lifeproof Flooring The Home

Installing Lifeproof Lvp Flooring Diy Tips And Tricks Building A Home Start To Finish Episode 16
See Also