Installing Tile on a Concrete Basement Floor: A Comprehensive Guide
Transforming your basement into a functional and aesthetically pleasing space often involves installing flooring. Tile is a popular choice for basements, thanks to its durability, moisture resistance, and stylish appeal. If you're considering tiling your concrete basement floor, here's a comprehensive guide to help you navigate the process.
Before embarking on the installation, it's crucial to assess the condition of your concrete floor. Ensure it's level, free from cracks or holes, and sufficiently dry. If necessary, address any issues by leveling the floor with a self-leveling compound, patching cracks, and installing a vapor barrier to prevent moisture problems.
Materials and Tools
To get started, gather the following materials and tools:
- Ceramic or porcelain tiles
- Thinset mortar
- Grout
- Tile spacers
- Notched trowel
- Rubber mallet
- Tile cutter or wet saw
- Level
- Tape measure
- Sponge
- Bucket
Step-by-Step Installation Instructions
1. Layout the Tiles: Start by determining the center point of your floor using a chalk line or string. Begin laying the tiles from the center, working your way outward.
2. Apply Thinset Mortar: Spread thinset mortar onto a small section of the floor using a notched trowel. Hold the trowel at a 45-degree angle and apply the mortar with even strokes.
3. Install the Tiles: Place the tiles on the mortar and press down firmly with a rubber mallet. Use tile spacers to maintain uniform spacing between the tiles.
4. Level the Tiles: Using a level, check the tiles to ensure they are level in both directions. Make any necessary adjustments by adding or removing mortar.
5. Cut Tiles: To fit tiles around obstacles or corners, use a tile cutter or wet saw to cut them to size. Smooth out any rough edges with a grinder or file.
6. Grout the Tiles: Once the thinset has set for 24 hours, apply grout to the spaces between the tiles. Use a grout float to spread the grout and remove excess. Allow the grout to cure for the time specified by the manufacturer.
7. Seal the Grout: After the grout has dried, apply a grout sealer to protect it from moisture and stains.
Finishing Touches
To complete the installation, you may consider adding baseboards or moldings around the perimeter of the floor. These moldings not only enhance the aesthetics but also protect the edges of the tiles from damage.
Regular maintenance and cleaning will help keep your tiled basement floor looking its best. Use a mild detergent and warm water to clean the tiles, and sweep or vacuum the floor to remove dirt and debris.

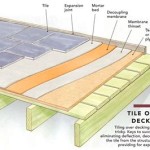
How To Install Tile Over Concrete Greenbuildingadvisor

How To Install Tile On Concrete Basement Bar Build Part 4
:max_bytes(150000):strip_icc()/can-you-install-tile-directly-on-concrete-1822600-04-458f7bb6c78348c1835cf8054ef36553.jpg?strip=all "How To Install Tile Over Concrete")
How To Install Tile Over Concrete

Concrete Basement Floor Tiling Preparation

How To Install Tiles On A Concrete Basement Floor Barana

How To Tile A Concrete Basement Floor The Grout Medic

How To Lay Tile On Concrete Like A Pro

How To Tile A Concrete Floor Howtospecialist Build Step By Diy Plans Floors Flooring

How To Install Tiles On A Concrete Basement Floor Barana

Thermaldry Basement Flooring Systems Waterproof
See Also