How To Install Garage Floor Tiles
Garage floor tiles offer a durable, attractive, and easy-to-maintain surface for garages of all sizes. They protect the underlying concrete from stains, damage, and wear while enhancing the aesthetic appeal of the space. This article provides a comprehensive guide to installing garage floor tiles, outlining the necessary tools, materials, and steps involved in the process.
Preparation is Key: Assessing the Garage Floor
Before commencing the installation process, a thorough assessment of the existing garage floor is crucial. This involves checking for cracks, uneven surfaces, and moisture issues. Existing cracks should be repaired using a concrete crack filler. Larger imperfections or uneven areas may require a concrete leveling compound. Moisture problems, such as efflorescence or dampness, must be addressed before tile installation to prevent adhesive failure and mold growth. Allow ample drying time for any repairs or treatments before proceeding.
Gathering the Necessary Tools and Materials
Efficient installation requires having the right tools and materials readily available. Essential tools include a tape measure, chalk line, level, rubber mallet, safety glasses, gloves, a utility knife or tile cutter, and notched trowel. Depending on the type of tile, a wet saw might also be necessary. Materials required include the chosen garage floor tiles, appropriate tile adhesive (consult the tile manufacturer’s recommendations), spacers, and optionally, sealant for the perimeter.
Cleaning and Priming the Garage Floor
Thoroughly clean the garage floor to remove dirt, debris, oil stains, and any other substances that might interfere with adhesion. A degreaser and a stiff-bristled brush are typically effective for this purpose. After cleaning, allow the floor to dry completely. Depending on the concrete’s porosity and the tile adhesive manufacturer's instructions, applying a primer may be necessary to improve adhesion. Follow the primer manufacturer's instructions for application and drying time.
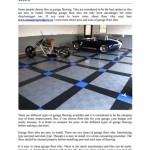
Planning the Tile Layout
A well-planned layout ensures a professional-looking finish. Start by finding the center of the garage floor. Snap chalk lines perpendicular to each other to create a central cross. Dry lay a few tiles along these lines, incorporating spacers, to visualize the layout and make any necessary adjustments. Consider incorporating border tiles or patterns, if desired. This dry layout also helps calculate the number of tiles required, minimizing waste.
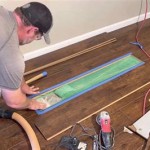
Applying the Tile Adhesive
Using the notched trowel, apply the recommended tile adhesive to a small section of the floor, working in manageable areas to prevent the adhesive from drying prematurely. The size of the notched trowel will depend on the size and type of tile being installed. Consult the adhesive manufacturer's instructions for specific recommendations. Spread the adhesive evenly, ensuring full coverage within the designated area.
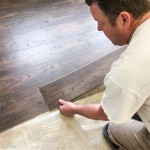
Placing and Securing the Tiles
Carefully place each tile into the adhesive, aligning it with the layout lines and adjacent tiles. Use spacers between tiles to maintain consistent grout lines. Firmly press each tile into the adhesive to ensure proper bonding. A rubber mallet can be used to gently tap down tiles to ensure an even surface and full contact with the adhesive. Periodically check tile alignment using a level to maintain a flat and even floor.
Cutting Tiles for Edges and Obstructions
Tiles will inevitably need to be cut to fit around edges, corners, and any obstructions in the garage. A tile cutter or wet saw can be used for this purpose. Measure accurately and mark the tiles before cutting to ensure a precise fit. Safety glasses should always be worn when cutting tiles.
Allowing Adequate Curing Time
Once all tiles are installed, allow the adhesive to cure completely according to the manufacturer's instructions. Avoid walking on the tiles or placing any heavy objects on them during this period. The curing time typically ranges from 24 to 72 hours, depending on the adhesive and environmental conditions.
Applying Grout (If Applicable)
If using tiles that require grouting, apply the grout after the adhesive has fully cured. Follow the grout manufacturer's instructions for mixing and application. Apply the grout using a grout float, pressing it firmly into the joints between the tiles. Remove excess grout with a damp sponge, being careful not to remove grout from the joints.
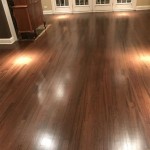
Sealing the Perimeter (Optional)
Applying a sealant along the perimeter of the garage floor can help prevent moisture penetration and improve the overall appearance of the installation. Choose a sealant that is compatible with both the tiles and the adhesive.
Maintaining Your New Garage Floor
Regular sweeping and occasional mopping with a mild detergent are typically sufficient to maintain the cleanliness and appearance of the garage floor tiles. Avoid harsh chemicals or abrasive cleaners that could damage the tile surface.

Here S How You Fit Interlocking Garage Floor Tiles Step By Quick Easy Gftc

How To Install Interlocking Garage Floor Tiles Modutile Full Explanation

How To Install Interlocking Garage Floor Tiles Locktile Pvc Tileslocktile

How To Install Garage Floor Tiles Flooring Llc

Tips To Prepare Your Garage Floor For Interlocking Tiles All Floors

How To Install Garage Floor Tile Motordeck Example

Installing Garage Floor Tiles Step By Rubi Blog Usa

How To Install Garage Floor Tiles Step By The Diy Playbook

Installing Garage Floor Tiles In An Angled Flexspec Modular Flooring

How To Install Garage Tiles
See Also