How To Install Laminate Floor Boards
Laminate flooring offers a cost-effective and visually appealing alternative to traditional hardwood. Its durability and ease of installation make it a popular choice for DIY home improvement projects. This article provides a comprehensive guide to installing laminate floor boards.
Planning and Preparation: Accurate measurements are crucial for determining the necessary quantity of materials. Calculate the room's square footage and add 10% for cuts and waste. Thorough preparation of the subfloor is essential for a successful installation. The subfloor must be clean, level, and dry. Existing flooring, such as carpet or vinyl, should be removed. Imperfections in the subfloor, like cracks or bumps, should be addressed using a self-leveling compound or patching material. Allow ample drying time according to the manufacturer's instructions.
Gathering Necessary Tools and Materials: Before beginning the installation, gather all the required tools and materials. This includes laminate flooring, underlayment, a tapping block, pull bar, spacers, measuring tape, saw (circular saw or jigsaw), safety glasses, gloves, and a moisture meter.
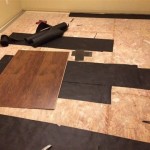
Installing the Underlayment: Underlayment provides cushioning, sound insulation, and a moisture barrier. Roll out the underlayment across the subfloor, ensuring the seams butt together tightly. Use tape to secure the seams and prevent shifting. Trim any excess underlayment using a utility knife.
Beginning the Installation: Start the installation in a corner of the room, working from left to right. Place spacers along the wall to create an expansion gap of approximately ¼ to ½ inch. This gap allows the flooring to expand and contract with changes in temperature and humidity, preventing buckling.
Connecting the Planks: Laminate flooring typically utilizes a click-lock system. Angle the first plank of the first row at a slight angle and insert the tongue edge into the groove edge of the adjacent plank. Gently lower the plank until it clicks into place. Use a tapping block and hammer to ensure a tight seam. Continue this process across the first row.
Cutting Planks: The last plank in a row will often require cutting. Measure the remaining space and mark the plank accordingly. Use a saw to cut the plank to the correct size. Remember to wear safety glasses when operating power tools.
Continuing the Installation: Begin the second row by using the cut-off piece from the previous row, ensuring that end joints are staggered for stability. This provides a more visually appealing and structurally sound floor. Maintain the expansion gap against the wall. Connect the planks in the second row, ensuring a tight fit. Continue this process, row by row, until the entire floor is covered.
Using a Pull Bar: In tight spaces, such as against walls or doorways, it may be difficult to click planks together. A pull bar provides leverage to connect planks in these areas. Insert the pull bar into the groove edge of the plank and gently tap it with a hammer to secure the connection.
Installing the Last Row: The last row of planks will likely require ripping (cutting lengthwise). Measure the remaining space, accounting for the expansion gap, and mark the planks accordingly. Use a saw to rip the planks to the correct width. Use a pull bar to install the last row, ensuring a tight fit against the wall.
Finishing Touches: Remove the spacers along the walls. Install baseboards or quarter-round molding to cover the expansion gap and provide a finished look. Clean the floor thoroughly to remove any dust or debris generated during the installation.
Doorways and Transitions: For doorways, use transition moldings to create a smooth transition between different flooring types or levels. These moldings are available in various styles and colors to match the flooring and surrounding décor. Measure the doorway width and cut the transition molding accordingly.
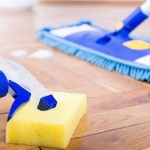
Maintenance: Regular sweeping or vacuuming helps to remove dirt and debris that can scratch the laminate surface. Avoid using excessive water when cleaning, as this can damage the flooring. Use a damp mop with a laminate floor cleaner for occasional cleaning. Protective furniture pads can prevent scratches and dents from furniture legs.
Following these steps will ensure a successful and professional-looking laminate flooring installation. However, always refer to the manufacturer's specific instructions for your chosen product, as installation methods can vary slightly between brands.

How To Install Laminate Flooring For Beginners

Our Step By Guide For Laying Laminate Flooring

Installing Laminate Flooring For The First Time Home Renovation

Install Laminate Flooring A Diy How To Guide Builddirect Learning Centerlearning Center

Laminate Floor Installation Tips

Guide To Installing Laminate Flooring Diy Family Handyman

The Ultimate Guide To Installing Laminate Flooring Parrys

How To Install A Laminate Flooring Paoson Blog Home Diy Tips

Determining The Direction To Lay Install Hardwood Laminate Or Luxury Vinyl Plank Flooring

How To Install A Laminate Flooring Paoson Blog Home Diy Tips
See Also