How To Repair Laminate Floor Boards
Laminate flooring offers an attractive and durable flooring solution. However, like all flooring materials, it is susceptible to damage. This article outlines several common laminate flooring issues and provides step-by-step instructions for their repair.
Assessing the Damage
Before initiating any repair, it's crucial to assess the type and extent of the damage. Minor scratches, chips, and gaps often require different approaches compared to significant damage like water damage or extensive warping.
Repairing Minor Scratches
Superficial scratches can often be addressed with readily available repair kits specifically designed for laminate flooring. These kits typically contain wax fillers or colored pencils that match the flooring's color. The affected area should be cleaned thoroughly before applying the filler or pencil according to the manufacturer's instructions.
Addressing Chips and Gouges
Small chips or gouges necessitate a slightly more involved approach. After cleaning the damaged area, a laminate repair putty, color-matched to the flooring, should be used to fill the cavity. The putty should be applied carefully, smoothed with a putty knife, and allowed to dry completely. Excess putty can be removed with a damp cloth. A final touch-up with a matching colored pencil or marker can blend the repair seamlessly with the surrounding flooring.
Fixing Gaps Between Planks
Gaps between laminate planks can occur due to seasonal changes in temperature and humidity or improper installation. Minor gaps can sometimes be closed by applying gentle pressure to the planks and tapping them back together. A rubber mallet and a tapping block can prevent damage to the planks during this process. For more stubborn gaps, a laminate flooring pull bar and tapping block may be required to tighten the planks together. Significant gaps may indicate underlying subfloor issues that should be addressed before attempting to close the gaps.
Repairing Water Damage
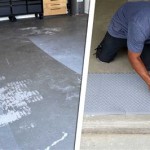
Water damage requires prompt action to prevent further issues like warping and mold growth. The source of the water leak should be identified and addressed immediately. Standing water should be removed, and the affected area should be thoroughly dried. If the laminate planks are warped or buckled, it may be necessary to replace them. Remove the damaged planks carefully, ensuring not to damage adjacent planks. New planks should be acclimated to the room's temperature and humidity before installation. After replacing the damaged planks, check the subfloor for moisture and address any issues before reinstalling the baseboards.
Replacing Damaged Planks
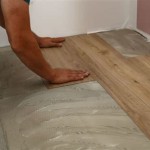
When individual planks are severely damaged beyond repair, replacement becomes necessary. Start by disconnecting the damaged plank from surrounding planks. This may require cutting the plank into smaller pieces to facilitate removal. Work carefully to avoid damaging adjacent planks. Once the damaged plank is removed, prepare the subfloor for the new plank. Install the new plank, ensuring it locks securely into place. It is recommended to keep spare planks from the original installation for such repairs. If spare planks are unavailable, sourcing a matching replacement can be challenging.
Preventing Future Damage
Proactive measures can significantly extend the lifespan of laminate flooring. Regular cleaning with appropriate cleaning products prevents the buildup of dirt and grime that can scratch the surface. Using felt pads under furniture legs prevents scratches and dents. Placing mats at entryways helps to trap dirt and moisture. Addressing spills promptly prevents water damage. Maintaining a consistent indoor temperature and humidity level minimizes the risk of gaps and warping.
Tools and Materials
Having the right tools and materials simplifies the repair process. Essential items include a laminate repair kit, putty knife, rubber mallet, tapping block, laminate flooring pull bar, moisture meter, utility knife, measuring tape, safety glasses, and gloves. Before starting any repair, ensure you have the necessary materials and tools readily available.
Seeking Professional Help
While many laminate flooring repairs can be handled as DIY projects, complex issues or extensive damage may require professional intervention. Consulting a qualified flooring installer can ensure the repairs are carried out correctly and effectively. Professional installers have the expertise and specialized tools to address complex situations and deliver a high-quality finish.
Safety Precautions
When undertaking any repair project, prioritizing safety is paramount. Always wear appropriate safety gear, including safety glasses and gloves, to protect yourself from potential hazards. Follow the manufacturer's instructions for using any repair products and tools. Ensure the work area is well-ventilated when working with adhesives or other chemicals. If using power tools, follow all safety guidelines provided by the manufacturer.

How To Repair Laminate Flooring The Home

Laminate Floor Repair Diy Family Handyman

How To Repair Laminate Flooring The Home

How To Repair Damaged Laminate Floor Checkatrade

How To Repair Laminate Flooring The Home

How To Fix Scratches On Laminate Flooring Directflooring Direct

How To Replace Damaged Flooring Plank Diy

How To Repair Laminate Flooring The Home

How To Prevent Repair Water Damage Laminate Flooring Claude Browns

8 Ways To Fix Scratches On A Laminate Floor Mersey Flooring
See Also