How To Lay Garage Floor Tiles
Garage floors endure significant wear and tear, requiring a durable and resilient surface. Tiles offer an excellent solution, providing strength, longevity, and aesthetic appeal. This article outlines the process of laying garage floor tiles, offering a comprehensive guide for a successful installation.
Assessment and Preparation: Before commencing the project, a thorough assessment of the existing garage floor is crucial. Check for cracks, uneven surfaces, or moisture issues. Cracks should be repaired using a suitable concrete patching compound. For significant unevenness, consider self-leveling concrete to create a smooth and stable base. Moisture problems, often stemming from inadequate drainage or ground seepage, must be addressed before tile installation. A moisture barrier application may be necessary to prevent future issues.
Material Selection: Choosing the right tile is paramount for a successful garage floor. Porcelain or ceramic tiles with a low water absorption rate are recommended due to their durability and resistance to staining. Specifically, look for tiles rated for floor use, as wall tiles lack the necessary strength. Select a tile size and color that complements the garage space and consider slip-resistant options for enhanced safety. Grout choice is equally important. Epoxy grout is generally preferred for garage floors due to its superior chemical and stain resistance compared to standard cement-based grout.
Tools and Materials Gathering: Proper tools ensure efficient and accurate installation. Gather the following: tile cutter or wet saw, notched trowel, rubber mallet, grout float, level, measuring tape, safety glasses, gloves, buckets, sponges, and a knee pad. Materials required include the chosen tiles, thin-set mortar (suitable for the tile type and substrate), grout, spacers, and sealant.
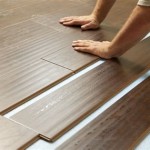
Layout and Dry Fit: Careful planning ensures a professional finish. Start by establishing a layout. The center of the garage often serves as a good starting point. Using a chalk line, mark the center lines of the garage both lengthwise and widthwise. This creates four quadrants, allowing for symmetrical tile placement and minimizing cuts around the edges. Perform a dry fit by laying out tiles along the center lines, using spacers to maintain consistent gaps. This helps visualize the final layout and identify any necessary adjustments before applying adhesive.
Thin-Set Application and Tile Placement: Begin applying thin-set mortar to a small section of the floor, working in manageable areas. Use the notched trowel to spread the mortar evenly, ensuring full coverage and consistent depth. Place the first tile at the intersection of the center lines, firmly pressing it into the mortar. Continue laying tiles, working outward from the center and using spacers to maintain consistent gaps. Regularly check for levelness and adjust as necessary with a rubber mallet. Remove excess mortar from between the tiles before it dries.
Cutting Tiles: Tiles often require cutting to fit edges and corners. A tile cutter or wet saw provides clean and accurate cuts. For straight cuts, a tile cutter is sufficient. For more complex cuts, a wet saw is recommended, especially for porcelain tiles. Measure carefully before cutting and always wear safety glasses when operating these tools.
Grouting: After the thin-set has cured for the manufacturer-recommended time (typically 24 hours), begin grouting. Mix the grout according to the manufacturer’s instructions. Apply the grout using a grout float, working it diagonally across the tile joints to ensure complete filling. Remove excess grout with the edge of the float and then use a damp sponge to clean the tile surface. Allow the grout to haze over slightly before buffing with a clean cloth.
Sealing: Once the grout has fully cured (typically 72 hours), apply a sealant to protect it from stains and moisture. Choose a sealant compatible with the chosen grout and tile type. Apply the sealant according to the manufacturer’s instructions, ensuring even coverage. This final step enhances the longevity and appearance of the tiled garage floor.
Post-Installation Care: While garage floor tiles are durable, proper care extends their lifespan. Regular sweeping or vacuuming removes loose debris. Occasional mopping with a mild detergent solution keeps the tiles clean. Avoid harsh chemicals, as they can damage the grout and tile surface. Promptly address any spills to prevent staining.

How To Install Interlocking Garage Floor Tiles Modutile Full Explanation

Here S How You Fit Interlocking Garage Floor Tiles Step By Quick Easy Gftc

How To Install Garage Floor Tiles Flooring Llc

How To Install Garage Floor Tiles Step By The Diy Playbook

How To Install Garage Flooring Ecotile Interlocking Floor Tiles In Small

Installing Garage Floor Tiles In An Angled Flexspec Modular Flooring

Tips To Prepare Your Garage Floor For Interlocking Tiles All Floors

How To Lay Garage Floor Tiles Gtools

Garage Floor Installation Guide Tiles Rolls And

Installing Garage Floor Tiles Step By Rubi Blog Usa
See Also