How To Replace Damaged Laminate Floor Planks
Laminate flooring offers an attractive and durable surface for homes and businesses. However, accidents can happen, resulting in damaged planks that require replacement. This guide provides a step-by-step process for replacing damaged laminate floor planks, restoring the floor's aesthetic and functionality.
Necessary Tools and Materials: Before beginning the repair, gather the necessary tools and materials. This typically includes a utility knife, pry bar, tapping block, rubber mallet, pull bar, measuring tape, safety glasses, gloves, replacement planks, and matching laminate adhesive (if required).
Safety Precautions: Safety should always be the top priority. Wear safety glasses to protect eyes from debris and gloves to protect hands. Ensure the work area is well-ventilated, especially when working with adhesives.
Locating the Damaged Plank: Identify the damaged plank requiring replacement. Consider the extent of the damage. Minor scratches or chips might be repairable with a laminate repair kit. However, deeper damage, cracks, or warping necessitate plank replacement.
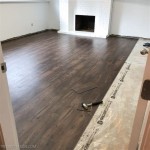
Preparing the Work Area: Clear the area around the damaged plank. Remove any furniture or obstructions that may hinder the repair process. This provides ample space for maneuvering tools and prevents accidental damage to surrounding planks.
Cutting the Damaged Plank: Using a utility knife, score the damaged plank along its length and width, creating multiple sections. Deep scoring helps prevent the surrounding planks from being damaged during removal. Be cautious not to cut too deep and damage the underlayment.
Removing the Damaged Pieces: Carefully insert the pry bar between the cut sections of the damaged plank and the adjacent planks. Gently lift and remove the cut pieces. A tapping block placed against the pry bar and struck with a rubber mallet can assist in applying even pressure and preventing slippage. Work slowly and methodically to minimize the risk of damaging surrounding planks.
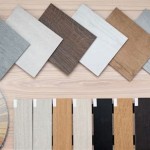
Preparing the Replacement Plank: Measure the dimensions of the removed plank to ensure the replacement plank is the correct size. If the replacement plank requires cutting, use a utility knife and a straight edge to ensure a precise cut. If the original installation used glue, apply a thin, even layer of matching laminate adhesive to the edges of the replacement plank.
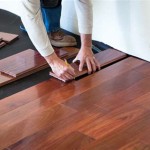
Installing the Replacement Plank: Carefully angle the replacement plank into position, ensuring the tongue and groove system aligns with the adjacent planks. Use a tapping block and rubber mallet to gently tap the replacement plank into place, ensuring a secure fit. Avoid excessive force, which could damage the plank or surrounding flooring.
Securing the Replacement Plank (Glue-Down Installations): If the original installation used glue, apply pressure to the replacement plank to ensure a strong bond with the adhesive. Remove any excess adhesive immediately with a damp cloth. Follow the adhesive manufacturer's instructions for drying time and any specific precautions.
Finishing Touches: Once the replacement plank is securely in place, inspect the area for any gaps or unevenness. Ensure the replacement plank is flush with the surrounding flooring. Clean the area to remove any debris generated during the repair process.
Addressing Specific Challenges: Replacing planks in the middle of the floor presents a greater challenge. A pull bar can be utilized to pull and lock the replacement plank into place. This tool provides the necessary leverage and ensures a tight fit without damaging the surrounding planks. Understanding the specific locking mechanism of the laminate flooring is crucial for successful replacement.
Plank Location and Cutting Considerations: When cutting replacement planks, consider the location of the damaged plank. Planks near walls or doorways may require specific cutting techniques to ensure a proper fit. Measure carefully and mark the cutting lines precisely to avoid unnecessary waste and ensure a professional finish.
Underlayment Inspection and Repair: When removing damaged planks, inspect the underlayment for any damage. Tears or compression in the underlayment can affect the stability and longevity of the new plank. Repair or replace any damaged sections of the underlayment before installing the replacement plank. This ensures proper support and prevents future issues.
Moisture and Expansion Gaps: Laminate flooring requires expansion gaps around the perimeter of the room to accommodate natural expansion and contraction due to changes in temperature and humidity. When replacing planks, ensure these expansion gaps are maintained. Failure to do so can lead to buckling or other damage over time.
Preventing Future Damage: Implement preventative measures to minimize the risk of future damage to the laminate flooring. Use furniture pads under heavy objects, avoid dragging furniture across the floor, and clean up spills promptly. Regular maintenance and proactive care can significantly extend the lifespan of the flooring and maintain its appearance.

Laminate Floor Repair Diy Family Handyman

How To Replace Damaged Flooring Plank Diy

How To Replace Warped Water Damaged Laminate Floor Boards

How To Fix And Replace Damaged Laminate Vinyl Plank Lvp Engineered Wood Flooring Like A Pro Diy

Replace A Damaged Board In Laminate Floor Rw Supply Design

How To Repair Damaged Laminate Floor Checkatrade

How To Fix Scratches On Laminate Flooring Directflooring Direct

How To Replace Lock Vinyl Flooring

3 Ways To Repair Laminate Flooring Wikihow

How To Repair Laminate Flooring Foreman Snags
See Also