A Guide To Versini Hardwood Flooring Installation
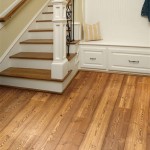
Versini hardwood flooring offers a blend of elegance and durability, making it a popular choice for homeowners. Proper installation is crucial for achieving the desired aesthetic and ensuring the longevity of the floor. This guide provides a comprehensive overview of the installation process, outlining essential steps and considerations for a successful outcome.
Assessing the Subfloor
Before beginning the installation, the subfloor must be thoroughly inspected and prepared. This lays the foundation for a stable and level flooring surface. An uneven or improperly prepared subfloor can lead to issues such as squeaking, cracking, and premature wear.
Key Subfloor Considerations:
- Levelness: The subfloor should be level within 3/16" over a 10-foot span. Any deviations exceeding this tolerance must be addressed through leveling compounds or other suitable methods.
- Cleanliness: The subfloor must be free of debris, dust, and any existing flooring materials. Thorough cleaning ensures proper adhesion of the underlayment and flooring.
- Moisture Content: Excessive moisture can damage hardwood flooring. The subfloor's moisture content should be measured and fall within the manufacturer's recommended range before proceeding with installation.
- Structural Integrity: The subfloor should be structurally sound and capable of supporting the weight of the hardwood flooring. Any necessary repairs or reinforcements should be completed before installation.
Choosing the Right Underlayment
The underlayment plays a critical role in the performance and longevity of Versini hardwood flooring. It provides cushioning, reduces sound transmission, and acts as a moisture barrier.
Key Underlayment Considerations:
- Moisture Protection: Choose an underlayment with adequate moisture protection properties, especially for installations over concrete subfloors.
- Sound Reduction: Consider an underlayment with sound-dampening qualities to minimize noise transmission between floors.
- Compatibility: Select an underlayment that is compatible with Versini hardwood flooring and the chosen installation method.
Acclimation and Handling
Proper acclimation is essential to prevent dimensional changes in the hardwood flooring after installation. This involves allowing the flooring to adjust to the temperature and humidity conditions of the installation environment.
Key Acclimation and Handling Points:
- Delivery and Storage: Upon delivery, store the flooring in the room where it will be installed for the recommended acclimation period, typically 48-72 hours.
- Temperature and Humidity: Maintain a consistent temperature and humidity level within the recommended range specified by Versini during acclimation and installation.
- Packaging: Do not remove the flooring from its packaging until ready for installation to protect it from damage and moisture.
Installation Methods
Versini hardwood flooring can be installed using various methods, including nail-down, glue-down, and floating. The appropriate method depends on the specific product, subfloor type, and installation environment.
Key Installation Method Considerations:
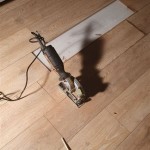
- Nail-Down: This method involves fastening the flooring directly to the subfloor using nails or staples. It is suitable for wood subfloors and provides a secure and stable installation.
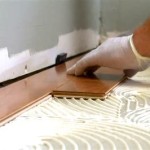
- Glue-Down: This method involves adhering the flooring to the subfloor using adhesive. It is often used for concrete subfloors and provides a strong bond.
- Floating: This method involves clicking the planks together to form a floating floor that is not attached to the subfloor. It is suitable for various subfloor types and offers ease of installation.
Expansion Gaps
Hardwood flooring expands and contracts with changes in temperature and humidity. Expansion gaps are crucial to accommodate these dimensional changes and prevent buckling or cupping.
Key Expansion Gap Considerations:
- Perimeter Gaps: Leave expansion gaps around the perimeter of the room, typically 1/4" to 3/8", to allow for expansion.
- Transition Areas: Install transition moldings at doorways and other transition areas to conceal expansion gaps and provide a finished appearance.
Finishing Touches
After the flooring installation is complete, several finishing touches are required to complete the project.
Key Finishing Steps:
- Cleaning: Thoroughly clean the installed floor to remove any dust, debris, or adhesive residue.
- Molding Installation: Install baseboards, quarter-round, or other molding to cover the expansion gaps and provide a finished look.
- Final Inspection: Conduct a final inspection to ensure the flooring is properly installed and meets quality standards.
By following these guidelines and consulting the manufacturer's instructions, a successful Versini hardwood flooring installation can be achieved, resulting in a beautiful and long-lasting floor.

Choosing The Perfect Flooring In Jacksonville Fl

Choosing The Perfect Flooring In Jacksonville Fl

Versini Hardwood Discount Truehardwoods Com

Choosing The Perfect Flooring In Jacksonville Fl

Versini Hardwood Discount Truehardwoods Com

Versini Hardwood Discount Truehardwoods Com

Versini Hardwood Discount Truehardwoods Com

Southern Classic Floors Inc Services

Versini Hardwood Discount Truehardwoods Com

Eucalyptus Flooring Reviews Pros And Cons S Best Brands 2024
See Also