Can You Replace Engineered Hardwood Floor Planks?
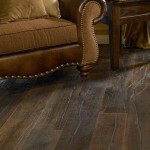
Engineered hardwood flooring offers the aesthetic appeal of solid hardwood with enhanced stability and versatility. However, like all flooring materials, it can suffer damage over time. This article explores the possibility of replacing individual engineered hardwood floor planks, examining the factors influencing the process and the steps involved.
Factors Influencing Plank Replacement
Several factors dictate whether replacing individual planks is a viable option:
- Type of Installation: Click-lock or floating installations are generally easier to repair than glue-down installations.
- Severity of Damage: Minor surface scratches can often be repaired without plank replacement. However, deep gouges, water damage, or extensive warping often necessitate replacement.
- Availability of Matching Planks: Locating matching planks from the original installation is crucial. Slight variations in color and grain are common even within the same product line over time.
- Subfloor Condition: Underlying subfloor issues may contribute to plank damage and should be addressed before replacing planks.
Tools and Materials Required
Gathering the necessary tools and materials beforehand streamlines the replacement process:
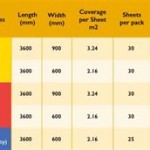
- Replacement Planks: Sourcing planks that perfectly match the existing floor is essential.
- Circular Saw or Oscillating Multi-Tool: Used to cut out the damaged plank.
- Chisel and Hammer: Used to remove the damaged plank and adhesive residue.
- Pry Bar: Aids in lifting and removing planks.
- Wood Glue (if applicable): For glue-down installations.
- Safety Glasses and Gloves: To ensure personal safety during the process.
- Vacuum and Dustpan: For cleanup.
Replacing Planks in a Click-Lock or Floating Floor
Replacing planks in a floating floor is generally less complex than in glued installations:
- Isolate the Damaged Plank: Carefully remove the baseboard or trim closest to the damaged plank to allow access.
- Cut Out the Damaged Plank: Use a circular saw or oscillating multi-tool to make several cuts within the damaged plank, dividing it into smaller sections for easier removal.
- Remove the Damaged Sections: Using a chisel and pry bar, carefully remove the cut sections of the damaged plank. Avoid damaging surrounding planks.
- Prepare the Replacement Plank: Remove the bottom groove and tongue edges of the replacement plank to allow it to fit into the existing floor.
- Install the Replacement Plank: Angle the replacement plank into position and press down firmly to engage the click-lock mechanism.
- Reinstall Baseboards/Trim: Replace the baseboards or trim to complete the repair.
Replacing Planks in a Glue-Down Floor
Glue-down installations present more challenges when replacing individual planks:
- Cut Out the Damaged Plank: Use a circular saw or oscillating multi-tool to cut around the perimeter of the damaged plank. Be cautious not to damage the subfloor.
- Remove the Damaged Plank: Using a chisel and hammer, carefully remove the damaged plank and any remaining adhesive. Thoroughly clean the subfloor surface.
- Prepare the Replacement Plank: Scrape off the bottom surface of the replacement plank to remove the factory finish, ensuring proper adhesion.
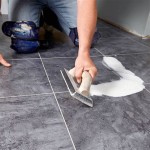
- Apply Adhesive: Apply a thin, even layer of wood glue to the subfloor where the replacement plank will be installed.
- Install the Replacement Plank: Position the replacement plank and press firmly into place. Use weights or clamps to ensure proper bonding while the adhesive dries.
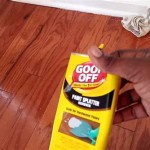
- Clean Up Excess Adhesive: Remove any excess adhesive promptly.
- Allow Adhesive to Cure: Follow the adhesive manufacturer's instructions for drying time.
Post-Replacement Considerations
After replacing planks, consider these factors:
- Blending in the Replacement: While aiming for a perfect match is ideal, slight color variations may be noticeable. Consider lightly sanding and refinishing the surrounding area to help blend the new plank with the existing floor.
- Protection: Applying a sealant or protective coating to the replaced plank can enhance its durability and longevity.
- Professional Assistance: If unsure about any aspect of the process, consult a professional flooring installer.
Preventing Future Damage
Proactive measures can help prevent future damage and extend the lifespan of your engineered hardwood floor:
- Regular Cleaning: Sweep or vacuum regularly to remove dirt and debris that can scratch the floor's surface.
- Use Protective Mats: Place mats at entrances and high-traffic areas to trap dirt and moisture.
- Furniture Pads: Use felt pads under furniture legs to prevent scratches and dents.
- Address Spills Promptly: Wipe up spills immediately to prevent water damage.
- Maintain Proper Humidity Levels: Excessive humidity or dryness can cause wood to warp or crack. Maintain a consistent indoor humidity level.

How To Replace Engineered Hardwood Floor Planks Diy Repair

Can I Install Engineered Hardwood Flooring Over Existing Floors Lv Toronto

Removing Replacing A Damaged Hardwood Flooring Board

How To Install Lock Engineered Hardwood Flooring

10 Major Disadvantages Of Engineered Wood Flooring An Hardwood Floors Guide Reallyfloors America S Est

Installing Luxury Vinyl Floors Over Engineered Hardwood Honey Built Home

What To Know Before Refinishing Engineered Hardwood Floors Blog

Can You Install Wood Flooring Over Tiled Floors Havwoods

Can You Refinish Engineered Hardwood Wood Refinishing Guide Reallyfloors America S Est Flooring

Can Engineered Wood Flooring Be Refinished Step Into Style The Ultimate Guide To
See Also