How To Lay Tongue and Groove Flooring Over Concrete
Installing tongue and groove flooring over concrete is a common home improvement project that can significantly enhance the aesthetics and comfort of a space. This type of flooring is known for its durability, ease of installation, and attractive appearance. However, proper preparation and installation techniques are crucial for ensuring a successful and long-lasting outcome. This article will guide you through the necessary steps to lay tongue and groove flooring over concrete, providing insights into material selection, preparation, and installation procedures.
1. Preparation is Key: Ensuring a Smooth and Stable Subfloor
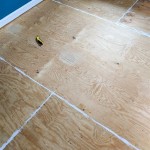
A solid foundation is essential for any flooring installation, particularly when laying tongue and groove flooring over concrete. The concrete surface must be smooth, level, and free from any imperfections that could affect the final installation. Here's a step-by-step guide for preparing your concrete subfloor:
- Clean the Concrete Surface: Thoroughly clean the concrete surface by removing dirt, dust, debris, and any existing coatings. You can use a shop vacuum, broom, and a damp mop for this purpose. Ensure the surface is completely dry before proceeding.
- Repair Cracks and Unevenness: If there are cracks or unevenness in the concrete surface, you need to repair them. Minor cracks can be filled with concrete patching compound, while larger cracks may require a wider patch. For unevenness, consider using a self-leveling compound to create a smooth and level surface.
- Apply a Moisture Barrier: Concrete can be prone to moisture issues, which can damage wood flooring. Apply a moisture barrier, such as a polyethylene sheet or a moisture-resistant barrier paint, to the concrete surface. This will prevent moisture from migrating up to the flooring. Ensure the moisture barrier overlaps the edges and is properly sealed.
- Install a Moisture Barrier: Protect your flooring from concrete moisture by installing a moisture barrier on the concrete subfloor. Use a polyethylene sheet or a moisture-resistant paint to ensure the wood flooring is properly protected from moisture and potential damage.
2. Selecting the Right Tongue and Groove Flooring
Choosing the right tongue and groove flooring for your project is crucial. Consider these factors:
- Wood Species: Different wood species have varying characteristics in terms of durability, color, and price. Popular choices include oak, maple, pine, and hickory.
- Wood Thickness: The thickness of the flooring will influence its durability and stability. Thicker planks are generally more durable but can be more expensive.
- Finish: Flooring can be finished with a variety of finishes, including oil, polyurethane, and wax. Choose a finish that complements your decor and offers the desired level of protection.
- Installation Method: Tongue and groove flooring can be installed in various ways, including glue-down, floating, or nailed installation. Evaluate the requirements of your specific project and the capabilities of your skills and tools.
3. Laying the Tongue and Groove Flooring: A Step-by-Step Guide
Once you have selected and prepared your materials, you can begin installing the tongue and groove flooring. Here's a step-by-step guide:
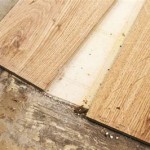
- Lay the First Row: Start by laying the first row of flooring planks against the wall. Ensure the planks are flush with the wall and have a gap of about 1/4 inch between the first plank and the wall. This gap will allow for expansion and contraction of the wood.
- Install Subsequent Rows: Lay each subsequent row of flooring by engaging the tongue of each plank into the groove of the previous plank. Maintain a consistent gap between the flooring and the wall. For glue-down installation, apply glue to the tongue and groove joints of each plank before joining them.
- Cut and Fit Planks: Use a circular saw or jigsaw to cut planks to size for fitting around obstacles or in corners. Use a combination square or other measuring tools to ensure accurate cuts.
- Secure the Flooring: For nailed installation, use a nail gun to secure the planks to the subfloor. For floating installations, tap the planks together with a tapping block to ensure a tight fit.
- Finish and Seal: After installation, finish the flooring by applying a sealant or stain. This will enhance the appearance and protect the wood from scratches and stains.
Installing tongue and groove flooring over concrete requires careful preparation, precise measurements, and proper installation techniques. By following these steps and paying attention to detail, you can create a beautiful and durable floor that will enhance the aesthetics and comfort of your home.

Installing Wood Flooring Over Concrete Diy

Installing Hardwood Floors On Concrete Subfloors

Hardwood Over Concrete Auten Wideplank Flooring

Q A Solid Wood Floors Over Concrete Slabs Jlc

Installing Engineered Hardwood On Concrete Twenty Oak

Installing Laminate Flooring Over Concrete The Ultimate Guide Aa Floors

Junckers Laying A Floor Over Batons

Fitting Hardwood Floor To Concrete Wood And Beyond Blog

Installing Wood Subfloors Over Concrete Hardwood Floors

Installing Engineered Hardwood On Concrete Twenty Oak
See Also