How to Remove Floating Floor
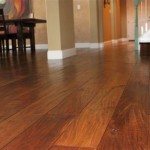
Floating floors, also known as engineered wood floors, provide a stylish and durable solution for homeowners seeking a new floor covering. However, there may come a time when you need to remove these floors, whether for renovation, replacement, or to access underlying structures. Removing a floating floor requires careful planning and execution to avoid damage to the floor itself and the subfloor beneath it. This article provides a step-by-step guide to help you safely and effectively remove your floating floor.
1. Preparation and Safety Precautions
Before beginning the removal process, it is essential to take the necessary safety precautions and gather the required tools.
Safety Precautions:
- Wear appropriate safety gear, including gloves, safety glasses, and a dust mask.
- Ensure the work area is well-ventilated to minimize exposure to dust and fumes.
- Be mindful of potential tripping hazards and obstructions around the work area.
Tools and Materials:
- Pry bar or floor scraper
- Hammer
- Utility knife
- Circular saw or jigsaw
- Dust collector
- Protective covering for surrounding areas
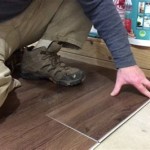
2. Removing the Floorboards
Once the preparation is complete, you can begin removing the floorboards. The following steps outline the process:
- Start in a corner or along an edge: Begin by removing the floorboards in a corner or along an edge of the room. This allows you to work your way inwards and provides easier access to the starting point.
- Use a pry bar: Insert the pry bar between the floorboards and the wall or adjoining floorboards, leveraging it to lift the boards. Be cautious not to damage the subfloor or adjacent flooring.
- Work carefully: Remove floorboards one at a time, working slowly and systematically. Be mindful of any adhesive or staples holding the boards in place.
- Utilize a circular saw or jigsaw: For wider floorboards or areas with obstacles, a circular saw or jigsaw can be used to cut through the boards. Ensure the blade is set to the appropriate depth to avoid damaging the subfloor.
3. Removing the Underlayment
After removing the floorboards, the underlayment beneath them needs to be removed. This may involve:
- Stapled or glued underlayment: Pry up the underlayment using a pry bar, taking care not to damage the subfloor.
- Loose underlayment: Simply lift and remove the underlayment. If it is in poor condition, dispose of it properly.
4. Inspecting and Cleaning the Subfloor
Once the floating floor and underlayment are removed, it is crucial to examine the subfloor for any damage or imperfections. This includes checking for:
- Soft spots or dips: These are often caused by moisture or structural issues and may require repair before installing a new floor.
- Loose or damaged boards: These should be secured or replaced, depending on their condition.
- Unevenness: This can be addressed by sanding or leveling the subfloor.
After inspecting the subfloor, it is essential to clean it thoroughly to remove any debris or dust before installing a new floor.

How To Remove Laminate Flooring The Home

How To Remove Laminate Flooring The Home

The Easiest Way To Remove Laminate Flooring

How Do I Remove Laminate Flooring Factory Direct

How To Remove Laminate Flooring

10 Steps To Remove Laminate Flooring Home Improvement

How To Remove Laminate Flooring A Step By Guide Mersey

How To Remove Laminate Flooring

How Do I Remove Laminate Flooring Factory Direct

How To Remove Laminate Flooring In 6 Easy Steps
See Also